


How to Do Invisible Decreases for a Smoother Finish
If you’ve ever looked at your finished amigurumi and noticed bumpy lines or obvious dents where you decreased stitches you’re not alone. I used to wonder why my toys looked crinkly and uneven near the top. That was before I learned the secret of the invisible decrease crochet technique.
Unlike regular decreases that leave visible holes or bulky shapes, the invisible decrease crochet method lets you reduce stitches with a smoother finish and almost no trace. It’s especially perfect for amigurumi, plush toys, and tight rounds where every stitch counts.
Once I switched to invisible decrease crochet, my projects looked cleaner, more polished, and totally professional. In this tutorial, I’ll show you how to master it step by step whether you’re shaping a bunny’s head or trimming a dinosaur’s belly.
Table of Contents
Why Invisible Decreases Matter
From Lumpy Tops to Sleek Plush — My Early Mistakes
When I crocheted my first stuffed animal, I followed the pattern exactly. But something didn’t look right. The top of the head had these obvious dents—almost like the poor thing had been dropped! The decreases were bulky, and little stuffing peeped through no matter how tight I stitched. That’s when I realized: not all decreases are created equal.
I searched everywhere for a fix. That’s when I stumbled across a video mentioning the invisible decrease crochet method. I hadn’t heard of it before and I’ll be honest, I thought, “How different can it be?”
Turns out, very different.
I practiced it on a scrap piece, just two rounds with decreases, and I immediately saw how much smoother it looked. No gaps, no puckering, no wonky stitches. I frogged (ripped out) the top of my stuffed cat and redid it using the invisible method. The result? It finally looked like something I’d be proud to sell or gift.
What Sets Invisible Decreases Apart
The secret to invisible decrease crochet lies in the way it blends into the fabric. Instead of pulling two full stitches together like a regular decrease, it works through just the front loops of the next two stitches. This creates a smaller, neater stitch that tucks in naturally with no visible gap or bulk.
Here’s why it matters so much in amigurumi:
- Standard decreases can leave visible holes
- Overstuffing pushes those holes open
- Plush pieces lose their soft, round shape
But invisible decreases? They disappear into the fabric like magic. Especially on small pieces like arms, legs, and curved heads—the difference is huge. Even when I use bright yarns or take close-up photos, the stitches look seamless.
Today, invisible decreases are one of my top tips for elevating your crochet from beginner to polished.
Anatomy of an Invisible Decrease
The Invisible Decrease Step by Step
At first glance, a decrease seems simple: combine two stitches into one. But when you’re working on tightly stitched amigurumi, regular decreases can leave small holes, bumpy ridges, or even pull the shape unevenly. That’s why learning the invisible decrease crochet technique makes such a difference.
Here’s a step-by-step breakdown so you can practice it with confidence:
- Find the next two stitches. You’ll work your decrease across them.
- Insert your hook under the front loop only of the first stitch.
- Without yarning over yet, insert your hook into the front loop of the next stitch.
- You’ll now have two front loops on your hook.
- Yarn over, and pull through both front loops at once.
- You now have two loops left on your hook.
- Yarn over again, and pull through both loops.
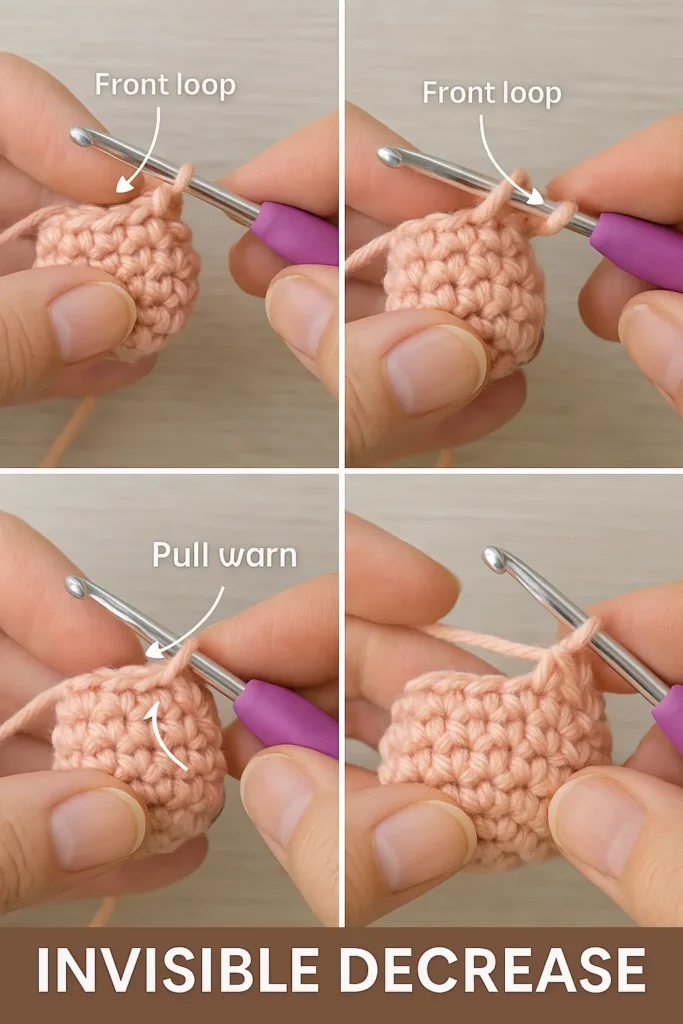
🎯 That’s it! You’ve just completed one invisible decrease crochet stitch.
Unlike the regular method (which grabs full stitches and creates a visible “dent”), this invisible method blends neatly into your fabric. It’s so smooth, most people won’t even spot where you decreased.
Invisible Decrease in the Round
This technique is most effective when working in spiral rounds, which is the standard for amigurumi. When done correctly, your decreases will align beautifully with the curve of your piece especially on areas like:
- The top of a head
- Arms or legs tapering at the end
- Tails and pointed features
- The bottom of plush bodies
💡 PRO TIP: Don’t skip the stitch marker! Marking the first stitch of each round helps you space your invisible decreases evenly—so you don’t end up with lopsided heads or uneven limbs.
Common Placement Errors & Troubleshooting
Even experienced crocheters run into trouble with invisible decreases especially if working with fuzzy or dark-colored yarn. Here are a few issues to watch for:
- “My decrease looks bulky or twisted.”
This usually happens when you accidentally grab both loops or pull the yarn too tight. Make sure you’re inserting the hook only under the front loops, and relax your tension slightly. - “There’s still a small gap or hole.”
Try tightening the stitch before the decrease, or use a slightly smaller hook. You can also gently tug the yarn tail when closing the round—it often smooths out the curve. - “I lose track of where I’m decreasing.”
Invisible decreases blend in so well that they’re easy to miss! Use a stitch marker at the beginning of your round and count each decrease as you go. You can even mark every decrease spot with a removable marker on your first practice runs.
👉 If you’re still getting familiar with the basics, Yarnspirations’ crochet tutorials offer helpful videos and beginner-friendly tips on single crochet, increases, and decreases that pair well with this guide.
Yarn Type & Hook Matter Too
Invisible decreases work best with smooth, light-colored yarns where loops are easy to see. If you’re using dark yarn or novelty textures like velvet or chenille, it’s harder to find the front loops and easier to grab the wrong part of the stitch.
Here’s what helps:
- Use a smaller hook size (about 0.5 mm smaller than your yarn label suggests)
- Stick to cotton or cotton-blends for early practice
- Work slowly and pause to examine your loops before finishing the stitch
The more you practice invisible decrease crochet, the more natural it feels and the neater your toys will look.
When and Where to Use It
Best Spots in Amigurumi Patterns
The invisible decrease crochet method is practically tailor-made for amigurumi. Since most shapes are round and stuffed tightly, using anything other than invisible decrease crochet often leads to visible holes or awkward shaping. This technique allows you to maintain both form and function with beautiful results.
Let’s go over the most common places where invisible decrease crochet really makes a difference:
🧸 Head Closures
When you’re finishing the top of an amigurumi head, regular decreases often cause visible ridges or tiny holes that stuffing can poke through. The invisible decrease crochet method tightens the top in a neat, gap-free way. It’s my go-to for giving heads that smooth, polished dome.
🐾 Arms and Legs
You’ll get a much cleaner shape by using invisible decrease crochet when tapering limbs. Whether it’s for a bunny’s paw or a doll’s ankle, the shaping looks more organic. It prevents that pinched look common with traditional decreases.
🧠 Necks and Torsos
In dolls or animals with narrow necks, invisible decreases help transition from a larger body to a thinner section without bunching. I almost always use invisible decrease crochet in these spots because it allows the fiberfill to stay hidden and the form to stay balanced.
🦊 Tails, Ears, and Small Features
This is where invisible decrease crochet truly shines. When working on tiny pieces like a cat’s ear, bear’s snout, or tail tip—you want every decrease to disappear. It’s especially helpful in patterns with a tight stitch count where details need to stay clean.
Invisible Decrease Crochet in Clothing & Accessories
Yes, you read that right invisible decrease crochet isn’t just for amigurumi! You can apply it to:
- Hats (decreasing at the crown)
- Slippers (around the toe shaping)
- Doll clothes (for sleeve tapering or waist shaping)
It’s perfect for anytime you want shaping that doesn’t leave a visible dent or break in your stitch pattern.
When Not to Use It
Even though I love the invisible decrease crochet technique, there are a few times it’s not ideal:
- With very fuzzy yarns like faux fur, where it’s impossible to see front loops
- In open lacework, where the visual effect matters more than seamless shaping
- In beginner patterns, where simpler techniques may be easier to follow until confidence builds
In those rare cases, I switch back to regular decreases, but I always return to invisible decrease crochet when the project calls for detail and durability.
Real-World Pattern Breakdown
In one of my popular beginner patterns (a small bear), here’s how I work the invisible decrease crochet method:
- Rounds 1–7: Simple increases to form the shape
- Rounds 8–13: Straight rounds
- Rounds 14–18: I begin tapering with invisible decrease crochet
- Rounds 19–22: Close up with tight, clean decreases and no gaps
The difference is obvious—not just in feel, but also in how professional the toy looks at the end.
Beginner-Friendly Recap
✔ Use invisible decreases on heads, limbs, necks, and finishing rounds
✔ Avoid when yarn is too fuzzy or loops are hard to see
✔ Invisible decreases give your toys a polished, shop-worthy look
✔ Try it on a simple pattern first to build confidence
Once you get the hang of where to place them, invisible decreases will become second nature — and your amigurumi will look better than ever.
Final Thoughts
If you’ve made a few amigurumi pieces already and are ready to take your finishes to the next level, invisible decrease crochet is the skill to master. It’s subtle, smooth, and once you get used to it, you’ll never want to go back.
Invisible Decrease vs Regular Decrease – Quick Comparison
If you’ve been using traditional single crochet decreases in your amigurumi projects, you’re not alone—I did too when I first started. But once you discover how much smoother and cleaner invisible decrease crochet makes your shaping, it’s hard to go back. The difference might seem subtle at first, but the visual and structural results speak for themselves.
Here’s a detailed comparison to help you decide when to use each technique and why invisible decreases are often the better choice—especially for plush toys.
More Free Amigurumi Patterns You’ll Love

")
")
")
🔍 Visual & Structural Differences

| Feature | Regular Decrease | Invisible Decrease Crochet |
|---|---|---|
| How It Works | Insert into 2 full stitches | Insert into front loops of 2 stitches |
| Appearance | Can leave gaps or bumps | Seamless, smooth stitch line |
| Used In | General crochet & flat patterns | Amigurumi, plush shapes, 3D rounds |
| Difficulty Level | Beginner-friendly | Slightly advanced, easy with practice |
| Finish Result | Can show holes, less polish | Tighter shaping, hides stuffing |
| Pattern Abbreviation | “dec” | “inv dec” or “invisible dec” |
| Stitch Count Change | Decreases by 1 stitch | Decreases by 1 stitch |
A regular decrease is simply inserting your hook into the next two stitches, yarning over, and pulling through everything—this method is quick and easy, and it’s still used in most flat patterns, garments, or areas where smoothness isn’t essential.
But in 3D work like amigurumi, that little bump can throw off the shape or even allow stuffing to peek through the gaps. That’s where invisible decrease crochet takes the lead. By working into only the front loops of the two stitches you’re joining, the result becomes part of the fabric. It blends in so well that you’ll have to look closely just to find it.
💡 Which Should You Use?
Use Regular Decrease When:
- You’re crocheting flat pieces or squares
- The texture or stitch pattern is already visible or bulky
- You’re following a pattern that relies on traditional decreases
- You’re just starting out and still building foundational skills
Use Invisible Decrease Crochet When:
- You’re shaping a round or closed 3D piece (like heads, arms, or tails)
- You want a professional-looking finish
- You’re working with tight stitches that need to hold stuffing
- Your decrease is visible in the final piece
💬 For example, I used to crochet teddy bear heads with regular decreases—and no matter how tight I stitched, I’d still get a little crater on top. When I switched to invisible decrease crochet, those tops became beautifully rounded with zero visible holes.
👶 For Beginners Worried About Technique
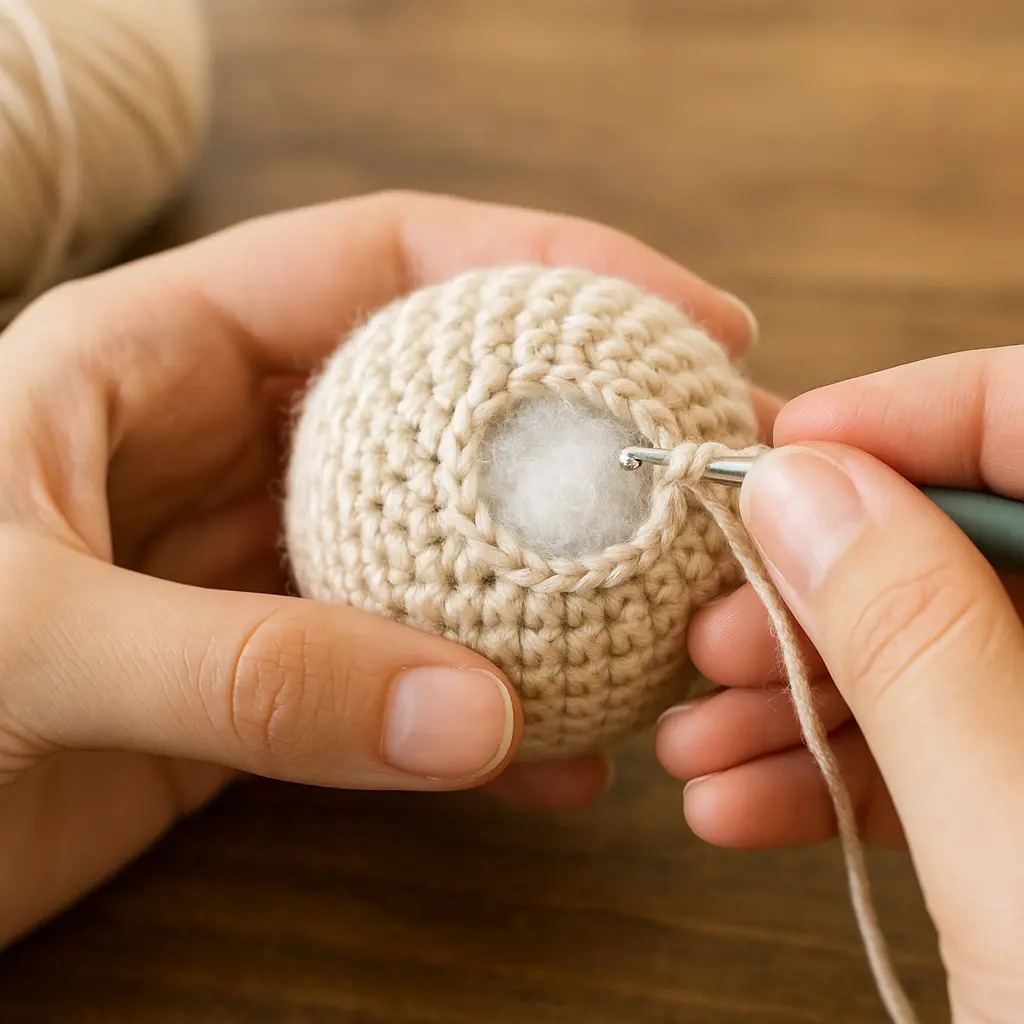
Many beginners worry that invisible decreases are hard to master—but here’s the truth: once you’ve practiced a few rounds, they become second nature. I recommend trying invisible decrease crochet on a small ball or swatch first. Once you see how it improves the final shape, you’ll be hooked.
And if you need help with the basics, my full amigurumi beginner’s guide shows the exact steps for both methods with photo tutorials.
Practice, FAQs & Final Tips
Quick Practice Sample
Before jumping into your next project, try this mini swatch to practice the invisible decrease crochet method:
Invisible Decrease Crochet Practice Pattern:
- Rnd 1: 6 sc in magic ring (6)
- Rnd 2: inc around (12)
- Rnd 3: sc, inc around (18)
- Rnds 4–5: sc around (18)
- Rnd 6: sc, invisible dec around (12)
- Rnd 7: invisible dec around (6)
- Finish off and stuff lightly
You’ll see how the invisible decrease crochet helps taper the ball smoothly without leaving visible holes or bumps. Once you’re confident, try using it in a real project—like the arms of a bunny or the top of a bee.
If you’re still unsure, this beginner-friendly guide can help reinforce the basics before you move into shaping techniques.
FAQ
What is an invisible decrease in crochet?
It’s a way to reduce two stitches into one by working only into the front loops of each stitch. It hides the decrease within the fabric, making it perfect for smooth amigurumi shaping.
Why does my invisible decrease look twisted or bumpy?
You’re likely grabbing both loops or pulling too tightly. Make sure to insert your hook into just the front loops and keep your yarn movement gentle but consistent.
Is invisible decrease crochet only for amigurumi?
Nope! It’s also great for hat crowns, slipper toes, or anywhere you want subtle shaping without gaps.
How tight should I pull when making invisible decreases?
Firm enough to hold shape, but not so tight that it distorts the round. Aim for consistent tension with your other stitches.
What does ‘inv’ mean in crocheting?
“Inv” is a common abbreviation for invisible—you’ll often see it used in patterns as inv dec, meaning “invisible decrease.”
What is the difference between a decrease and an invisible decrease?
A regular decrease pulls together two full stitches, often leaving a bump or gap. An invisible decrease crochet pulls together only the front loops, which hides the transition and creates a neater, cleaner look.
How do you do an invisible stitch in crochet?
The term “invisible stitch” can refer to invisible decrease or techniques like the invisible join. Both aim to blend stitches seamlessly by hiding where rows or rounds end.
How to dec sc in crochet?
To decrease a single crochet (sc dec), insert your hook into the next stitch, yarn over and pull up a loop, then do the same in the next stitch. Yarn over again and pull through all three loops. That’s the standard decrease. For a cleaner finish, try the invisible decrease crochet version instead.
How to do an invisible yarn change in crochet?
To switch colors invisibly, complete the last yarn-over of the previous stitch with the new color. This places the new yarn cleanly on top, minimizing the color “jump.” It works especially well in amigurumi or striped patterns.
Final Tips
Once you’ve mastered the invisible decrease crochet method, your amigurumi will never look the same again—in the best way! It’s a small skill that makes a huge difference.
🧶 Want to see real examples using this method? Head over to my Medium blog where I share behind-the-scenes tips, patterns, and before-and-after photos of finished toys.
And as always, tag me @TopAmigurumi with your creations—I’d love to see your progress and cheer you on!