


Have you ever changed yarn colors in your amigurumi and ended up with a weird line or a jagged bump? You’re not alone, I’ve been there too. When I first started learning changing colors in amigurumi, I couldn’t figure out why my cute little plushies had awkward stripes or spiraling seams. It turns out, the trick isn’t just where you change the color, but how.
In this guide, I’ll walk you through seamless color change techniques that actually work, no bulges, no lines, just smooth transitions. Whether you’re adding a new head color, giving your doll a sweater, or crocheting stripes, you’ll learn the tricks to changing colors in amigurumi like a pro.
If you’re just starting out and curious about the basics, this step-by-step guide to your first amigurumi project walks you through everything from your first stitch to finishing touches.
Table of Contents
My First Color Disaster (and What I Learned)
A Wobbly Stripe and a Lesson in Frustration
When I crocheted my very first striped bunny, I was thrilled, until I stepped back and saw a wonky stripe twisting around its belly. The transition from white to pink didn’t look clean at all. It formed an obvious diagonal line, almost like a helix, that ruined the cute, cuddly look I was going for.
I thought I had followed the instructions perfectly, but something was clearly wrong. I had no idea that changing colors in amigurumi was a technique in itself, not just a matter of switching yarns.
At the time, I didn’t understand that amigurumi is typically worked in continuous spirals, not joined rounds. That spiral motion means every new row starts slightly offset from the last one. So when I simply pulled in a new color at the start of a round, it created a noticeable jog in the pattern. It wasn’t just a minor flaw, it completely distracted from the design.
What I Was Doing Wrong
I later learned that changing colors in amigurumi isn’t something you just wing. There’s a specific way to do it cleanly, and it starts with how you finish the stitch before the color change.
Instead of completing a stitch in the old color and starting the next one in the new color, you should:
- Stop at the last yarn-over of the old stitch,
- Bring in the new yarn for that final yarn-over,
- And continue stitching in the new color.
This creates a smooth, near-invisible transition that sits naturally within the fabric. When you don’t do this, the difference stands out like a sore thumb.
I made this mistake more times than I care to admit. My striped bear looked like it had racing stripes. My little frog? One eye was stitched in the “wrong place” because of an accidental twist in the round caused by poor color placement. Every one of those flubs taught me something.
Today, I love teaching changing colors in amigurumi because once you get the hang of it, you can create adorable patterns with stripes, patches, clothes, even facial features, without ruining the smooth shape of your work.
So if you’ve ever ended up with uneven lines or bulky bumps, don’t worry, you’re not doing it wrong. You just haven’t learned the secret yet. And that’s what we’ll cover in the next section.
Tools & Timing for Seamless Color Changes
The Right Tools Make All the Difference
When it comes to changing colors in amigurumi, even small details in your setup can impact your final result. It’s not just about switching yarns, it’s about switching them cleanly. The tools you use and the moment you choose to change make a real difference in whether your seam shows or stays hidden.
Here’s my essential color-change kit:
- Tapestry needle – Helps weave in your yarn tails snugly and invisibly. A blunt tip is ideal so you don’t split your stitches.
- Sharp embroidery scissors – Clean, short cuts prevent fraying and bulkiness at the color joins.
- Consistent yarn weight – This is a big one. If your old and new colors are slightly different in texture or thickness, you’ll see it. Always match yarn weights when changing colors in amigurumi.
- Stitch markers – Use these to track where each round begins. When working in spirals (which is the norm for amigurumi), the starting stitch shifts slightly each time, and so can your color change if you’re not careful.
- Crochet hook with a comfortable grip – Even tension is crucial. A hook that helps you maintain consistency will make your color changes smoother and your shape neater.
I personally use a 2.75 mm or 3.5 mm ergonomic hook when changing colors in amigurumi, depending on the yarn weight. It gives me enough control without straining my hands during long sessions.
Using consistent yarn types and the correct hook size really matters. This yarn weight, gauge, and hook size guide explains exactly how to choose what works best for your project.
When Should You Change Colors?
Timing is everything. If you change yarn colors after finishing a stitch, you’ll always end up with a harsh, visible line. But if you switch yarns during the last step of the final stitch in your old color, your transition blends right in.
Here’s how to do it:
- Work your last stitch of the round up to the final yarn over.
- Drop your current yarn.
- Yarn over with the new color and pull through the loops.
- Continue crocheting in the new color.
This method prevents those annoying jogs and helps keep your stitches tight and even. It’s the same color-change principle used in professional crochet tutorials like those from the Craft Yarn Council, which emphasizes clean transitions for polished finishes. It’s hands-down the cleanest way of changing colors in amigurumi, especially for simple round changes like heads, limbs, or bellies.
Placement Is Everything
One of the smartest things you can do is to plan where your color change happens. Avoid switching colors at the front or visible sides of your project. Instead, make your color transitions on the back, under the arms, or even on the bottom of the toy. That way, even if the seam isn’t totally perfect, it won’t be noticeable.
In most of my designs, I place color joins under the tail or in the back of the head. For dolls, I hide it behind the hair or body line. When changing colors in amigurumi, strategic placement is a game-changer.
Spiral Rounds vs Joined Rounds
Spiral rounds are most common in amigurumi, and they’re why color changes can get tricky.Since the round gradually shifts, your color transitions can drift upward in a diagonal spiral. This effect is closely related to how you begin your work, especially whether you start with a magic ring or a chain circle, both of which impact round alignment and color breaks. If you’re doing stripes, that drift becomes obvious fast.
That’s why stitch markers are so helpful. Mark the exact stitch where you want the color change to happen, and keep it consistent. This technique will give you clean horizontal lines even when changing colors in amigurumi made in spirals.
If your pattern uses joined rounds instead of continuous spirals, it’s a bit easier to hide color changes because each round ends in a defined place. In that case, just switch yarns at the join, but still remember to do it during the last yarn over of the final stitch.
Final Thought: Don’t Rush the Change
Finally, don’t be afraid to slow down when changing colors in amigurumi. Take a second to adjust your yarn tension, tuck in any loose tails, and make sure your next stitch looks clean and even, this helps prevent color distortion during transitions. You’ll thank yourself later when you see the finished piece with no bumpy transitions or wiggly lines.
Color changes might seem small, but when done right, they add polish and charm to your plush toys. And when done wrong? Well, we’ve all been there, and that’s why learning the right timing and tools is so worth it.
Techniques That Actually Hide the Seam
Why Seamless Color Changes Matter
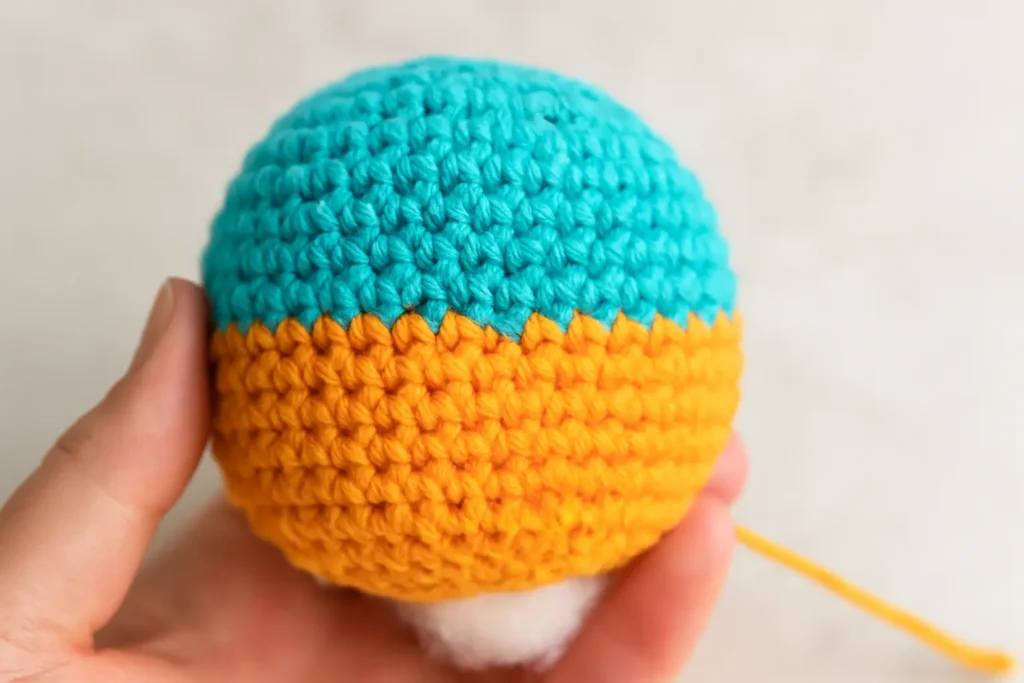
When you’re changing colors in amigurumi, the difference between a polished plush and a lopsided one often comes down to the seam. Nothing ruins the look of a cute crochet toy faster than a jagged line or a visible color jog that throws off the symmetry of your design. But don’t worry, there are a few tried-and-true methods for keeping your color transitions smooth and practically invisible.
Let’s walk through the best techniques to hide the join when changing colors in amigurumi. Whether you’re working in spirals, creating stripes, or making character outfits, these methods will keep your stitches clean.

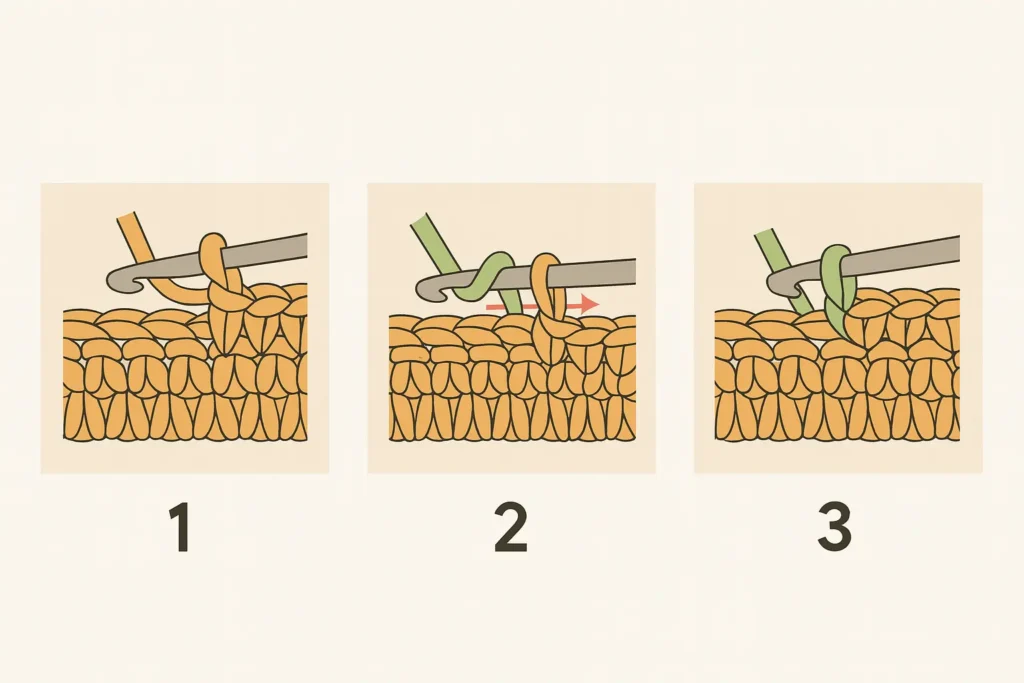
1. The Classic Invisible Color Change
This is the foundation for clean color transitions when changing colors in amigurumi. Instead of finishing a stitch in the old color and starting the next in the new one, you make the color switch at the last yarn-over of the previous stitch.
Here’s how to do it:
- Insert your hook into the next stitch with the old color.
- Yarn over and pull up a loop.
- Now stop, don’t finish the stitch.
- Drop the old color and yarn over with the new color.
- Pull through both loops to complete the single crochet.
From here, continue in the new color. That subtle switch mid-stitch makes the transition nearly invisible.
This technique is essential when changing colors in amigurumi, especially when you’re also shaping your toy at the same time. For example, using an invisible decrease during the transition helps maintain a smooth shape, perfect for heads, legs, or chubby plush tummies.
2. The Slip Stitch Trick (for Sharp Stripes)
If you’re working on stripes, such as a bumblebee or rainbow plushie, you may have noticed that the color shifts creep upward with each round. That’s because you’re working in spirals, and each new round starts one stitch over from the last.
To fix that when changing colors in amigurumi, try this method:
- End the last round of the old color with a slip stitch.
- Cut the yarn and pull it through tightly.
- Start the new color with a standing single crochet or chain 1 + single crochet.
This little bump smooths out the “step” between color rounds and helps you achieve a clean jogless stripe, especially on plushies with bold, horizontal patterns.
3. The Jogless Join (for Body-to-Head or Clothing Changes)
This method is ideal for dramatic color switches, like changing from skin tone to clothing on an amigurumi doll. It helps avoid the bulky jump that often happens at the transition point.
Steps for a jogless join when changing colors in amigurumi:
- Slip stitch to the first stitch of the round before the color change.
- Fasten off the old yarn and pull through.
- Insert your hook into the next stitch.
- Pull up the new yarn and chain 1.
- Continue with the new color.
The jogless join works best when changing colors in amigurumi at major breaks, like heads, sweaters, pants, or leg stripes, because it minimizes the visible step.
4. The False Stitch Start
This is a clever trick for when you want to “fake” the start of a round. It’s useful if you’re changing colors in amigurumi while working continuous spirals, but still want your stripe line to stay even.
How it works:
More Free Amigurumi Patterns You’ll Love

")

")
- After completing a round in your old color, slip stitch instead of doing a final single crochet.
- Cut the yarn and pull the end through.
- Begin the next round with a new color and a seamless join or standing sc.
This trick is especially effective in toys with lots of visible rounds, like turtles, caterpillars, or striped sea creatures, where changing colors in amigurumi repeatedly is part of the design.
5. Hide the Join Strategically
Where you change colors can be just as important as how. If your seam is visible from the front, it will draw attention, even if your transition is clean.
Instead:
- Place your color changes on the back or bottom of the toy.
- Use the tail of the toy, under the arms, or behind the head as camouflage.
- Avoid switching yarns in high-contrast colors (like white to black) at the very front.
Strategic placement is key to hiding even the most subtle changes. This rule applies whether you’re making small adjustments or major design breaks while changing colors in amigurumi.
6. Add a Back Loop Break
If you’re adding a belt, collar, or trim, try crocheting into the back loop only for one round before the color switch. This creates a tiny ridge and makes the new color look more like a built-in design element than a visible transition.
The back loop break is fantastic when changing colors in amigurumi for decorative details. It’s often used in doll dresses, bear bellies, and even animal paws to give definition between sections.
7. Stitch Markers Are Your Friend
A good stitch marker is your best ally when changing colors in amigurumi. Use it to mark the exact spot where you want to change colors, especially if you’re doing the same transition multiple times, like in limbs or ears.
Consistency makes color changes look intentional. A stitch off here or there might not seem like much, but once your piece is assembled, those seams can become distracting.
8. Weaving in Ends Without Bulk
One of the trickiest parts of changing colors in amigurumi is dealing with yarn tails. If you don’t weave them in well, they’ll poke through the fabric. Worse, they might loosen and create holes at your color change line.
Tips for clean weaving:
- Weave each tail in opposite directions.
- Insert the tail through at least 3–4 stitches.
- Try to weave along the inside of a round to avoid thickness buildup.
9. Be Consistent Across the Project
If you change colors one way on the head and a different way on the arms, it’ll show. Pick a method and stick to it. Whether you’re using invisible color changes, slip stitches, or jogless joins, using the same approach throughout your piece is what gives your toy a truly professional look.
Final Thoughts
There are many ways of changing colors in amigurumi, but the goal is always the same: a clean finish that keeps the focus on your adorable creation, not the color line. With these techniques in your toolbox, your plushies will look cleaner, more polished, and much more huggable.
The best part? Once you master these transitions, you’ll be able to customize nearly any amigurumi pattern to add stripes, outfits, or bold features, without seams stealing the spotlight.
Common Mistakes When Changing Colors in Amigurumi (and How to Avoid Them)
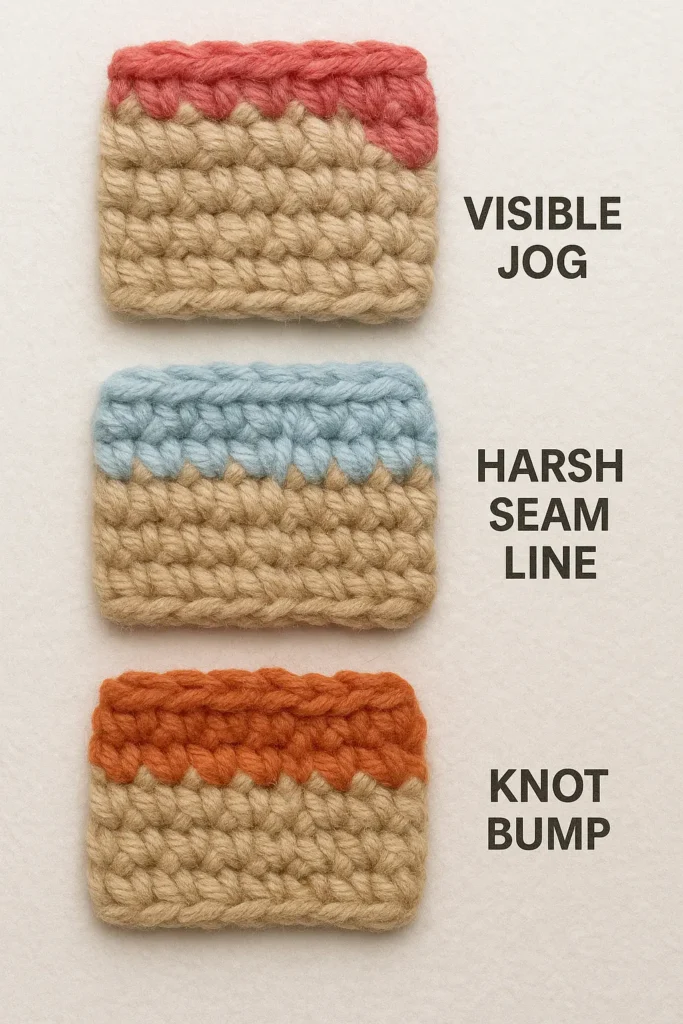
Even seasoned crocheters can run into trouble when switching yarns. If you’re still seeing visible seams, color jogs, or messy joins, don’t panic, it likely comes down to a few small missteps. Here are some of the most common problems that arise when changing colors in amigurumi, and exactly how to fix them.
❌ Mistake #1: Changing Colors After Finishing the Stitch
One of the biggest beginner traps is completing the final stitch in the old color and then starting the new round with a new yarn. This almost always leads to an ugly “step” or bump where the new color starts.
✅ The Fix: Always change colors during the last yarn-over of the last stitch in the old color.
❌ Mistake #2: Not Using Stitch Markers
Because most amigurumi is worked in spirals, round positions shift slightly each time. If you’re not marking your starting stitch, you might find your color changes creeping upward or backward.
✅ The Fix: Use a stitch marker to keep color changes aligned. Place it in the first stitch of the round and move it up each time.
❌ Mistake #3: Weaving in Tails Too Loosely (or Too Tightly)
Poorly woven yarn tails can either bulk up your work or cause gaps where colors meet. This can make the cleanest stitch look messy.
✅ The Fix: Use a tapestry needle and weave tails securely along the inside of the work for 4–5 stitches. Don’t knot, just keep it snug and smooth.
❌ Mistake #4: Mixing Yarn Types
Yarns with different textures, weights, or finishes will behave differently even if they look similar. This can create ridges or sudden changes in tension, especially when changing colors in amigurumi.
✅ The Fix: Always use yarns from the same brand or yarn family when possible. Stick to cottons or soft acrylics with similar twist.
❌ Mistake #5: Not Planning Seam Placement
If you change colors right in the middle of the face or chest of your toy, even a perfect transition might look out of place.
✅ The Fix: Think about your amigurumi’s final pose or front-facing view. Place color changes under the body, behind the head, or in other less-visible spots.
Why This Matters
Avoiding these mistakes doesn’t just make your toys prettier, it also makes them more durable. Clean joins mean fewer gaps, fewer unraveling tails, and a more solid structure overall. Whether you’re making a gift, selling your work, or just want to feel proud of your plushie, mastering changing colors in amigurumi is an investment in your craft.
Frequently Asked Questions
What’s the best way to change yarn colors in amigurumi?
The best way to change yarn colors in amigurumi is to switch during the final yarn-over of the last stitch in the old color. This smooth transition helps avoid steps or bumps and blends the new color cleanly into your design.
Why does my color change in amigurumi look like a step?
A step or jagged line usually means the color was changed after finishing a stitch. When working in spirals, this creates a slanted effect. To fix it, try slip stitching at the end of the round and starting the new color with a standing stitch.
How do you keep stripes from spiraling in amigurumi?
When changing colors in amigurumi with stripes, use a stitch marker to control round starts. Also, end the color section with a slip stitch and begin the next color in the same stitch spot. This stops the spiral drift and keeps stripes straight.
Can I change colors in the middle of a round?
Technically yes, but it’s harder to hide. If you must change colors mid-round, do it on the back side of the toy and always in the last yarn-over of a stitch.
Where should I hide color changes in amigurumi?
Aim for hidden zones like under the toy, behind the head, or under the arms. Consistency matters, always change in the same position to maintain clean results.
What if my yarn colors are slightly different in texture?
Uneven textures or thicknesses will make seams stand out. For the cleanest finish when changing colors in amigurumi, use yarns from the same weight and brand whenever possible.
How do I weave in the ends after changing colors?
Thread each yarn tail along the inside of the body using a tapestry needle. Weave through 3–5 stitches firmly but without pulling too tightly. This keeps the surface smooth and secure.
How to change colors in crochet without showing?
To change colors in crochet invisibly, make the color switch in the final yarn-over of the last stitch before the new color begins. This method is ideal when changing colors in amigurumi, especially in continuous rounds.
How do I change color but keep it clean in crochet amigurumi?
Use a seamless join technique or a jogless color transition. Always change colors on the back or bottom of the toy, and avoid placing joins on the front-facing side.
How to change yarn color seamlessly?
For a seamless transition, drop the old yarn and finish the stitch with the new yarn’s yarn-over. Then continue crocheting. This is the cleanest way of changing yarn color in amigurumi or any round crochet.
How to hide yarn when switching colors?
Weave the yarn tails inside the body using a blunt needle, moving along the back loops of stitches. Avoid knots. Tighten gently so there are no bumps on the outside.
🧵 Keep Learning & Stitching with Me!
If you loved this tutorial on changing colors in amigurumi without a visible seam, let’s stay connected!
📌 Follow me on Pinterest for daily pin-worthy amigurumi tips, free patterns, and adorable project inspiration:
👉 TopAmigurumi on Pinterest
✍️ Read more behind-the-scenes crochet stories and deep dives on Medium:
👉 Follow TopAmigurumi on Medium
Every share and follow helps this little handmade corner of the internet grow. Thanks for stitching along with me! 💛