


There’s something magical about crafting your very first amigurumi, tiny stitches transforming into a cute, cuddly friend! In this article, we’ll walk through the key steps to launch your first amigurumi project. We’ll begin with a warm introduction and personal story, then dive into materials, essential techniques, and finishing touches. Every step is explained clearly and conversationally, just like stitching beside a friend. Ready? Let’s get crocheting!
Table of Contents
Starting Your Amigurumi Journey
My First Amigurumi Memory
I still remember the thrill of making my first amigurumi, an adorable little ball shaped like a cheerful blueberry. I didn’t even know where to begin! I had my grandmother’s old crochet hook, a small ball of yarn, and a vague YouTube clip saved in my bookmarks. I made mistakes, my stitches were loose, counts were off, my magic ring looked more like a weird knot, but by the end, I held that soft blueberry in my hands and felt pure joy. That’s when I realized: crochet isn’t just a craft, it’s comfort in your hands, one lovable loop at a time.
That moment sparked my passion for amigurumi. If you’re reading this because you’re curious about how to start your first amigurumi project, know that your first piece doesn’t have to be perfect, it just has to feel like yours.
What to Expect from This Guide
Here’s what we’ll cover:
- Choosing the right materials (yarn, hook, stuffing)
- Learning the most-used stitch, single crochet, and how to work magic rings
- Following a beginner‑friendly pattern step by step
- Stuffing, shaping, sewing pieces together, and giving your creation personality
You’ll go from zero to stitching your first amigurumi in no time, without feeling overwhelmed. Let’s roll up our sleeves!
Materials & Basics You’ll Need
Gathering Supplies for Your First Amigurumi
Before crocheting a single stitch, let’s talk about what you need to get started. The good news? Your first amigurumi doesn’t require a huge investment, just a few tools and a little space to create.
Here’s what belongs in your beginner crochet kit:
1. Yarn
For your first amigurumi, go with medium-weight yarn, also labeled as worsted weight (category 4). It’s thick enough to hold shape, but not too bulky to work with.
Cotton yarn is slightly firmer and creates nice stitch definition, while acrylic is soft, affordable, and easier to find. Brands like Paintbox, Red Heart, and Lion Brand have great starter options.
Avoid novelty yarns (like boucle, velvet, or fuzzy textures) for now, they’re adorable, but nearly impossible to see your stitches in. You’ll thank yourself later.
If you’re unsure about yarn sizes or weights, the Craft Yarn Council’s yarn weight guide is an excellent reference It helps you choose the right yarn based on your hook, tension, and project goals.
Pro Tip: Stick with light or bright solid colors. Dark yarn hides stitches, which makes learning harder on the eyes (literally!).
2. Crochet Hook
A 4 mm crochet hook (US size G/6) is perfect for beginners using worsted yarn. It’s small enough to give your stitches a tight finish (important in amigurumi!) but large enough for easy handling.
You can choose from:
- Aluminum hooks (cheap and common)
- Ergonomic hooks (comfortable handles for longer sessions)
Some beginners find that ergonomic hooks reduce hand fatigue, especially helpful if you’re practicing your first amigurumi in longer sittings.
If you’re unsure which hook to grab, check your yarn label, but remember: use a smaller hook than recommended to keep the stitches tight and stuffing-proof. A loose fabric might work for blankets, but not for plush toys!
3. Stuffing
Use polyester fiberfill stuffing it’s soft, moldable, washable, and available in big bags at most craft stores. It fills your toy evenly and gives it a plush, squishy feel. For tiny pieces like arms or tails, use the tip of your hook or a chopstick to push stuffing into tight spots.
Don’t use cotton balls or scrap yarn, they can lump and shift. And for your first amigurumi, a consistent shape is easier to stitch around and finish cleanly.
4. Safety Eyes or Embroidery Floss
Want to give your creation personality? Add eyes! For most plushies, safety eyes are the go-to they snap into place and stay put. Insert them before stuffing and sealing the piece.
But for babies, pets, or small children, skip the plastic and go with embroidered eyes using black or brown thread. It’s just as cute and safer, too.
Check out my full guide on how to safely attach eyes to amigurumi, you’ll avoid beginner slip-ups and get balanced results.
5. Stitch Markers
Stitch markers are essential when working in spirals. You’ll place one at the start of each round to keep your place as you work.
You can use plastic locking markers, bobby pins, or even a scrap of yarn in a contrasting color. It may feel like “extra work,” but trust me: it will save your sanity!
6. Tapestry Needle
This blunt, large-eyed needle is used to sew limbs to your project, weave in loose ends, and close up the final hole at the end. Without it, finishing your first amigurumi will feel incomplete and possibly fall apart.
If you want to go the extra mile, keep a small pair of scissors handy and a zip pouch to organize everything. These tiny additions make a big difference in how easy it is to sit down and enjoy your creative time.
Optional Tools:
- Row counter (or phone app)
- Yarn needle threader
- Mini measuring tape
- Notebook for notes or row tracking
Once you’ve gathered your materials, you’re officially ready to begin your first amigurumi! From this point on, it’s all about loops, laughter, and learning as you go.
Understanding Stitch Terminology (Without the Overwhelm)
To read patterns confidently, you’ll need to get familiar with a few abbreviations. Most amigurumi patterns are written using US crochet terms. Keep this reference close while working on your first amigurumi:
| Abbreviation | Meaning |
|---|---|
| sc | single crochet |
| inc | increase (2 sc in same stitch) |
| dec | decrease |
| MR or magic ring | Start your piece in a circle |
| rnd(s) | round(s) |
| sl st | slip stitch |
| ch | chain |
| FO | fasten off |
The two most important terms to know as a beginner are:
- Single Crochet (sc) – the basic building block of nearly every first amigurumi toy.
- Magic Ring – the circular foundation for working in the round.
Some patterns will explain terms at the top. Others assume you know them, which is why this quick guide helps avoid confusion mid-project.
Mastering the First Stitches
Make a Magic Ring (The Right Way)
Every first amigurumi begins with the same magical move: the magic ring. It creates a neat, closed center with no hole, giving your plush toy a polished, professional look. I’ll admit, it gave me a bit of a headache when I tried it for the first time. But once I figured out the rhythm, I couldn’t believe how easy it actually was.
Here’s how to do it:
Wrap the yarn around two fingers to form a loop, with the tail behind.
Insert your hook under the front strand and pull up the back strand.
Chain one, then crochet your first round of single crochets directly into the ring.
Pull the tail gently to close it tightly, and just like that, your project is off to a strong start.
This small circle is the foundation of your first amigurumi, so don’t worry if it takes a few tries. For extra guidance, check out the photo tutorial inside this beginner’s guide.
Still not ready for the magic ring? You can also chain two and work into the second chain. It’s not as seamless, but it works fine for your first amigurumi attempt.
Single Crochet, Increases & Decreases
The single crochet (sc) stitch is your new best friend when making your first amigurumi toy. It’s the most-used stitch in the entire process. Here’s the breakdown:
- To sc: Insert hook, yarn over, pull through, yarn over, pull through both loops.
- To increase (inc): Make two scs in one stitch.
- To decrease (dec): Use the invisible method, hook into the front loops of two stitches, yarn over, pull through both, then yarn over again and pull through both loops.
These three techniques, sc, inc, and dec, are all you need to shape your first amigurumi creature. From round heads to stubby legs, it’s all about combining these stitches strategically.
Need a bit more help avoiding beginner mistakes? I share my biggest blunders in this guide to amigurumi mistakes, so you can skip the struggle and keep smiling.
Finally, remember that most first amigurumi patterns are worked in spirals, not joined rounds. Mark the first stitch of each round with a stitch marker, it’ll keep your work neat and frustration-free.
Bringing Your First Shape to Life
Reading a Simple Pattern the Easy Way
Let’s be honest, opening your first amigurumi pattern can feel like staring at code from outer space. But once you break it down, it’s a lot easier than it looks. You don’t need to memorize fancy stitch dictionaries, you just need to understand the basics.
Here’s a snippet from a typical beginner pattern:
Rnd 1: 6 sc in magic ring
Rnd 2: inc in each st (12)
Rnd 3: *sc, inc* repeat around (18)
Rnd 4: *2 sc, inc* repeat around (24)
Here’s what’s really going on:
- Rnd 1: Start with 6 single crochets in a magic ring. This forms the base.
- Rnd 2: Increase in each stitch, so 2 single crochets in every stitch from round 1. Now you have 12 total.
- Rnd 3: Do one sc, then one increase. Repeat that sequence until the round is complete (6 times).
- Rnd 4: Same idea, now you work 2 scs, then an increase.
Patterns often use asterisks (*) and parentheses to show what to repeat. That repetition is what helps you shape your toy into round, soft pieces perfect for cute little heads, bodies, and limbs.
More Free Amigurumi Patterns You’ll Love


")
")
If you need extra help, I highly recommend reading my full guide on how to read an amigurumi pattern. It explains stitch terms and row-by-row logic using pictures and real pattern examples.
And remember: nearly every first amigurumi project is made in a spiral, not joined rounds. That means you won’t close each round with a slip stitch. Instead, you’ll continue around and around, marking the first stitch of each round with a stitch marker. It keeps your count accurate and your sanity intact!
Practice with a Ball Pattern (Your First Shape)
Ready to crochet your first amigurumi piece? Let’s start with a ball. This basic shape is used for heads, bodies, or even simple characters like plushies and emoji toys. Here’s a practice pattern to try:
Rnd 1: 6 sc in magic ring (6)
Rnd 2: inc in each st (12)
Rnd 3: *sc, inc* around (18)
Rnd 4: *2 sc, inc* around (24)
Rnd 5: *3 sc, inc* around (30)
Rnds 6–10: sc around (30)
Rnd 11: *3 sc, dec* around (24)
Rnd 12: *2 sc, dec* around (18)
Rnd 13: *sc, dec* around (12)
Stuff with fiberfill
Rnd 14: dec around (6)
Fasten off, sew hole closed.
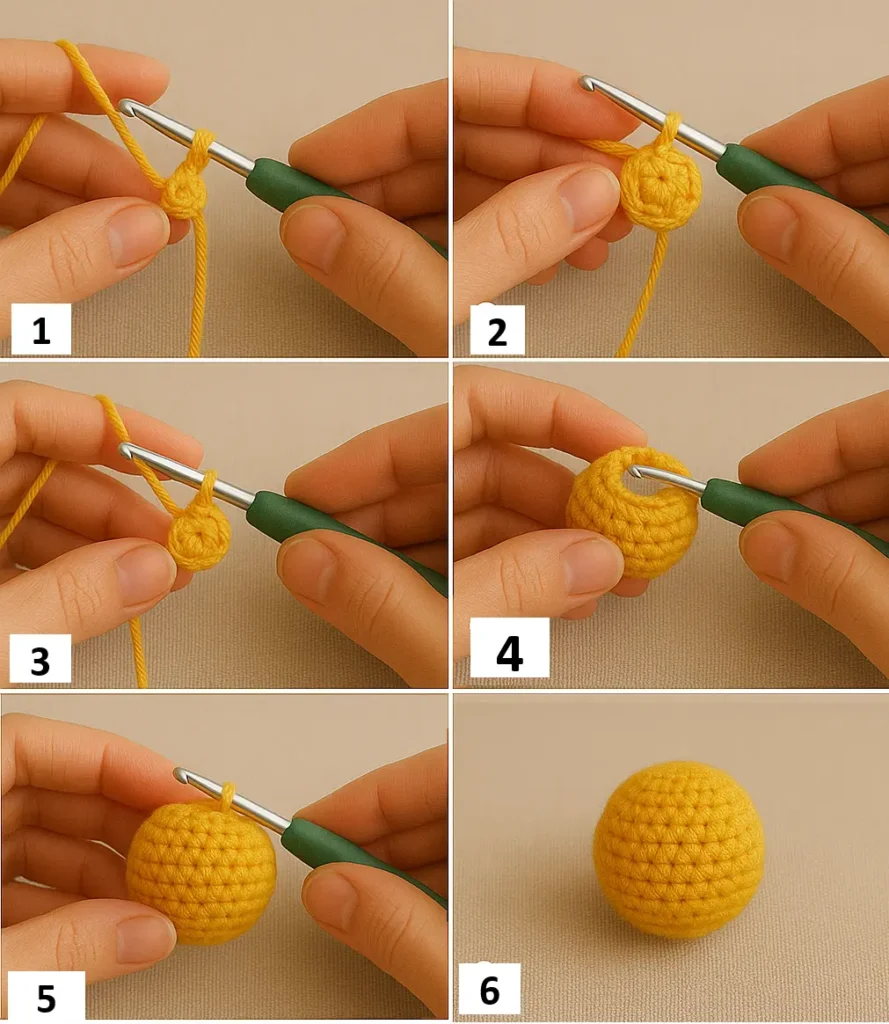
This is your very first amigurumi building block. The first half increases in size to form a dome, the middle holds the shape, and the last rounds decrease it back down. When you add stuffing before sealing it up, you’ll have a perfect squishy ball.
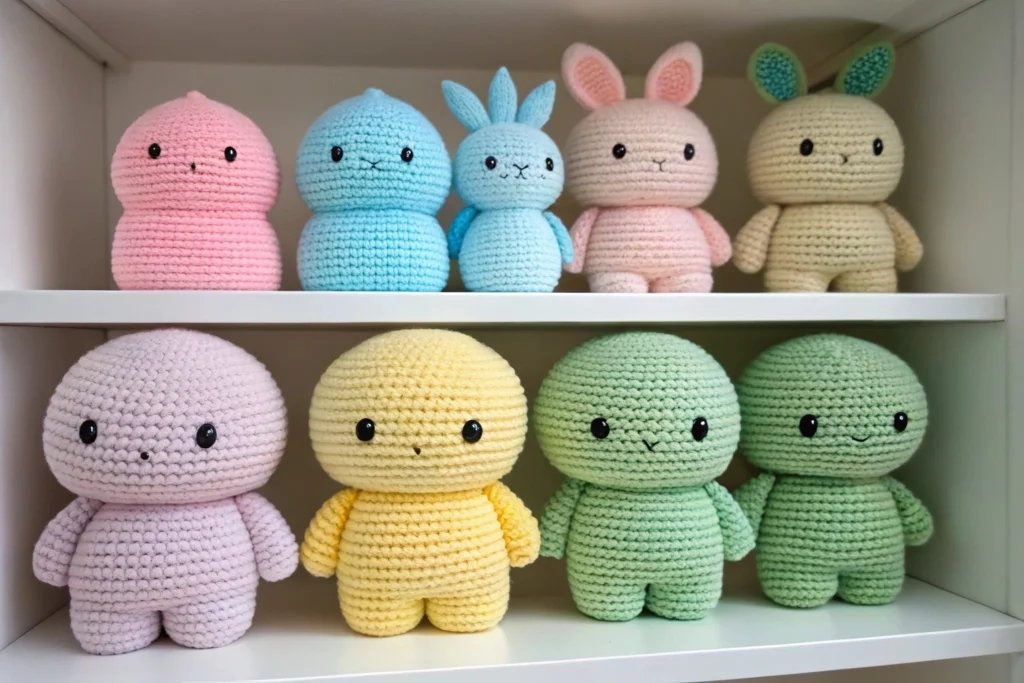
If that feels good, you can build from there and use the same logic to shape a pear, a mushroom, or even the head of a tiny bear. That’s the beauty of first amigurumi projects: they’re simple in theory, but endless in possibility.
Stuffing, Shaping, and Personality
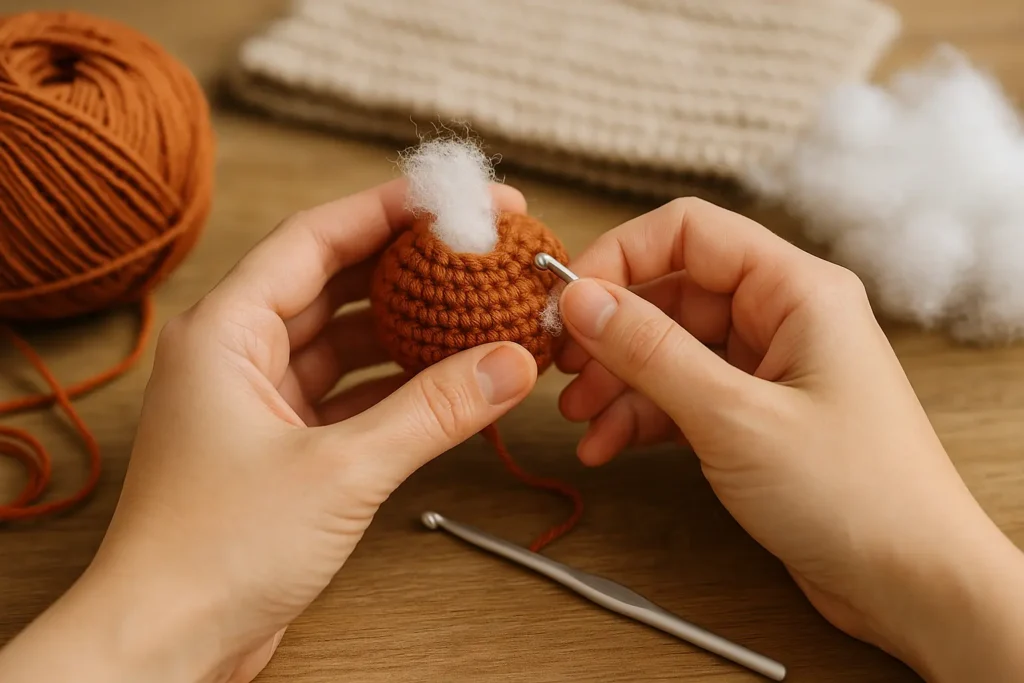
The magic isn’t just in the yarn, it’s in how you bring your project to life. Once you’ve completed the main shape, it’s time to stuff your first amigurumi. Here’s how to make it just right:
- Use small pinches of fiberfill at a time.
- Stuff the ball firmly, but not so much that it stretches the stitches.
- Push fiber into the edges using the back of your crochet hook.
- Pause mid-way and shape it with your hands, soft sculpting works wonders.
Before you close your project completely, it’s time for the eyes. Most beginner patterns use safety eyes, which are inserted between stitches and locked in place inside. Always attach them before you finish stuffing and closing the piece. Safety eyes are great, but if your toy is for a baby or pet, stick with embroidered features to avoid choking hazards.
Once you’re happy with your toy’s shape and face, fasten off your yarn and use a tapestry needle to close the hole. Hide your tail inside with a few gentle tugs.
If you’re adding limbs or details (like ears, a tail, or arms), line them up first with sewing pins. Then whip stitch them into place. I learned the hard way once, attaching a bunny ear off-center! Now I always dry-fit pieces first, and I recommend you do too for your first amigurumi.
FAQ
1. Do I need to join rounds or work in a spiral for my first amigurumi?
It’s best to work your first amigurumi in a spiral (continuous rounds) unless the pattern says otherwise. That keeps your piece smooth and free of visible seams. Experienced crocheters on r/Amigurumi often say:
“No chain either. You just work in a continuous ‘spiral’ … That’s why the stitch marker is so important!”
Joined rounds (slip stitch + chain) may flatten areas like ears but for your first amigurumi, spiral is easier and more forgiving.
2. How tight should my stitches be for a first amigurumi?
Tight enough that stuffing doesn’t show through. Use a hook 1–2 sizes smaller than what the yarn label recommends. This creates a firm fabric that holds stuffing well. Tight stitches help your first amigurumi look neat and well-shaped.
3. When is the best time to add safety eyes to your first amigurumi?
Insert safety eyes after finishing half of the shape and before stuffing it fully. That way, the backs secure inside without distorting the form. If your toy is for a baby, switch to embroidered eyes, safer and still cute.
4. How much stuffing is right for a first amigurumi?
Add stuffing little by little. Too much makes it round but stiff; too little gives a floppy look. Stuff firmly but gently, using a hook or your fingers to fill round shapes snugly. This gives your first amigurumi a sweet, squishy finish.
Common Troubleshooting Tips
Lopsided shapes? Always count your stitches
If your first amigurumi comes out uneven, it’s often a misplaced stitch. Use stitch markers and count at the end of every round. As one Redditor shared:
“use a stitch marker to mark the first stitch… count when you’re done a row! It is frustrating but easy to pull the stitches out and redo.”
Gaps in the fabric? Try invisible decreases and tighter tension
Open spaces usually happen from loose tension or too few decreases. Switch to the invisible decrease method described earlier to close gaps neatly. You can also tighten stitches slightly by pulling the yarn a bit firmer, but not too tightly to warp the piece.
Final Thoughts & What to Crochet Next
Congratulations on creating your first amigurumi! You’ve learned the magic ring, single crochet, increasing, decreasing, reading patterns, stuffing, and finishing touches. Each step builds your skills and confidence, and it’s okay if your first toy looks “handmade.” That charm is part of the magic.
Ready to take it further? Here are a few next steps:
- Try shaping bodies and limbs using these same techniques
- Customize with color changes, embroideries, or add simple embellishments like bows or scarves
- Explore beginner kits like The Woobles to guide you through themed projects
- Join online groups for inspiration and advice forums, like r/Amigurumi, which are incredibly supportive
Every new piece you make will be more confident and quicker than your first amigurumi. Soon, you’ll be gifting, displaying, or even selling your creations, and most importantly, enjoying the creative journey.
Conclusion
Your first amigurumi journey is more than just a crochet project; it’s a stepping stone into a world full of cute creations, mindful moments, and crafty community. You’ve conquered the basics and are ready to embark on your next creation, whatever that may be. And if you ever feel stuck, remember: I’ve written many focused tutorials to guide you forward, from pattern decoding to fixing stitches.
Ready to Stitch Your Next Smiling Friend?
You’ve just finished your first amigurumi, how amazing is that? Now’s the perfect time to keep the momentum going. Try a new pattern, experiment with fun yarn colors, or maybe even crochet a tiny gift for someone you love.
🌟 Share your creation with us on social media, tag @TopAmigurumi, or drop a comment below—I’d be thrilled to cheer you on!
💬 Looking for more behind-the-scenes stories, tips, and personal reflections? Visit my Medium page where I share heartfelt tales from my crochet journey—straight from my cozy corner to yours.