


Introduction: Why Fixing Amigurumi Mistakes Early Matters
Starting your amigurumi journey can be both exciting and frustrating. You’ve followed the pattern, but somehow your cute creature looks more like a spaghetti monster than the Pinterest-perfect bunny you imagined. 😅
Don’t worry, you’re not alone! Every crocheter makes mistakes, especially in the beginning. But with a few simple corrections, you can avoid the most common amigurumi pitfalls and enjoy the process of bringing your crochet toys to life.
In this guide, we’ll cover the 10 most frequent amigurumi mistakes, explain how to recognize them, and give you easy ways to fix them. Whether you’re struggling with stitch tension, stuffing, or even facial symmetry, we’ve got you covered.
Let’s make your next amigurumi project your best one yet!
Jump to a section
❌ Mistake 1: Using the Wrong Yarn Weight or Hook Size
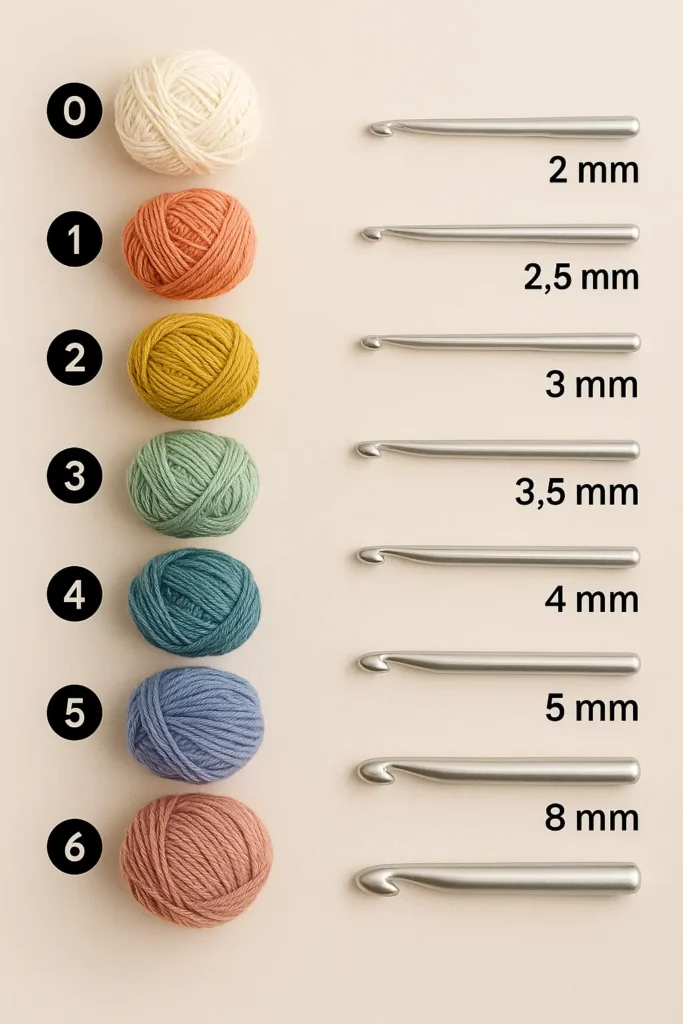
One of the most common amigurumi mistakes is using yarn and hook sizes that don’t match the pattern. This can make your toy look too floppy, too stiff, or completely the wrong size. Even a small change in yarn weight or hook size can drastically alter your amigurumi’s shape and texture.
🔧 How to Fix This Common Amigurumi Mistake:
Always follow the pattern’s recommended yarn weight and hook size. If the pattern calls for worsted-weight yarn and a 3.5 mm hook, don’t substitute it with bulky yarn or a larger hook unless you’re intentionally resizing. Sticking to the correct combination ensures your stitches are tight enough to hold stuffing and that the finished size matches expectations.
If you’re unsure how yarn weight, gauge, and hook size interact, check out our complete beginner’s guide here.
✨ Pro Tip:
To avoid visible gaps in your fabric, a frequent result of this common amigurumi mistake, use a crochet hook 0.5–1.0 mm smaller than the yarn label recommends. This helps create a firmer stitch that holds stuffing beautifully.
❌ Mistake 2: Skipping the Magic Ring (Magic Circle)
Skipping the magic ring and starting with a chain loop is one of the common amigurumi mistakes that leads to holes in the center of your piece. These gaps make the stuffing visible and can weaken the structure of your amigurumi, especially in small, round parts like heads and limbs.
🔧 How to Fix This Common Amigurumi Mistake:
Always begin your amigurumi with a magic ring unless the pattern says otherwise. The magic ring allows you to pull the center tightly closed, avoiding holes and keeping your piece neat and secure.
If you’re struggling with the technique, practice using thicker yarn and a larger hook to get the motion right. There are plenty of step-by-step tutorials and videos available that break down this essential move.
✨ Pro Tip:
Some crafters reinforce the magic ring with a second loop or a knot to ensure it stays closed over time, especially useful for toys given to children. Mastering the magic ring is one of the easiest ways to avoid common amigurumi mistakes early on.
“Still struggling with the magic ring? This step-by-step magic circle tutorial helped me when I started!”
❌ Mistake 3: Inconsistent Tension and Stitch Size
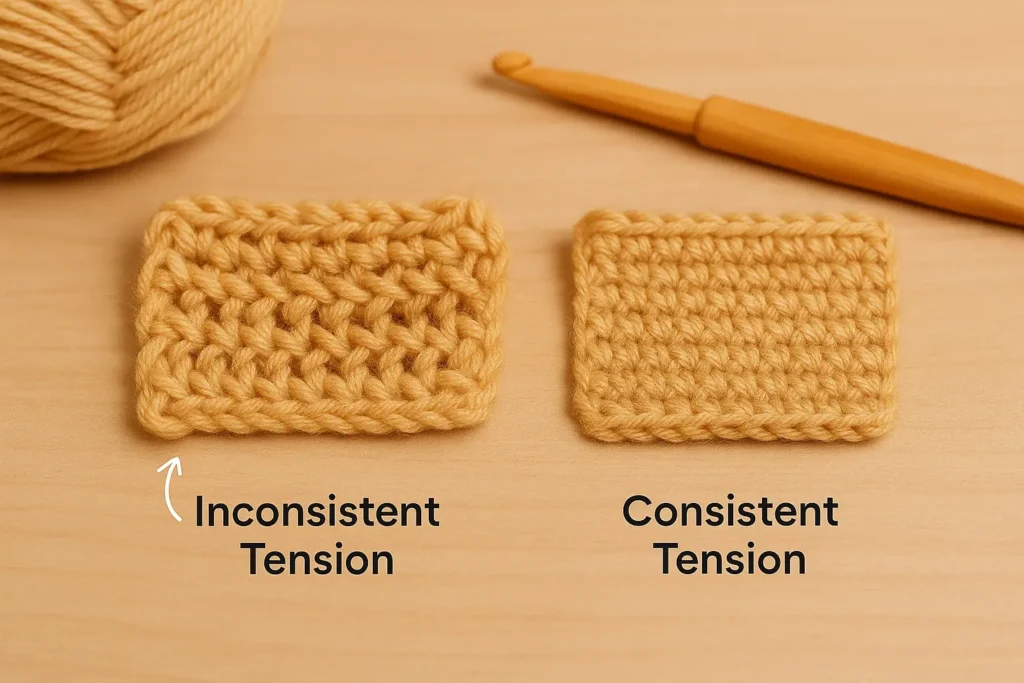
One of the most common amigurumi mistakes beginners face is inconsistent stitch tension. Uneven tension leads to lumpy, misshapen toys or pieces that don’t fit together well during assembly.
🔧 How to Fix This Common Amigurumi Mistake:
Consistency is key. Your yarn weight, gauge, and hook size must work in harmony. If your stitches vary in size, your amigurumi might bulge in the wrong places or appear uneven.
To fix this:
- Practice keeping your hand position and yarn tension steady.
- Use a yarn guide ring if your fingers tire quickly.
- Make swatches and practice maintaining even tension before starting your project.
✨ Pro Tip:
Use the same yarn brand and dye lot for your project when possible. Switching yarns mid-project can throw off your gauge and tension, making the amigurumi mistake even worse.
“My granddaughter took one look at my first bunny and said, ‘Grandma… it looks like a potato.’ She wasn’t wrong. But that potato-bunny still sits proudly on my shelf!”
❌ Mistake 4: Using the Wrong Yarn Weight or Hook Size
One of the most overlooked amigurumi mistakes is selecting the wrong yarn weight or crochet hook size. This seemingly small decision can affect your toy’s structure, appearance, and durability. If your stitches are too loose, the stuffing will peek through. If they’re too tight, your project may feel stiff and misshapen.
🔧 How to Fix This Amigurumi Mistake:
To avoid these amigurumi mistakes, always pay attention to the pattern’s recommended yarn weight, gauge, and hook size. When substituting materials:
- Match the yarn’s weight category (like DK or worsted).
- Test with a gauge swatch to maintain the correct stitch size.
- Use a smaller hook than usual to keep your stitches tight and even.
✨ Pro Tip:
Most amigurumi patterns assume tighter stitches, so don’t be afraid to go down one or two hook sizes from the yarn label. This helps avoid common amigurumi mistakes like visible gaps or floppy limbs.
❌ Mistake 5: Skipping the Magic Ring
One of the most frequent amigurumi mistakes beginners make is skipping the magic ring (also known as the magic circle) and starting with chain stitches instead. While chaining may seem easier, it often leaves a visible hole at the beginning of your piece, especially noticeable on rounded shapes like heads or limbs.
🔧 How to Fix This Amigurumi Mistake:
Use the magic ring technique to start your work when the pattern calls for it. This method allows you to pull the center tightly closed, leaving no gap. If you’re struggling, practice with thicker yarn and a larger hook to understand the motion before switching to your project yarn.
✨ Pro Tip:
Mastering the magic ring early helps you avoid one of the most common amigurumi mistakes that affect the professional look of your toys. It’s a small change that makes a big visual difference.
❌ Mistake 6: Inconsistent Tension
One of the more subtle amigurumi mistakes is inconsistent tension throughout the project. If your stitches are too tight in one part and too loose in another, the finished piece may look lumpy, uneven, or misshapen. This is especially noticeable in symmetrical designs like heads, bodies, or limbs.
🔧 How to Fix This Amigurumi Mistake:
Focus on practicing even tension by consciously holding your yarn the same way throughout the project. Try making a few small practice swatches before diving into your main amigurumi piece. Using the same yarn weight, gauge, and hook size also plays a role in achieving consistency.
✨ Pro Tip:
Tension control is a skill that improves over time. Keep a steady rhythm while crocheting and check your progress regularly to spot uneven spots early. This avoids one of the most frustrating amigurumi mistakes that only become obvious at the very end.
❌ Mistake 7: Crocheting Too Tightly or Too Loosely
One of the most common amigurumi mistakes beginners make is crocheting with tension that’s either too tight or too loose. Tight stitches can make it difficult to insert your hook, causing hand fatigue. Loose stitches, on the other hand, can leave unsightly gaps where stuffing peeks through.
🔧 How to Fix This Amigurumi Mistake:
Aim for consistent and moderate tension; your stitches should be tight enough to prevent stuffing from showing but loose enough to crochet comfortably. Always use the recommended hook size for your yarn weight and check your gauge before starting.
✨ Pro Tip:
If you notice your stitches are too tight, try using a hook that’s 0.5 mm larger. For loose stitches, size down your hook. Getting the right balance can prevent many frustrating amigurumi mistakes later in the project.
❌ Mistake 8: Ignoring the Right Side of Your Work
Another frequent amigurumi mistake is not paying attention to which side of your crochet work is the right side. In amigurumi, the “right side” is the outer, more textured side of your stitches, which gives your creation that signature smooth and neat look.
Flipping sides mid-project can result in uneven textures and an inconsistent appearance, especially noticeable in the final shape and face of your toy.
🔧 How to Fix This Amigurumi Mistake:
Always identify the right side of your fabric early on and keep it facing outward throughout your project. For most patterns worked in continuous rounds, the right side is the one facing you as you work counterclockwise.
✨ Pro Tip:
Mark the inside (wrong side) with a scrap of yarn or safety pin early in your project. This simple trick can help you avoid one of the most subtle amigurumi mistakes.
🧵 Storytime:
Say hello to Inside-Out Igor. He was stitched beautifully… except his maker accidentally used the wrong side of the fabric. Now his stitches look a little off, and he’s hiding in the corner of the craft shelf. Flip your work right-side out before attaching pieces!
❌ Mistake 9: Poor Placement of Facial Features
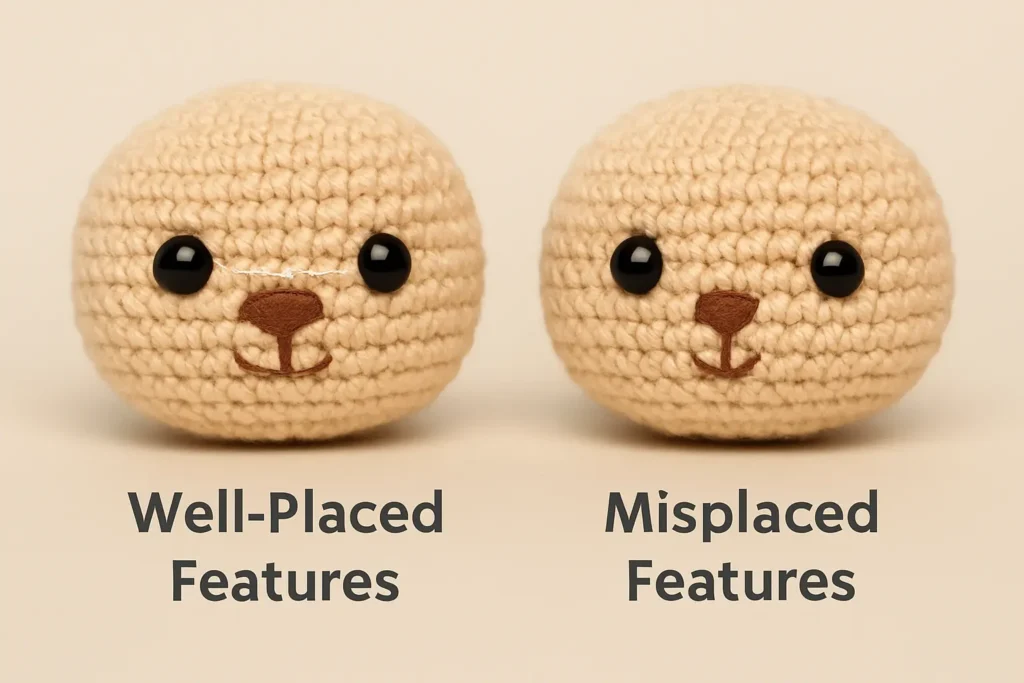
One of the most noticeable amigurumi mistakes happens during the final stages: placing the eyes, nose, or mouth unevenly. Misaligned facial features can make your adorable plushie look unintentionally off or lopsided, even if the rest of your work is flawless.
Since amigurumi is all about personality, even a slight shift in eye placement can dramatically alter the expression of your toy.
🔧 How to Fix This Amigurumi Mistake:
Before attaching safety eyes or embroidering details, use pins or stitch markers to test different placements. Step back and look at your work from a distance, or even take a photo, which helps you evaluate symmetry more easily.
Once you’re happy with the layout, only then should you secure the pieces.
✨ Pro Tip:
Always double-check proportions and balance, especially when working on animals or characters with expressive faces. Fixing facial placement early saves a lot of frustration later and avoids one of the most common amigurumi mistakes.
More Free Amigurumi Patterns You’ll Love


❌ Mistake 10: Giving Up Too Soon
One of the most underestimated amigurumi mistakes is simply giving up when things get tricky. Whether it’s a confusing pattern, a stitch that just won’t behave, or a lumpy-looking creation, many beginners walk away before realizing that amigurumi success comes with practice.
Every crocheter starts somewhere, and perfection is rarely part of the first attempt.
🔧 How to Fix This Amigurumi Mistake:
Be kind to yourself. Embrace the learning curve and understand that each project, even the “failed” ones, teaches you something valuable. Try smaller, simpler patterns first, and gradually build your skills and confidence.
Seek help in crochet forums, video tutorials, or from the amigurumi community. Mistakes are not a sign of failure; they’re a part of the process.
✨ Pro Tip:
Keep your first amigurumi project, even if it looks wonky. It’ll remind you of how far you’ve come and how much you’ve learned. That’s the beauty of avoiding the biggest amigurumi mistake of all: giving up too early.
“I once rushed a toy to finish it for a birthday and forgot to double-check the right side. The seams were backward, but my niece loved it anyway. She called it ‘Inside-Out Teddy.’”
Final Thoughts: Learning from Amigurumi Mistakes
Making amigurumi mistakes is part of every crocheter’s journey. Whether you’re a complete beginner or already working on your tenth plushie, there’s always something new to learn. Each mistake is simply a stepping stone toward mastering the art of amigurumi.
By recognizing these common issues and knowing how to fix them, you’ll avoid frustration, build better habits, and enjoy the process so much more.
🧶 Remember: the most successful crafters aren’t the ones who never make mistakes, they’re the ones who keep stitching anyway.
🧵 Ready to Keep Growing?
👉 Dive deeper into amigurumi with our beginner-friendly guide to what amigurumi is and how to get started.
You’ll find tips, tools, and beginner patterns that help you apply what you’ve learned mistake-free!
🧵 Frequently Asked Questions About Amigurumi Mistakes
❓What are the most common amigurumi mistakes beginners make?
Beginners often struggle with inconsistent tension, skipping the magic ring, using the wrong yarn weight and hook size, or misplacing facial features. These small issues can add up and make your final toy look a bit wonky, but the good news is, all of these amigurumi mistakes are fixable with a little guidance and practice.
❓Why does my amigurumi look lopsided or uneven?
This is one of the most frustrating amigurumi mistakes and usually comes from inconsistent stitch tension or using different yarn brands within one project. It could also be that the wrong side of the fabric is facing out, which changes the texture and look of your piece. Don’t worry, even my first bunny looked more like a potato!
❓How can I avoid visible gaps between stitches?
Loose stitches are a common amigurumi mistake that causes stuffing to peek through. To fix this, try using a crochet hook that’s at least 0.5 mm smaller than what your yarn label suggests. Tighter stitches = cleaner finish. It’s one of those small changes that make a huge difference.
❓Is it okay to substitute yarn in amigurumi patterns?
Yes, but with caution. One of the sneaky amigurumi mistakes is picking a yarn that doesn’t match the pattern’s weight or texture. Always match the yarn weight and make a gauge swatch first. I once used chunky yarn on a delicate pattern and ended up with a giant bear that wouldn’t fit on the shelf!
❓How important is the magic ring in amigurumi?
Super important! Skipping the magic ring is one of the top amigurumi mistakes. It often leaves a hole at the start of your piece that never quite disappears. Take the time to practice it, it’ll give your toys a polished, professional look from the very first stitch.
❓What’s the best way to fix facial features that are off-center?
This is one of those “final step” amigurumi mistakes that can ruin the whole vibe of a cute plushie. Always test the placement using pins or stitch markers before committing. And don’t forget to step back and check the symmetry — or take a photo to review from a distance.
❓Can I fix an amigurumi project that went wrong halfway through?
Absolutely! One of the most empowering lessons is that many amigurumi mistakes are reversible. You can frog (unravel) part of your work, redo sections, or even repurpose the yarn for a new creation. I’ve done it many times, it’s part of the journey.
❓What is the hardest part of amigurumi?
For most beginners, the hardest part is maintaining consistent tension while working in the round, especially with tight stitches. It takes some muscle memory to get used to! Learning the magic ring, invisible decreases, and correct facial placement also trip people up. But once you push through those early amigurumi mistakes, it becomes second nature.
❓What is the right and wrong side of amigurumi?
The right side of amigurumi is the outer side with neat, “V”-shaped stitches, it looks more textured and polished. The wrong side is bumpier and usually faces inward. Mixing them up is a subtle but common amigurumi mistake that can affect your toy’s overall look. A tip? Mark the wrong side early on with a scrap yarn or safety pin so you don’t accidentally flip your work mid-project.
❓How do I avoid holes in my amigurumi?
Tight, even stitches are the key! Use a hook slightly smaller than your yarn recommends, and don’t stretch your loops too much. Skipping the magic ring is another mistake that causes center holes. If you’ve struggled with this before, you’re not alone. Mastering this one fix can solve many frustrating amigurumi mistakes.
❓Why can I see the stuffing in my amigurumi?
If the stuffing is visible, it’s usually because the stitches are too loose. This amigurumi mistake happens when you use a hook that’s too big or your tension is too relaxed. Try using a smaller hook and firmer tension to create a denser fabric. Bonus tip: always use a stuffing color that matches your yarn, it helps hide small gaps!
1 comment
Thank you, Martha!
Your patterns are very easy to understand.
I’m working on your Labubu pattern! 🙂