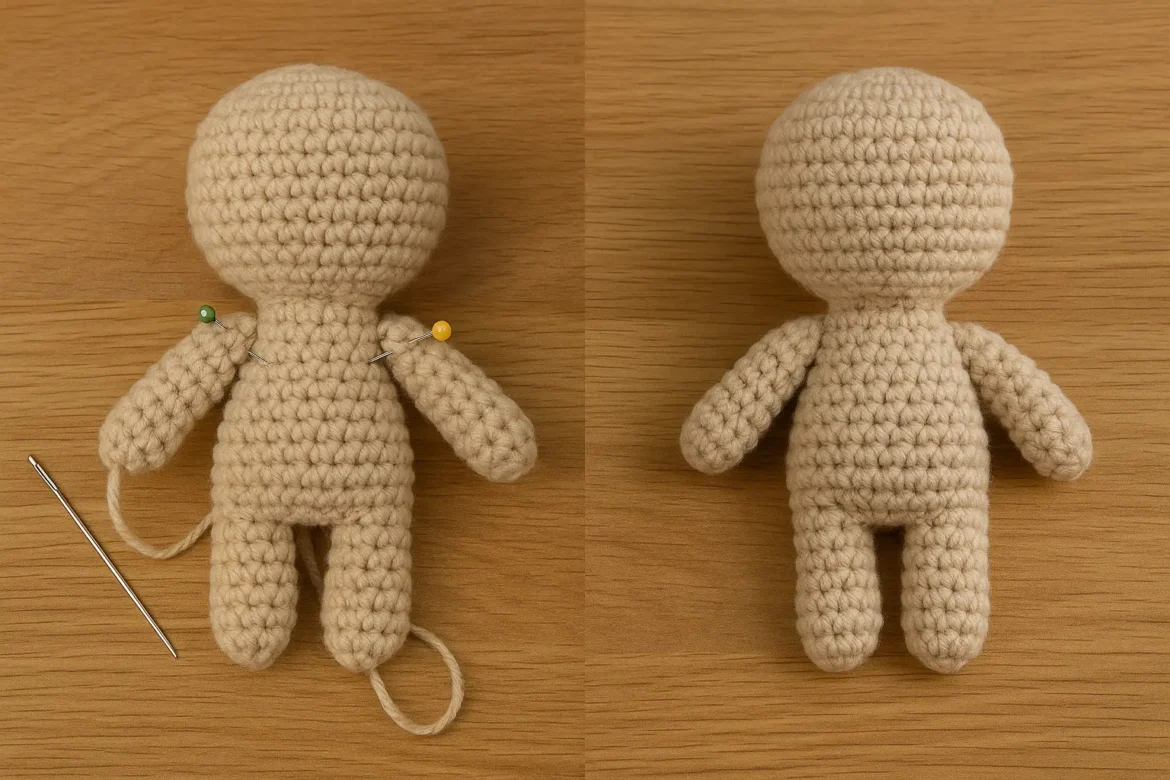
Crooked arms or wobbly legs can ruin an otherwise adorable toy. In this guide you’ll learn how to attach amigurumi limbs evenly, arms, legs, and ears, using repeatable placement rules and 7 easy attachment methods. If you’re new to plush toys, warm up with our beginner posts first: start your first amigurumi, master the magic ring vs. chain circle, and choose the right yarn weight, gauge & hook size. Then come back and use the steps below to attach amigurumi limbs evenly, no guesswork, just consistent symmetry.
External technique inspiration you can explore later: limb-attachment roundups at Pocket Yarnlings and plush-yarn sewing tips at The Friendly Red Fox (we’ll link these in the resources section near the end).
Jump to section
Placement Math That Never Lies (Fast, Repeatable Rules)
Crochet bodies are worked in rounds, so symmetry = center → mirror. Use these three micro-rules every time:
A) Find the true center (front/back)
- Pick the target round where the limb will sit.
- Fold the piece so the round touches itself; place a marker at the fold’s midpoint = front center.
- Rotate 180° to mark the back center (directly opposite).
Tip: If the body has a tail/starting point “scar,” center your fold using the smoothest arc, not the scar. Neat shaping helps, review Invisible Decrease Crochet for cleaner edges before you attach.
B) Set a balanced stitch span (the “N-rule”)
From the front center, count N stitches to the left and N to the right to place start/stop pins for each arm. Do the same on the opposite side for the second arm. Legs follow the same logic but usually sit lower and sometimes wider for balance.
Suggested spans by body circumference (at the target round):
| Circumference (C) | Typical Arm Span (N left + N right) | Typical Leg Span (N left + N right) |
|---|---|---|
| 18–24 sts | 2+2 (total 4) | 3+3 (total 6) |
| 30 sts | 3+3 (total 6) | 4+4 (total 8) |
| 36 sts | 4+4 (total 8) | 5+5 (total 10) |
| 42–48 sts | 4–5 per side (8–10 total) | 6 per side (12 total) |
How to use it: If C=30 and you choose arm span total 6, count 3 stitches left and 3 right from the front center and pin those as your start/stop landmarks. Mirror the exact counts on the back side before attaching.
Want a quick rehearsal? Grab a small cylinder (24-st round) and test pins on the Mini Potted Puff Flower body or any tiny practice base. A 24-st round works nicely with 2+2 for arms and 3+3 for legs.
C) Mirror counts before you commit (the “ladder check”)
- Between the two arm pins on the left, count the stitches (e.g., 6).
- Between the two arm pins on the right, the count must match (6).
- Check that both arm tops sit on the same round number. If one pin drifted up/down a round, re-pin now.
- Repeat for legs and for ears (ears usually sit a touch behind the vertical center for a natural look).
Seated vs. Standing Placement (quick offsets)
- Standing toys: Legs sit a bit higher and closer to the center for a vertical stance.
- Seated toys: Legs sit lower and wider. If the feet are meant to lie flat, choose the larger leg span from the table and pin slightly lower by 1 round.
- Try this in practice on Crochet Frog Keychain (seat stance) vs. the Leggy Frog (dangly stance).
Sanity Math (30 seconds)
- If your body increased by +6 per round during shaping, placements that align with multiples of 6 often look most centered.
- For very small bodies (C ≤ 24), choose the smaller arm span (2+2) so limbs don’t crowd the face.
- For plush/chenille, spans look bigger visually, if in doubt, drop span by one stitch per side and rely on a clean seam (we’ll show you how).
If you’re still building confidence with shaping and round counting, keep What Is Amigurumi? and How to Read an Amigurumi Pattern open while you place pins. They’ll help you track rounds and stitch math cleanly so you attach amigurumi limbs evenly every time.
Quick Wins (practice now)
- Arms/Ears: Pin spans on the Amigurumi Duck Keychain wings/ears to see how tiny spans change the expression.
- Legs: Test seated placement on Swinging Duck or Crochet Macaron (as mock legs), then attach for real on your next plush.
The 7 Attachment Methods (step-by-step + when to use which)
Below are the most reliable ways to attach amigurumi limbs evenly. Each mini-tutorial uses the fold-and-mirror rules from Part 2 so your arms, legs, and ears line up perfectly.
Whip Stitch (classic, fast)
Best for: cotton/acrylic yarns, quick finishing
You’ll get: sturdy seam, slightly visible edge if tension is tight
Steps
- Mark center + pin your start/stop landmarks (Part 2).
- Thread a long tail from the limb.
- Place the limb on the body; insert needle from body → limb edge; pull snug.
- Repeat around, always catching one body stitch and the next limb edge “V”.
- Mirror count: confirm the same number of bites on left/right limbs.
- Secure with two small backstitches, bury tail deep.
Pros: fast, beginner-friendly.
Cons: seam can show on smooth cotton if you pull too tight.
Fix: use even tension; angle stitches slightly inward.
Practice on: wings/fins of the Amigurumi Duck Keychain or Lucky Rainbow Koi.
Mattress/Ladder Stitch (nearly invisible)
Best for: smooth cotton where you want a seamless look
You’ll get: flat, invisible join if you bite under the edge loops
Steps
- Pin landmarks.
- With a matching yarn, take tiny horizontal bites under the outer loops of body and limb edges (don’t pierce the full stitch).
- Alternate left/right like “rungs of a ladder.”
- Every 3–4 rungs, snug the yarn; the seam zips closed.
- Mirror count stitches; finish with an invisible knot, bury tail.
Pros: invisible, very neat.
Cons: slower than whip stitch; needs patience.
Tip: perfect for attaching ears where tilt is obvious.
Practice on: ears for Amigurumi Bunny.
Button Joint (moveable, secure)
Best for: larger toys; when you want arms/legs to rotate
You’ll get: mobility + strong core through the body
Steps
- Choose two flat buttons slightly larger than your limb opening.
- Thread strong yarn through a long doll needle.
- Path: button → limb → body (through to the other side) → limb → button.
- Repeat the path 2–3 times, staying on the same round.
- Tighten gradually until limbs move but don’t wobble; tie surgeon’s knot under one button; bury tails.
Pros: durable, adjustable movement.
Cons: visible buttons; not ideal for baby toys.
External how-to reference: a classic walkthrough is here: My Scrappy Ideas (button joints):
Practice on: Loaf Cat arms for posable vibes.
Yarn-Through (thread joint, no hardware)
Best for: plush/chenille; baby-safe (no buttons)
You’ll get: rotation with a hidden thread path
Steps
- Use contrast smooth yarn (not plush) for the joint line, cleaner, less shedding.
- Long needle path: limb A → body (straight line) → limb B → back through body to limb A.
- Repeat 2–3 passes on the same round; snug evenly so limbs rotate but stay centered.
- Secure with two opposing knots inside a limb; bury tail.
Pros: movable limbs, hidden hardware, great for plush.
Cons: needs a steady hand to keep the path truly horizontal.
External tips: The Friendly Red Fox discusses yarn-through & plush handling:
Practice on: plush versions of Free Whale fins (scaled down).
Join-As-You-Crochet (single crochet through both)
Best for: no-sew finishers; sturdy everyday toys
You’ll get: locked seam; clean look if counts are mirrored
Steps
- Stop crocheting the body exactly where the limb should attach.
- Pin limb top between your start/stop markers.
- Work sc through body stitch + limb stitch together, stitch-for-stitch across the span.
- Continue body round; check that opposite limb uses the same span on the same round.
- Weave any small gaps closed with the tail.
Pros: no sewing, very strong.
Cons: you must plan placement while the body is open.
External example: Jess Huff shows attach-as-you-go concepts in loop-stitch projects; same idea applies to SC joins:
Practice on: Crochet Frog Keychain arms.
Join-As-You-Crochet (loop-stitch variant)
Best for: furry/loop-stitch bodies where sewing shows
You’ll get: hidden join within the texture
Steps
- Mark the span as usual.
- Replace the SC joins with your loop stitches, but still catch both fabrics (body + limb) each stitch.
- Keep loop size consistent to avoid a lumpy shoulder.
- After the span, resume normal loops around the body.
Pros: seamless in fluffy textures.
Cons: harder to see stitches—double-check you’re catching both pieces.
External example (context): see Jess Huff loop-stitch tutorials.
Practice on: fluffy variants of Amigurumi Owl wings.
Surface-Crochet Attach (stylized, minimal sewing)
Best for: small decorative limbs/ears; when you want a “grown from body” look
You’ll get: limbs that look integrated with the body surface
Steps
- With body complete, place pins to outline where the limb sits.
- Surface-slip-stitch a short chain/arc to anchor the top edge.
- Work surface-SC (or SS) across your pinned span, gently “building” the attachment line.
- Optionally, crochet a tiny tube from that line to form a nub/ear, then sew the free edge.
Pros: ultra-clean for tiny parts, near no-sew.
Cons: not ideal for heavy limbs.
External overview: Pocket Yarnlings discusses surface/“seamless” styles among other methods:
Practice on: small ears for Molly the Octopus accessories or mini horns on Realistic Snake variants.
Mini Comparison (choose your method quickly)
| Method | Skill | Speed | Seam Visibility | Mobility | Best For |
|---|---|---|---|---|---|
| Whip stitch | Beginner | Fast | Low–Med | Fixed | Cotton/acrylic, wings |
| Mattress/ladder | Beginner+ | Medium | Low (best) | Fixed | Ears/arms where seam must vanish |
| Button joint | Intermediate | Medium | Button shows | Moveable | Larger toys, display pieces |
| Yarn-through joint | Intermediate | Medium | Hidden | Moveable | Plush/chenille, baby-safe (no hardware) |
| Join-as-you-SC | Beginner+ | Fast | Low | Fixed | No-sew fans, sturdy play toys |
| Join-as-you-Loop | Intermediate | Med | Hidden in texture | Fixed | Furry bodies/loop stitch |
| Surface-crochet | Intermediate | Med | None (integrated) | Fixed | Tiny stylized parts |
Common Mistakes (and fixes to keep limbs even)
- One limb higher than the other: You switched rounds mid-span. Re-pin so both tops sit on the same round, then re-attach.
- Shoulders look bulky: Over-tight whip stitches. Use mattress stitch or reduce tension.
- Wobble on plush: Use yarn-through joint with 2–3 passes and snug gradually.
- Tilted ears: Ears should sit slightly behind the vertical midline; mirror counts left/right before sewing.
- Visible gaps: After any join-as-you-go, use tail to ladder-stitch tiny gaps shut.
Helpful links while you work
- Smooth shaping for neater seams: Invisible Decrease
- Counting rounds accurately: (pair this guide with your upcoming counting-rounds article)
- Quick practice bases: Mini Potted Puff Flower, Crochet Macaron, Free Whale
Plush/Chenille Special Handling (clean seams, zero shed)
Plush yarn is gorgeous but unforgiving. These tweaks make it easy to attach amigurumi limbs evenly on fluffy fabric without fuzz explosions.
A) Sew with smooth contrast yarn
Instead of sewing with the same plush strand, thread a smooth worsted yarn (matching color) in a long doll needle. It slides cleanly, bites consistently, and helps you attach amigurumi arms and attach amigurumi legs without tearing the chenille core.
B) Pre-compress the seam line
Before you stitch, pinch the body where the limb will sit to lightly compress stuffing. This creates a shallow channel so your whip or mattress stitches sink in and the ears/arms don’t balloon. It’s a tiny step that keeps limbs level and helps you attach amigurumi ears evenly.
C) Shorter bites, shallow angles
Use short, shallow bites (slanting slightly inward) instead of big vertical stabs. You’ll avoid “snag trenches” and keep the limb top perfectly horizontal, critical when you want to attach amigurumi limbs evenly across both sides.
D) Yarn-through joint for moveable plush limbs
If you want rotation without buttons, run a yarn-through joint (2–3 passes on the same round) and snug gradually until the arms/legs sit firm but swivel. This is the plush-friendly path to attach amigurumi arms that can pose while staying symmetrical.
Practice on: a plush version of the Free Whale (test fins), or add fuzzy wings to the Amigurumi Owl to master shallow bites.
Tip: If seams still peek through, switch to mattress/ladder stitch and keep tension even. For shaping that supports neat joins, review Invisible Decrease Crochet.
Seated vs. Standing Placement (natural posture without guesswork)
Getting posture right is half the battle when you attach amigurumi limbs evenly.
Standing toys (vertical balance)
- Place legs one round higher and slightly closer to the center line than you think.
- If the toy tilts, reinforce with a second hidden yarn-through pass across the hips so both legs lock to the same horizontal axis.
Seated toys (stable sit)
- Drop legs one round lower and widen the span by 1 stitch per side (see the table from Part 2).
- For “flat feet” poses, pin the front edge of the foot slightly angled forward before sewing—this keeps both soles level and helps you attach amigurumi legs that sit naturally.
Ears and facial balance
- Most heads look best when ears sit a hair behind the vertical midline. Mirror counts from the crown center and keep left/right differences ≤1 stitch to attach amigurumi ears evenly.
Try it now: Compare a seated look on Crochet Frog Keychain vs. a standing/dangly look on Leggy Frog. You’ll feel how span and round choice change posture while you still attach amigurumi limbs evenly.
Troubleshooting Gallery (quick fixes that actually work)
Use these before/after checks whenever something feels off. They double as a final audit to attach amigurumi limbs evenly every time.
1) One arm higher than the other
Why: You drifted up/down a round mid-span.
Fix: Re-pin so both arm tops sit on the same round number; re-stitch the 3–5 offending bites. Do a mirror count across start/stop pins.
2) Bulky shoulders on plush
Why: Bites are too deep; tension too high.
Fix: Switch to mattress stitch with shallower bites; compress the seam line first; sew with smooth yarn. Now attach amigurumi arms again with even tension.
3) Wobbly legs (hip wobble)
Why: Single pass joint or loose seam.
Fix: Add a second yarn-through pass on the same round; snug gradually from both ends. Check that both legs share one perfectly horizontal axis to attach amigurumi legs that don’t swing unevenly.
4) Ears tilt forward
Why: Placed on or ahead of the vertical midline.
Fix: Shift 1 stitch behind the midline and re-sew with mattress stitch. Mirror counts from the center top to attach amigurumi ears evenly.
5) Visible gaps at the join-as-you-go seam
Why: Missed a stitch or loose crossover.
Fix: Ladder-stitch the gap with the tail. If using loop stitch bodies, re-work the loops in the span so the texture hides the seam and you still attach amigurumi limbs evenly.
Quick practice swatches (confidence boosters)
- 24-st cylinder drill: Pin a 3+3 arm span and a 4+4 leg span; attach with mattress stitch on one side and join-as-you-SC on the other. You’ll see exactly how counts preserve symmetry.
- Plush patch: On a small fuzzy swatch, run the yarn-through joint twice, then a third pass if needed; adjust snugness until rotation is smooth and level.
Great test patterns on your site:
- Arms/wings: Amigurumi Duck Keychain, Lucky Rainbow Koi
- Legs/posture: Swinging Duck, Crochet Macaron (mock legs)
- Ears/balance: Amigurumi Bunny
FAQs about How to Sew Amigurumi Pieces
What’s the easiest way to attach amigurumi limbs evenly if I’m a total beginner?
Use the fold–center–mirror routine: mark the center stitch on the target round, count a balanced span (e.g., 3+3 on a 30-st round), pin start/stop landmarks, and then mattress stitch edge-to-edge. This keeps you on one round and helps you attach amigurumi limbs evenly with minimal fuss. Practice on the Mini Potted Puff Flower first.
How do I attach amigurumi arms with a no-sew method?
Pause the body where the arm sits, pin your span, and single crochet through both layers (body + arm) across the span. Resume the body round. This “join-as-you-crochet” method locks placement so you attach amigurumi arms symmetrically on the same round. See 3.5 above.
How do I attach amigurumi legs so the toy can sit without wobbling?
Drop the legs one round lower and widen the leg span by 1 stitch per side. If there’s hip wobble, add a second yarn-through pass on the same round so both legs share a perfectly horizontal axis. This helps you attach amigurumi legs that sit naturally.
What’s the cleanest seam for ears so they don’t tilt?
Use mattress/ladder stitch with shallow bites just under the outer loops; place ears slightly behind the vertical midline. Mirror counts left/right to attach amigurumi ears evenly. If the ear leans, move it back by 1 stitch and re-zip the seam
Best method for plush/chenille when sewing makes a mess?
Sew with smooth contrast yarn (not plush), take short, shallow bites, and consider a yarn-through joint for gentle rotation. This combo lets you attach amigurumi limbs evenly on fuzzy fabric without shredding the chenille.
How do I fix limbs that are already crooked without redoing everything?
Snip only the last 3–5 stitches of the seam, lift them out with a needle, re-pin the landmarks on the same round, and resew that segment. Finish with a tiny ladder stitch to close any gap.
Quick Picks (choose a method in 10 seconds)
- Fast & neat (fixed): Mattress/ladder stitch → best to attach amigurumi limbs evenly with minimal seam.
- No-sew (fixed): Join-as-you-SC → sturdy, great for play toys.
- Moveable (no hardware): Yarn-through joint → plush-friendly rotation.
- Moveable (hardware): Button joint → adjustable but buttons show (not baby-safe).
- Furry bodies: Join-as-you-Loop → hides the join in texture.
- Tiny decorative parts: Surface-crochet attach → stylized, near no-sew.
For shaping that supports clean joins, keep these open:
Try It Now
- Arms/wings: Amigurumi Duck Keychain, Lucky Rainbow Koi
- Legs/posture: Swinging Duck, Leggy Frog
- Ears/balance: Amigurumi Bunny
New? Start here: First Amigurumi Step-by-Step Guide and Yarn Weight, Gauge & Hook Size Guide, then come back to attach amigurumi limbs evenly like a pro.


