


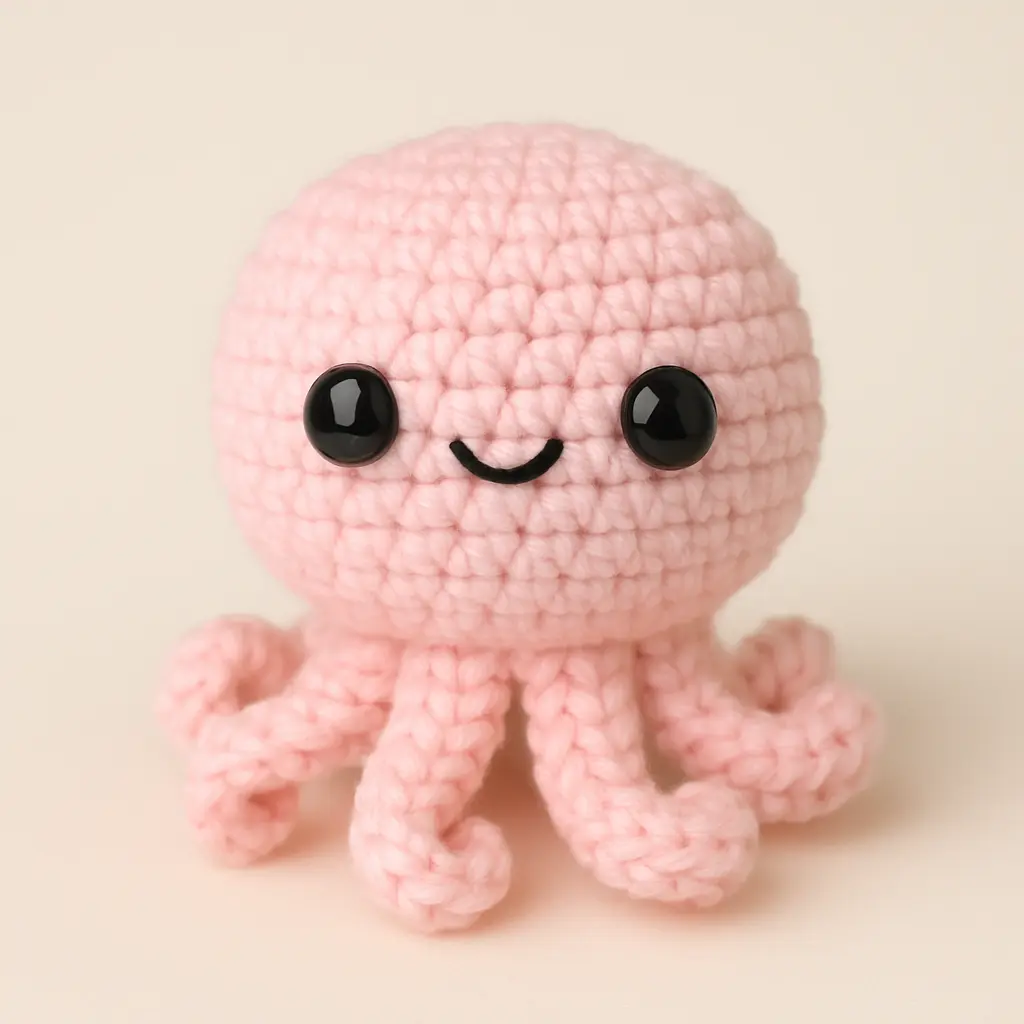
There’s something irresistibly sweet about creating a tiny, squishy octopus that fits in the palm of your hand. When I first designed Molly the Octopus, it was for my granddaughter’s ocean-themed nursery. I wanted something playful yet soft, cheerful but huggable, and Molly the Octopus turned out to be all that, with her little curl-up tentacles and gentle smile.
Whether you’re a beginner dipping your hook into your first project or a seasoned yarn wizard looking for a fast, heartwarming make, this Molly the Octopus tutorial will be your new favorite. We’ll walk through each step together, and by the end, you’ll have your own little sea buddy perfect for keychains, mobiles, or just to sit on your desk and make you smile.
Jump to a section
The Crochet Moment That Started It All
It all began with a bag of pastel yarn I’d stashed away the soft kind you save for something special. My youngest granddaughter, Lily, had asked for “a sea creature with curly legs.” That was all the inspiration I needed. A few cozy evenings, some trial stitches, and Molly the Octopus was born.
She’s round, a little chubby, and her tentacles curl like they’re ready to dance. What didn’t I expect? How quickly she’d become everyone’s favorite! Every time someone saw her at craft fairs, baby showers, or even just perched on my shelf, they asked for the pattern.
That’s when I added the free Molly the Octopus pattern to TopAmigurumi.com, next to reader-loved posts like the Amigurumi Bunny Free Pattern. It felt like the right home for her.
Now, she’s yours to create too.
Why This Pattern Is a Beginner’s Favorite
One reason Molly the Octopus is so beginner-friendly is her simplicity. If you’ve never made an amigurumi octopus before, this is the one to try. The body builds up in easy rounds, and the tentacles? They’re a magical chain stitch that transforms into spirals almost instantly.
She’s also a blank canvas for creativity. Crochet her in lavender, blush pink, or even rainbow pastels. Add sleepy embroidered eyes or shiny black safety eyes. She’s been a nursery toy, a bag charm, even a smiling desk companion.
For total beginners, I highly recommend pairing this with our how-to guide for first amigurumi projects. It walks you through magic rings, stitch counts, and assembly.
The joy of finishing your own Molly the Octopus is something I truly hope you’ll experience.
How to Crochet Molly the Octopus (Step-by-Step Pattern Inside!)
If you’ve gathered your yarn and are itching to get started, you’re in the right place. This part of the Molly the Octopus tutorial walks you through everything from tools to the final stitch of her little head.
Supplies You’ll Need + Yarn & Hook Tips
Before we dive into the crochet magic, here’s what I used for my version of Molly the Octopus a soft, pastel-colored cutie just under 4 inches tall:
| Item | Description |
|---|---|
| Yarn | Light pink or lavender (main), white (underside), black (eyes) |
| Crochet Hook | 2.5 mm (adjust to match your yarn weight) |
| Safety Eyes | 6 mm size (or embroider with thread for baby safety) |
| Stuffing | Polyester fiberfill (light but firm) |
| Yarn Needle | For sewing tentacles and the underside |
| Stitch Marker | Optional, but very handy for tracking rounds |
👉 If you’re unsure about yarn categories, check out our Beginner’s Guide to Yarn Weight, Gauge & Hook Size. It’ll help you make the right match!
This pattern works beautifully with sport-weight cotton blends like YarnArt Jeans or Alize Cotton Gold. You want something soft but structured so the head keeps its round shape.
Step-by-Step: Head, Body & Tentacles Explained
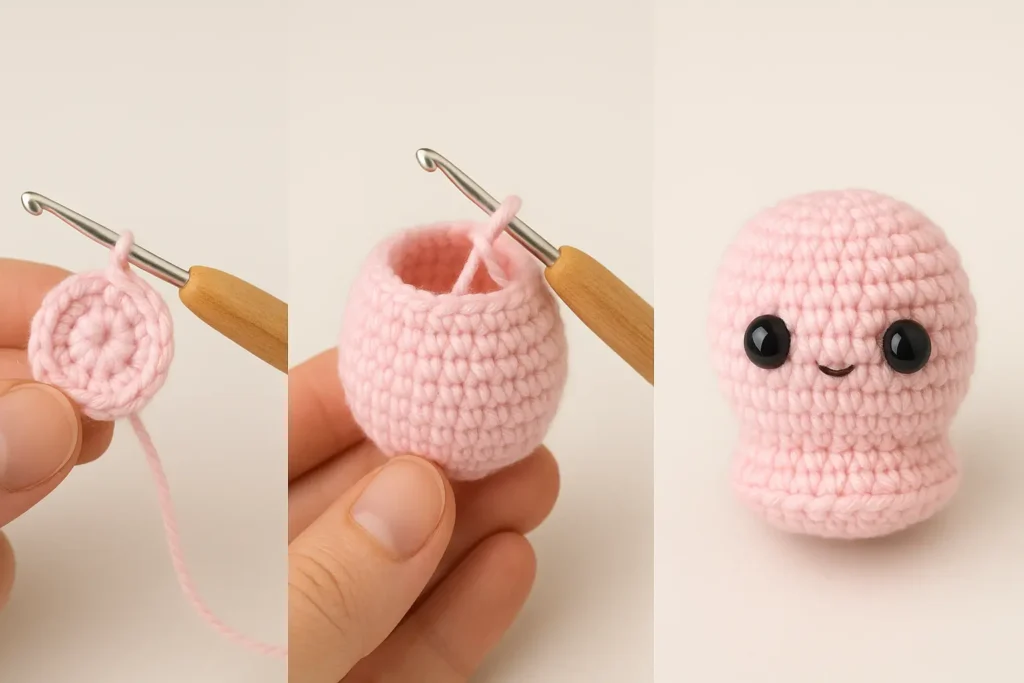
We’re building Molly the Octopus from the top down. The head and body are worked in one piece, then we’ll add the tentacles.
🧠 Head & Body (worked in one piece)
Using your main color (light pink or lavender):
- Round 1: Magic ring, 6 sc into ring → (6 sts)
- Round 2: inc ×6 → (12 sts)
- Round 3: (sc, inc) ×6 → (18 sts)
- Round 4: (2 sc, inc) ×6 → (24 sts)
- Round 5: (3 sc, inc) ×6 → (30 sts)
- Rounds 6–12: sc in each st → (30 sts)
- Round 13: (3 sc, dec) ×6 → (24 sts)
- Round 14: (2 sc, dec) ×6 → (18 sts)
- Round 15: (sc, dec) ×6 → (12 sts)
- Stuff with fiberfill
- Round 16: dec ×6 → (6 sts)
Fasten off, weave the end through the front loops, and pull to close.
📍Pro Tip: Insert 6–8 mm safety eyes between rounds 10 and 11 before stuffing for easier placement. If this is your first time adding safety eyes, you might also want to read How to Read an Amigurumi Pattern it’s full of beginner-friendly visuals.
✂️ Stitch a simple smile with black embroidery floss to bring Molly to life.
🦑 Tentacles (Make 8)
You can use the same yarn as the body or mix pastel tones for a colorful touch:
- Chain 16
- Starting in the 2nd chain from the hook: work 2 sc in each stitch across (this will make them curl up adorably) → approx. 30 sts
- Fasten off, leave a long tail for sewing
💡 Optional Variation: For thicker tentacles, try 3 sc per chain, they’ll puff out even more!
After you’ve crocheted 8 tentacles, give them a quick twist to encourage the curl if needed. Don’t worry if they aren’t identical. Molly’s charm lies in her handmade squishiness.
That’s it for the body and legs, easy, quick, and super satisfying. And you’ve now completed the most important parts of Molly the Octopus.
Finishing Touches & Custom Add-Ons for Molly the Octopus
You’ve made the squishy head, shaped those adorable spiraled tentacles, now it’s time to bring Molly the Octopus to life with some final assembly and creative flair. This part will guide you through sewing, customizing, and adding personality to your little sea cutie.
Attaching Tentacles & Underside Tips
To start, lay your finished head/body on a flat surface with the closed bottom facing up. Arrange the 8 tentacles in a circle, spacing them evenly around the base.
There are two ways to attach them:
- Sewing Method:
Use a yarn needle to sew each tentacle to the outer loops of the final round of the body. Make 1–2 secure stitches per tentacle using the long tail you left during fastening off. - Weaving Method:
Thread the tail through the stitch hole, knot it securely inside, and hide the yarn end. This method is quicker and works great for decorative or display plushies.
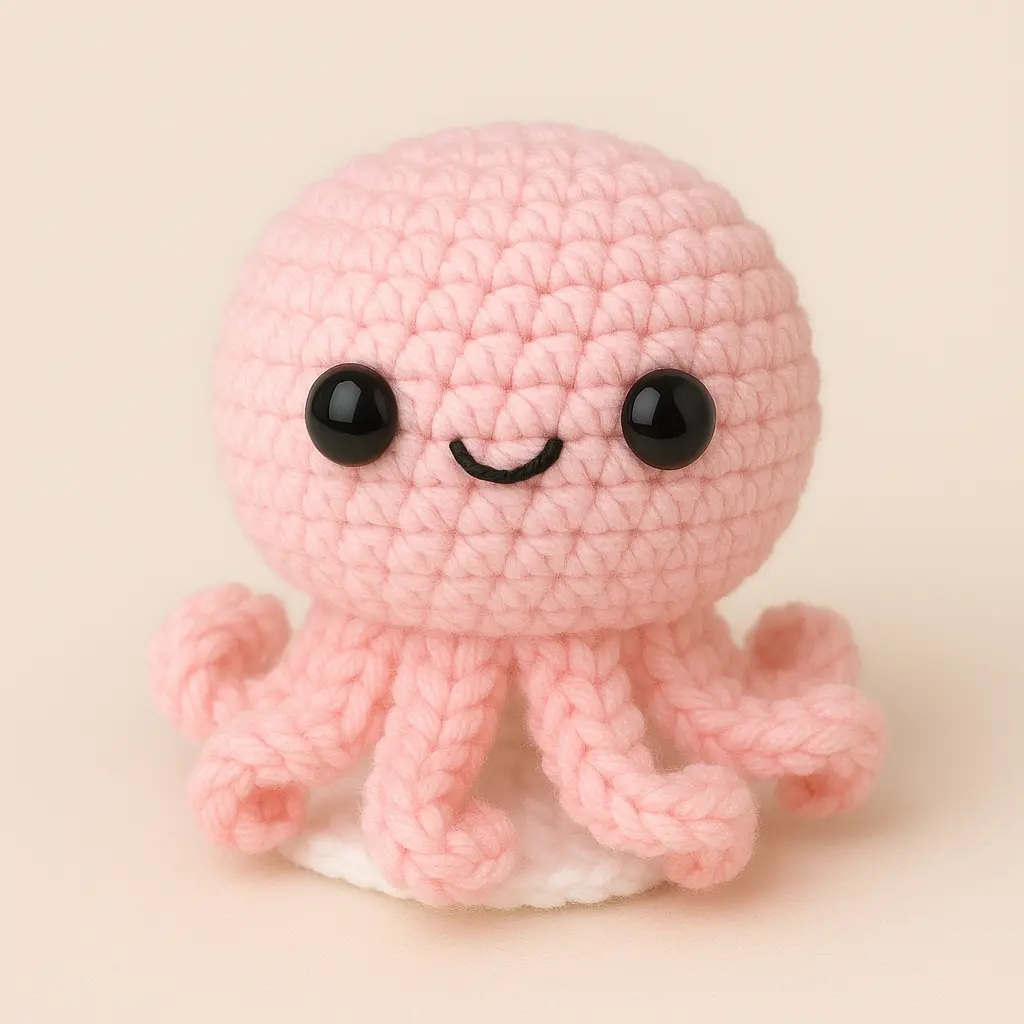
Optional but highly recommended: stitch on the white underside circle for a polished finish. It gives Molly the Octopus a clean look, especially if she’s going to be flipped around by little hands or attached to a keychain.
🧼 Underside Pattern (Crochet or Felt)
Using white yarn:
- Round 1: MR, 6 sc → (6 sts)
- Round 2: inc ×6 → (12 sts)
- Round 3: (sc, inc) ×6 → (18 sts)
- Round 4: (2 sc, inc) ×6 → (24 sts)
- Fasten off, leave a tail
Position the circle inside the tentacle ring and sew it using a ladder stitch for an invisible join. If you’d prefer a faster route, cut a 3.5–4 cm white felt circle and attach it underneath with fine hand-stitching or glue (if not for babies).
Need more amigurumi finishing help? Visit our guide on Top 10 Amigurumi Mistakes to Avoid to keep things neat and frustration-free.
Fun Customizations for Molly the Octopus
One of the reasons crocheters love this octopus amigurumi pattern is how easy it is to personalize. A few fun tweaks can make every Molly unique:
- 🎀 Mini Bow: Crochet a tiny bow or use a ribbon to sew on the side of Molly’s head.
- 💗 Heart Patch: Add a small heart to the front using contrasting yarn or felt.
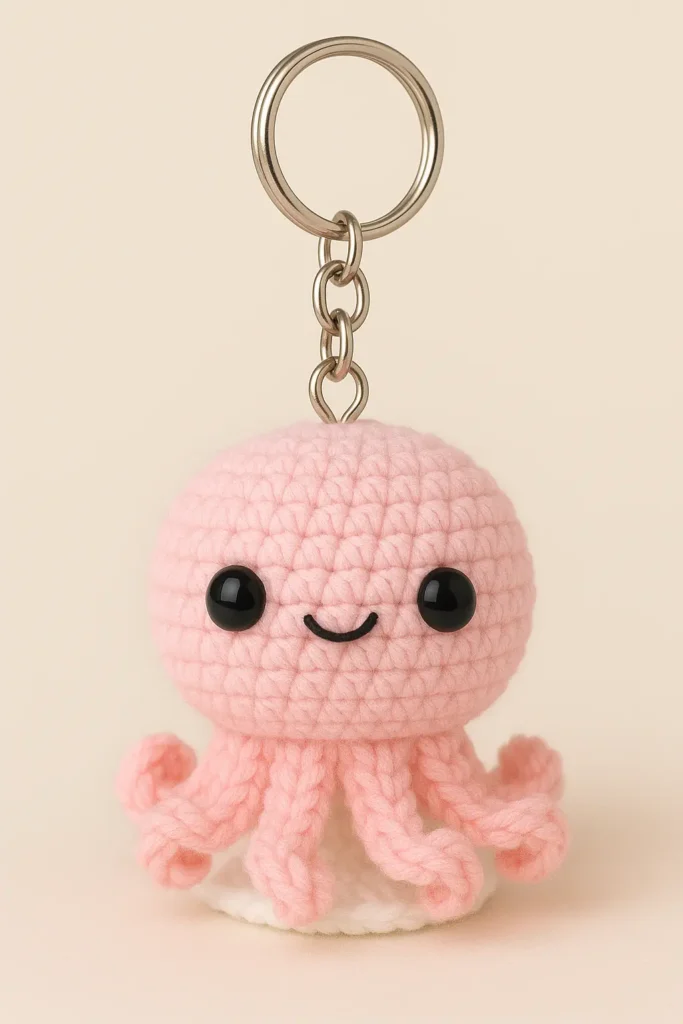
- 🔄 Keychain Option: Before closing the head, loop a bit of sturdy yarn or thread on top for hanging. She makes a darling addition to backpacks and diaper bags.
- 💤 Face Style: Embroider sleepy eyes, happy eyes, or even add tiny lashes for extra cuteness.
- 🌈 Rainbow Tentacles: For a colorful twist, use a different pastel shade for each tentacle. Kids absolutely love this version!
If you’re in the mood to expand your sea-themed collection, you might also enjoy our Amigurumi Owl Free Pattern, which pairs perfectly with Molly on a nursery shelf.
You’ve now got a fully assembled Molly the Octopus, full of personality, softness, and whimsy. Whether you’re gifting her or keeping her for yourself, she’s sure to bring smiles wherever she goes.
FAQs About Amigurumi Molly the Octopus Tutorial
Let’s answer some of the most common questions people ask before starting this cute little project. These are based on what crafters like you are searching for on Google right now.
How long does it take to crochet Molly the Octopus?
For most crocheters, Molly takes about 1.5 to 2 hours. It’s a quick and satisfying project, especially if you’ve done basic amigurumi before. Beginners might need a little longer, especially when sewing tentacles evenly.
Can I make Molly the Octopus with plush yarn?
Yes, but plush yarn makes her larger and slightly harder to control for newbies. Stick with cotton or a light sport-weight yarn if you’re new to crocheting small plushies.
More Free Amigurumi Patterns You’ll Love


")
")
Is Molly safe as a baby toy?
If you skip the safety eyes and embroider them instead, Molly the Octopus is a great choice for babies just ensure all pieces are securely stitched and there are no loose ends.
How do I keep the tentacles curly?
Tentacles naturally curl when you do 2 or 3 single crochets per chain stitch. If they ever flatten after play or storage, just twist them gently back into shape.
Final Thoughts: Your New Favorite Sea Buddy
Making Molly the Octopus feels like stitching joy into yarn. She’s a small project with big personality — one that delights everyone from toddlers to grandmas. Whether you’re gifting her to a loved one or keeping her near your work desk, her tiny curls and soft, round shape are always welcome.
“If you enjoyed making Molly the Octopus, you might also like this octopus crochet pattern by DenizasToysJoys — a charming alternative design loved by many amigurumi fans.”
If this pattern made you smile, you might also love our Free Crochet Labubu Pattern — another fan favorite full of charm and easy steps.
📌 Follow me on Pinterest for daily pin-worthy amigurumi tips, free patterns, and adorable project inspiration:
👉 TopAmigurumi on Pinterest
✍️ For more stories behind the stitches and behind-the-scenes crochet moments, find me on Medium:
👉 Follow TopAmigurumi on Medium
Happy stitching, and don’t forget to tag me if you post your Molly. I’d love to see what yours looks like!