


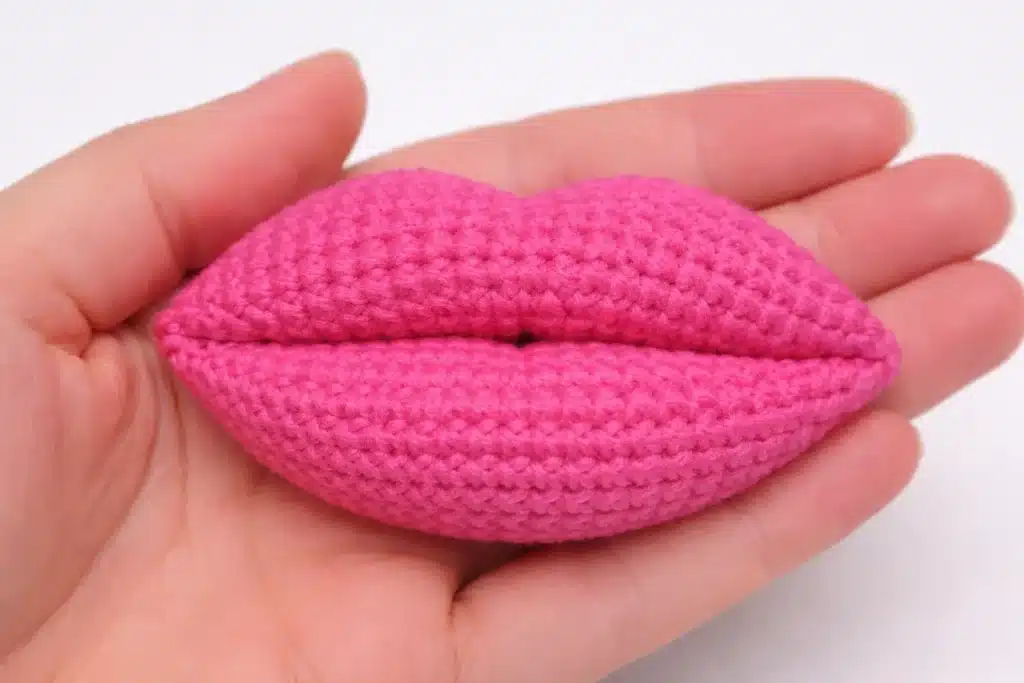
If you’re looking for a crochet lips pattern for Valentine’s Day, this puffy 3D lips prop is the ultimate “kiss” project: quick, cute, and super photogenic. You can use it as a Valentine photo prop, gift topper, garland accent, or even turn it into a keychain/brooch with a small hardware add-on.
Valentine idea: pair these lips with our crochet heart pattern (Angel & Devil version) for a themed set.
Jump to section
Materials for This Crochet Lips Prop
Skill Level
Beginner–Intermediate (simple shaping using increases and decreases)
Yarn & Colors
- Yarn weight: DK / Light Worsted (Category 3) or Sport (Category 2)
(Smooth cotton or a cotton-blend gives a clean stitch look.) - Color: Hot Pink / Bright Pink (same color for both lips)
✅ Tip for bigger lips: If you use thicker yarn, your lips will be larger and extra puffy. If you’re unsure about sizes, check our yarn weight, gauge, and hook size guide.
Hook
- 2.5 mm – 3.0 mm (tight stitches recommended)
- DK yarn: 2.75 mm
- Sport yarn: 2.5 mm
Other Supplies
- Polyester fiberfill stuffing
- Yarn needle
- Scissors
- Stitch marker
Crochet Abbreviations (US)
- MR = magic ring
- sc = single crochet (need a refresher? see how to single crochet)
- inc = increase (2 sc in same stitch)
- dec = decrease (sc2tog)
If you prefer an official abbreviation reference, the Craft Yarn Council has a standard list: crochet abbreviations.
Notes Before You Start
- Work in continuous rounds (don’t join unless you want to).
- Keep your tension tight so stuffing doesn’t show.
- Stuff lightly for a realistic “soft kiss” shape.
- New to MR? This guide helps a lot: magic ring vs chain circle.
3D Crochet Lips Pattern (Prop Version)
A) Upper Lip (Pink)
R1: MR, 6 sc (6)
R2: (sc 2, inc) x2 (8)
R3: (sc 3, inc) x2 (10)
R4: (sc 4, inc) x2 (12)
R5: (sc 5, inc) x2 (14)
R6: (sc 6, inc) x2 (16)
R7: (sc 7, inc) x2 (18)
R8–R9: sc 18 (18) (2 rounds)
R10: dec, sc 16 (17)
R11: dec, sc 15 (16)
R12: dec, sc 12, dec (14)
R13: inc, sc 12, inc (16)
R14: inc, sc 15 (17)
R15: inc, sc 16 (18)
R16–R17: sc 18 (18) (2 rounds)
R18: (dec, sc 7) x2 (16)
R19: (dec, sc 6) x2 (14)
R20: (dec, sc 5) x2 (12)
R21: (dec, sc 4) x2 (10)
R22: (dec, sc 3) x2 (8)
R23: (dec, sc 2) x2 (6)
Fasten off, stuff lightly, then close by threading through the front loops of the last 6 stitches and pulling tight. Weave in the end.
If you want cleaner shaping on the decreases, use an invisible decrease technique (it reduces bumps and makes the lips look smoother): invisible decrease crochet.
B) Lower Lip (Pink)
R1: MR, 6 sc (6)
R2: (sc 2, inc) x2 (8)
R3: (sc 3, inc) x2 (10)
R4: (sc 4, inc) x2 (12)
R5: (sc 5, inc) x2 (14)
R6: (sc 6, inc) x2 (16)
R7: (sc 7, inc) x2 (18)
R8–R14: sc 18 (18) (7 rounds)
R15: (dec, sc 7) x2 (16)
R16: (dec, sc 6) x2 (14)
R17: (dec, sc 5) x2 (12)
R18: (dec, sc 4) x2 (10)
R19: (dec, sc 3) x2 (8)
R20: (dec, sc 2) x2 (6)
Fasten off, stuff lightly, close the same way — but leave a long tail for sewing.
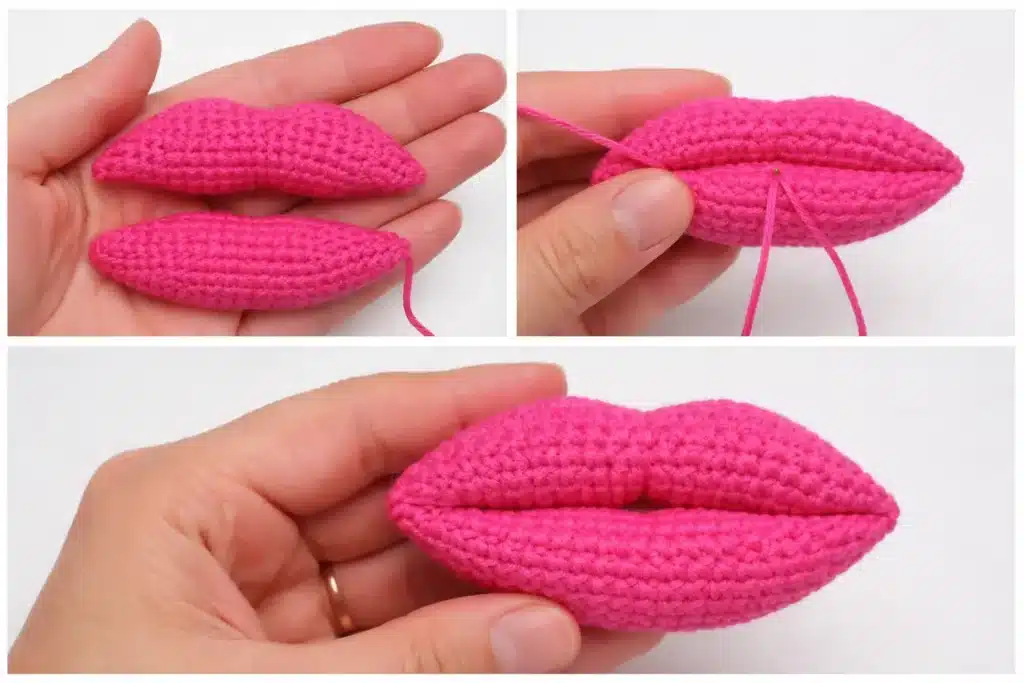
C) Assembly (Realistic Lip Crease)
- Place the upper lip on top of the lower lip and align the ends.
- Using the long tail, sew along the “mouth line” with small whip stitches (catching outer loops helps hide the seam).
- Add 2–4 tight tack stitches in the center to create the realistic lip crease.
✅ Shaping tip: After sewing, pinch the center slightly and add one extra tiny tack stitch if you want a deeper Cupid’s-bow effect.
Quick Size Notes
- Sport + 2.5 mm: smaller, neat stitches
- DK + 2.75 mm: classic puffy prop size
- Worsted #4: jumbo lips (extra plush Valentine décor)
Customizations, Size Options, and Valentine Uses
Now that you’ve crocheted the upper lip and lower lip, let’s make your crochet lips pattern for Valentine’s Day look even more realistic with small tweaks (no new pattern — same base you already have).
1) How to Get the Perfect “Puffy Kiss” Shape
This lips prop looks best when it’s soft and rounded, not overstuffed.
- Stuff lightly at first, then close.
- After closing, use your fingers to shape the curve: push a bit more stuffing toward the center and smooth the edges.
- If your stitches show stuffing, switch to a smaller hook or tighten tension. (This is especially important with DK yarn.)
If you want to understand why hook size changes the final shape so much, our yarn weight, gauge, and hook size guide explains it clearly.
2) Size Guide (Without Changing the Pattern)
You can keep the exact same stitch counts and change only yarn/hook to control size:
- Sport yarn + 2.5 mm hook → small, neat lips (great for small props)
- DK yarn + 2.75 mm hook → classic Valentine prop size
- Worsted #4 + ~3.0 mm hook → jumbo lips (extra plush and dramatic)
✅ Valentine tip: Jumbo lips look amazing as a table décor piece or photo prop.
3) Make It More Realistic (Lip Crease + Cupid’s Bow)
You already included the best detail: center tack stitches.
Here’s the “pro” way to place them:
- Add 2–4 tack stitches in the center (upper + lower) to pinch inward.
- For a deeper Cupid’s bow look, add one tiny tack stitch slightly above center on the upper lip (just enough to create a subtle dip).
Keep these stitches tight — they are what make the lips look “real.”
4) Valentine Ideas: What to Do With Your Crochet Lips Prop
This 3D lips prop is perfect for Valentine crafting because it instantly reads “kiss” even from far away.
Use it as:
- Showpiece photo prop for Valentine pictures
- Gift topper (attach it to a ribbon bow)
- Valentine décor (hang it with a hidden thread)
- Fun desk plush (small, puffy, and cute)
- Themed set with a heart gift (pair it with our crochet heart pattern for a complete Valentine vibe)
5) Optional Add-Ons (Still the Same Pattern)
If you want extra “Valentine energy” without changing the crochet:
- Keychain: sew a small loop on the back (chain 8–12, then sc back) and attach a ring.
- Brooch: stitch a pin back to the flat seam area.
- Hanging décor: sew a clear fishing line or thin thread at the top center.
FAQ — Crochet Lips Pattern for Valentine’s Day
Can beginners make this crochet lips pattern?
Yes. It uses only single crochet, increases, and decreases, plus basic sewing for assembly. If you’re new, keeping track of your rounds helps a lot.
How do I make the lips bigger without changing the pattern?
Use thicker yarn. Sport yarn makes smaller lips, DK makes a classic size, and worsted yarn makes jumbo lips. If you want the full explanation, check our yarn weight and hook guide.
What yarn is best for realistic crochet lips?
A smooth cotton or cotton-blend works best because it shows clean stitches and holds shape nicely.
How much should I stuff the lips?
Stuff lightly until it looks puffy, then stop. Overstuffing can make the lips look round like a ball instead of lip-shaped.
Can I turn the crochet lips into a keychain?
Yes. Sew a small yarn loop on the back (or attach hardware) and add a keyring. The 3D prop version looks adorable as a big “kiss” charm.
How do I stop the lips from looking uneven?
Mark the center points, stitch evenly, and add the crease stitches last. If one side looks higher, reshape the stuffing and add one tiny tack stitch to balance.
Pin This for Later 💗
If you’re building a Valentine craft list, save this crochet lips pattern for Valentine’s Day to Pinterest so you can come back when you’re ready to make a whole set (lips + hearts + cute gift toppers).
")
 — Free & Beginner-Friendly")
")
")