


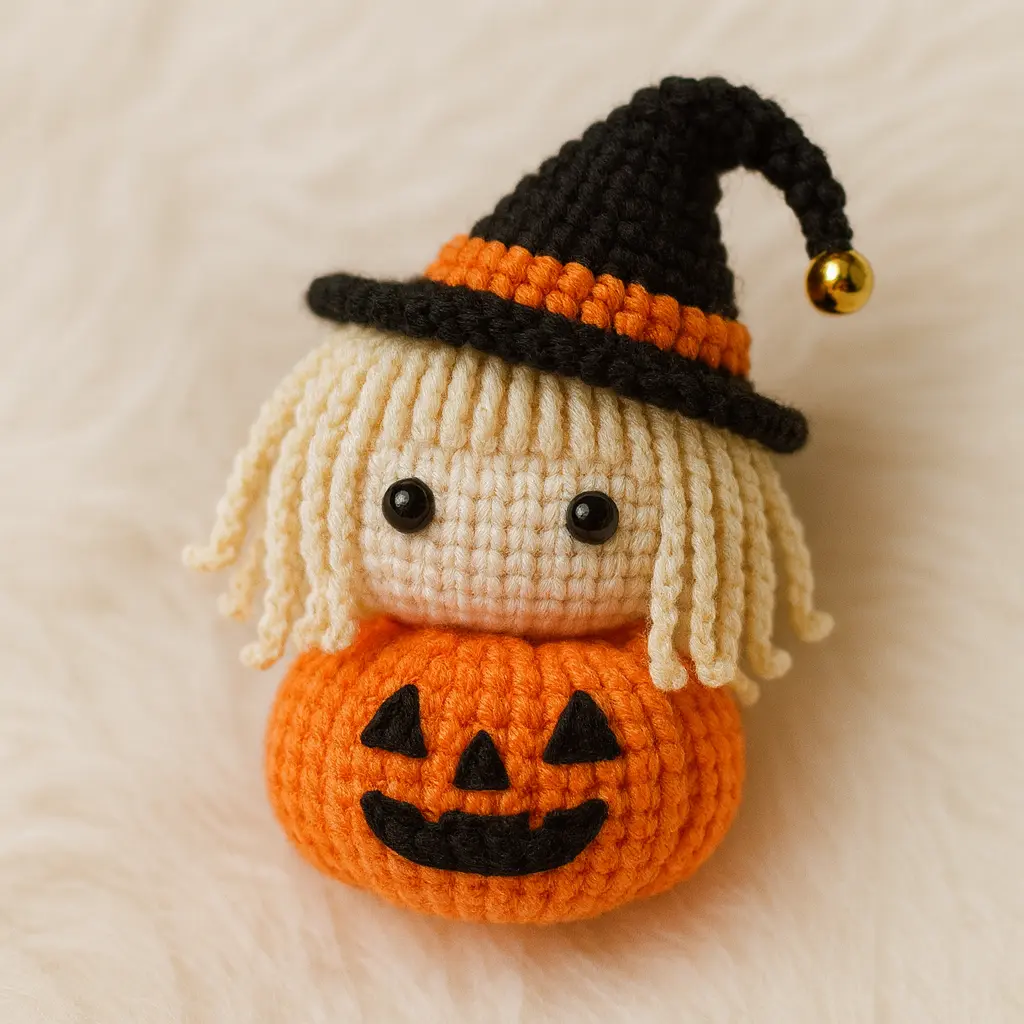
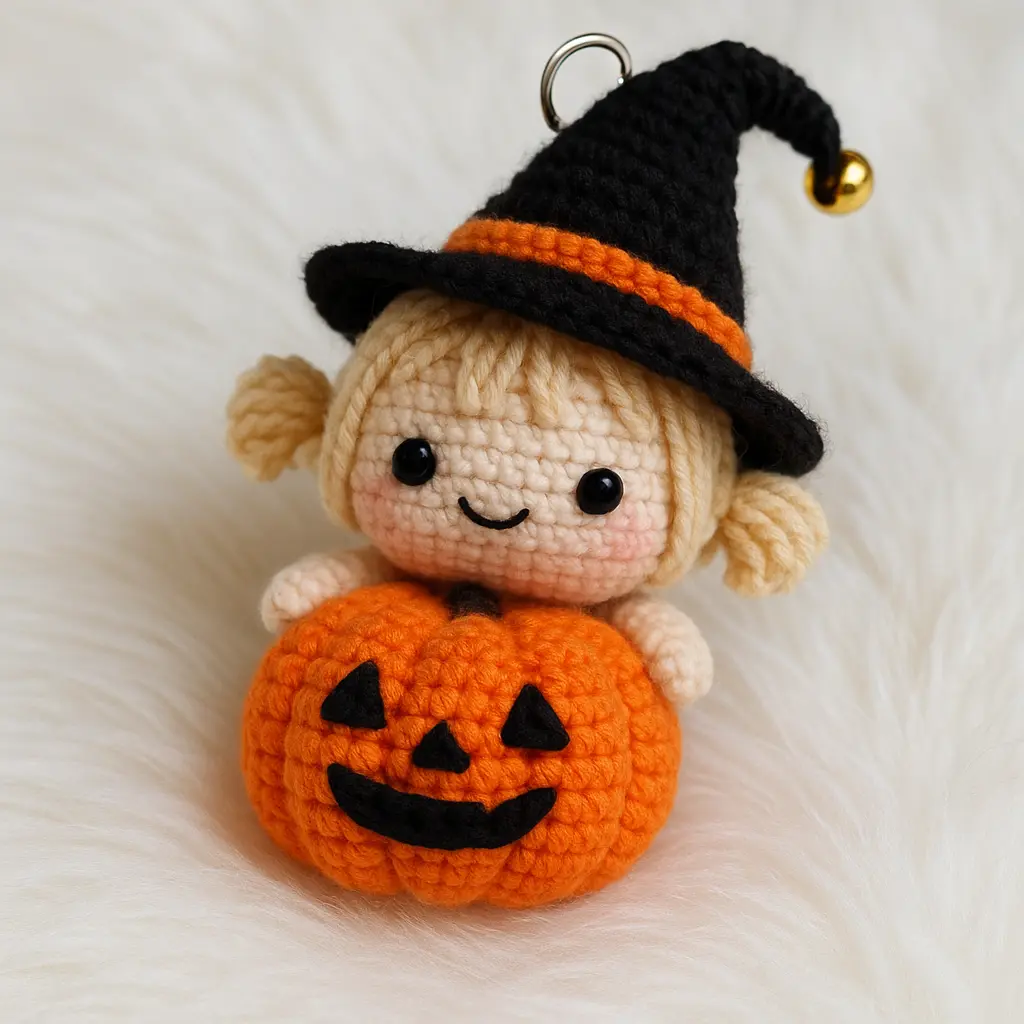
Ready for spooky-cute? This pumpkin witch crochet pattern turns a simple pumpkin into an adorable amigurumi witch—complete with a pointy hat, curly “ch + sc” hair, and an optional mini broom or keychain loop. The project is beginner-friendly, uses basic stitches, and works up fast with DK/light-worsted yarn and a 2.0–2.5 mm hook. In this tutorial you’ll find clear rounds for the head, pumpkin body, hair cap with strands, and a neat FLO brim for the hat, plus assembly tips and mini variations. Grab your yarn and let’s make a tiny witch that’s perfect for Halloween gifts, desk décor, or backpack charms.
New to amigurumi? Start with the quick first-amigurumi step-by-step guide, then review the magic ring vs. chain circle and yarn weight, gauge & hook size.
Jump to section
Materials & Tools
- Yarn: DK / light-worsted cotton or acrylic
- Colors: orange (pumpkin), black (hat), skin (head), beige (hair), small brown (broom, optional)
- Hook: 2.0–2.5 mm (e.g., “Match hook to yarn—see the official yarn weight system”).
- Safety eyes: 6–8 mm
- Notions: stuffing, stitch marker, yarn needle, scissors, blush/embroidery thread for cheeks & mouth
- Extras (optional): tiny bell or bead for hat tip, jump ring/keychain, craft wire for broom handle
Skill level: Beginner-friendly
Finished size: ~10–12 cm (4–4.7 in) with 2.25 mm hook
Time: 2–3 hours (standard), 60–90 min (mini keychain)
Abbreviations (US)
ch = chain • sl st = slip stitch • sc = single crochet • hdc = half double crochet
dc = double crochet • inc = increase (2 sts in one st) • dec = invisible decrease
MR = magic ring • FLO = front loop only
(Crocheting from UK sources? Keep this handy: US vs UK crochet terms conversion chart.)
Head (skin color)
Start with a magic ring. If MR gives you trouble, use the alternative start here: magic ring vs. chain circle.
- R1: MR, 6 sc (6)
- R2: inc ×6 (12)
- R3: (sc, inc) ×6 (18)
- R4: (sc, inc, sc) ×6 (24)
- R5: (3 sc, inc) ×6 (30)
- R6–R11: sc around (30)
- R12: (3 sc, dec) ×6 (24)
- R13: (sc, dec, sc) ×6 (18)
- R14: (sc, dec) ×6 (12)
Finish: Stuff firmly (top and cheeks), fasten off leaving a long tail for closing/sewing.
Eye placement: Insert safety eyes between R8–R9, spaced 6–7 sts apart. Add a tiny stitch of pink thread for cheeks and embroider a small smile if you like.
Pro tips
- Keep a marker at the first stitch of each round and count out loud or use a tally counter. If you lose track, this guide helps: count rounds in crochet.
- For invisible joins later, leave the tail long enough to close the top neatly when attaching.
Pumpkin Body (orange) — for your pumpkin witch crochet
Work in a continuous spiral. A stitch marker is your best friend here.
- R1: MR, 6 sc (6)
- R2: inc ×6 (12)
- R3: (sc, inc) ×6 (18)
- R4: (sc, inc, sc) ×6 (24)
- R5: (3 sc, inc) ×6 (30)
- R6: (2 sc, inc, 2 sc) ×6 (36)
- R7: (5 sc, inc) ×6 (42)
- R8: (3 sc, inc, 3 sc) ×6 (48)
- R9–R12: sc around (48)
- R13: (3 sc, dec, 3 sc) ×6 (42)
- R14: (5 sc, dec) ×6 (36)
- R15: (2 sc, dec, 2 sc) ×6 (30)
- R16: (3 sc, dec) ×6 (24)
- R17: (sc, dec, sc) ×6 (18)
- R18: (sc, dec) ×6 (12)
- R19: dec ×6 (6)
Finish: Fasten off. Stuff firmly but evenly.
Shape the pumpkin ribs (8 segments):
Thread a long strand of orange on a yarn needle. Starting at the center top, pass the needle straight down through the pumpkin and out the center bottom. Pull snug to create the first groove. Bring the yarn up the outside and repeat this top-to-bottom wrap 8 times around, spacing the grooves evenly (like slicing a pie). Knot securely at the bottom and bury the tail.
Face: Embroider eyes/mouth or add safety eyes for a cute witch pumpkin crochet look.
Troubleshooting & pro tips
- Seeing small holes where you decreased? Use the invisible decrease method for neater shaping.
- Keep your stitch counts accurate; if you drift, recount rounds before decreasing heavily.
Hair (beige) — curly “ch + sc” strands for your pumpkin witch crochet
Make a small cap, then add strands around the edge. Work continuously and anchor each strand with a sl st into the next base stitch.
- Hair cap
- R1: MR, 6 sc (6)
- R2: inc ×6 (12)
- R3: (sc, inc) ×6 (18)
- R4: (sc, inc, sc) ×6 (24)
Strands (S) — work these around the cap edge:
- S1–S2: ch 17, turn; starting in 2nd ch from hook sc 16, sl st to next base st.
- S3–S7: ch 16; back in 2nd ch: sl st 5, sc 10, sl st to next base st.
- S8–S11 (curly bangs): ch 11; back in 2nd ch: sl st 1, sc 2, hdc 2, dc 1, hdc 2, sc 2, sl st to next base st.
- S12: ch 11; back in 2nd ch: sl st 1, sc 2, dc 1, hdc 2, sc 2, sl st to next base st.
- S13–S17: ch 16; back in 2nd ch: sl st 5, sc 10, sl st to next base st.
- S18–S19: ch 17; back in 2nd ch: sc 16, sl st to next base st.
Finish: Fasten off. Sew the cap to the head; tie two tiny pigtails if desired.
Pro tips
- For tighter curls, add 1–2 more increases (e.g., replace some sc with hdc/dc on the return).
- Want highlighted strands (e.g., orange tips)? Change yarn when starting a strand; fasten and weave neatly (we’ll cover color-change best practices in the hat section).
- Keep lengths symmetric on left/right so the bangs frame the eyes placed between R8–R9 of the head.
Witch Hat — cone + band + FLO brim (for your witch hat pumpkin crochet look)
Work in the round; note the color band on R10. Keep tension even so the cone stands upright.
- R1 (black): MR, 3 sc (3)
- R2: sc, inc, sc (4)
- R3: sc, dc-inc ×2, sc (6)
- R4: inc, (dc, dc-inc) ×2, inc (10)
- R5: 4 sc, 2 dc, 4 sc (10)
- R6: 4 sc, dc inc ×2, 4 sc (12)
- R7: (sc, inc) ×6 (18)
- R8: sc around (18)
- R9 (change to orange): (sc, inc, sc) ×6 (24)
- R10: sc around (24) ← hat band
- R11 (change back to black, FLO): (3 sc, inc) ×6 (30) ← start brim
- R12 (FLO): (inc, 4 sc) ×6 (36)
- Fasten off and weave in ends. Optionally stitch a tiny bell or bead to the tip.
Pro tips
- To avoid a visible jog at color changes on R9–R11, use a no-jog color swap (carry tail to the inside and tighten after the first stitch). See changing colors in amigurumi.
- Want a wider brim? Add one or two extra increase rounds after R12, keeping increases evenly spaced (e.g., (inc, 5 sc) ×6 → 42).
- If your cone leans, add one extra even round before R9 or lightly steam-shape.
Assembly — clean joins for your pumpkin witch crochet
You can either sew the head to the pumpkin, or do a quick “no-sew” capture through a small opening.
A) Standard sew-on method
- Position: Pin the head slightly behind the pumpkin’s top center so the face peeks over the pumpkin.
- Join: With the head tail, whipstitch or ladder stitch through head sts ↔ pumpkin top sts. Work slowly, a few stitches at a time.
- Tension: After 6–8 stitches, lightly tug to seat the seam and keep the neckline round.
Need perfectly even placement? Reuse the pins method you used earlier when shaping—keep them until the last few stitches for symmetry.
B) Quick “no-sew” capture (beginner-friendly)
- Before fully closing the pumpkin, leave 6–8 sts unclosed.
- Insert the head slightly into the opening.
- Ladder stitch across the remaining pumpkin sts, catching head sts beneath—this traps the head securely with minimal visible seam.
Hat attachment (jaunty angle)
- Angle the hat 10–15° to one side. Stitch around the inner edge of the brim into head sts; add two hidden stitches through the cone base for extra security.
- If the brim flips up, steam lightly and shape while cooling.
Hair placement
- Center the curly bangs above the eyes (S8–S12).
- Tack the side strands so they frame the pumpkin without covering the face, then secure the back cap with 4–6 small stitches.
Keychain / hanging loop (optional)
- Add a jump ring through two stitches at the hat tip (or sew a short ch 12 loop, sl st to form a ring).
- For durability, pass the jump ring through a small split ring before the keyring.
Finishing touches
- Tidy decreases: If any decrease spots look gappy, close tiny holes with the tail or switch to an invisible decrease in future rounds — guide here: invisible decrease crochet.
- Face: Embroider a tiny smile and blush; keep symmetry by counting the same stitch distances from the eyes.
- Photo-ready: Lightly steam the brim, fluff curls, and roll the pumpkin ribs with your fingers to sharpen the grooves.
Variations (quick mods for your pumpkin witch crochet)
1) Mini Keychain (fast gift)
- Hook/Yarn: 2.0 mm with fine cotton.
- Pumpkin: Stop even rounds at R10 (48 sts) → jump to decreases.
- Hair: Shorten every strand by 2–3 chains.
- Hat: Work as written; optionally skip R12 for a narrower brim.
- Hardware: Add split ring through hat tip or sew a ch 12 loop.
2) Striped Hat Band
- Keep R10 in orange as written (band), but swap to purple/green for a bolder Halloween accent.
- For a wider band, add 1 even round in the band color before R11.
3) No-Sew Build
- Leave the pumpkin top slightly open, insert head, and ladder-stitch the opening closed around the neck. This traps the head without separately sewing it on.
4) Spooky Face Options
- Kawaii: safety eyes + tiny smile.
- Witchy: embroidered lashes, brows, or a tiny fang for playful “witch pumpkin crochet” vibes.
- Glowing eyes: use neon yarn dots or reflective thread.
Love this? Pin this Pumpkin Witch Crochet so you can find it later! 🧶📌
Troubleshooting (quick fixes)
Pumpkin looks lumpy / uneven ribs
- Re-distribute stuffing, then re-wrap the rib yarn 8 times with even tension. Roll the grooves between your fingers to “sharpen” them.
Gaps at decreases
- Use the invisible decrease. Keep hook smaller if your tension is loose.
Hat cone leans / brim flares too much
- Add one even round before R9 for structure.
- If brim waves, swap an increase round for (inc, 5 sc) ×6 → then steam lightly and shape.
Head sits crooked
- Pin in four quadrants before stitching and check symmetry from front/side. This guide helps with placement: attach amigurumi limbs evenly (same pinning logic for heads).
Hair too wild / hides the face
- Shorten side strands by 2 chains; tack two stitches per strand near the cheek to keep curls framing the eyes.
Stitch counts drifting
- Use a marker at the first stitch, then recount every second round. If you’re new to pattern notation, this primer is handy: how to read an amigurumi pattern.
Color-change jog on the hat band
- Start the new color on the last pull-through of the previous stitch; tug tails to the inside and secure after the first stitch of the new round.
FAQ about Pumpkin Witch Crochet Pattern
Is this a witch pumpkin crochet pattern or a carving stencil?
Crochet pattern. You’ll use yarn and a hook to make an amigurumi pumpkin witch crochet doll—no carving or painting.
What size hook and yarn should I use?
DK/light-worsted yarn with a 2.0–2.5 mm hook. Tight tension helps the pumpkin ribs and hat cone hold shape.
Where do I place the safety eyes?
Between R8–R9 on the head, about 6–7 stitches apart. Add a tiny embroidered smile and blush if you like.
How do I make the curly bangs?
Use the “chain + back down with mixed stitches” method from the Hair section (S8–S12). More hdc/dc = tighter curl; more chains = longer curl.
Can I make a no-sew version of this Pumpkin Witch Crochet Pattern ?
Yes. Leave a few stitches open at the pumpkin top, insert the head slightly, then ladder-stitch the opening closed around it.
My decreases look holey—what should I do?
Use invisible decreases and stuff firmly (we linked the detailed tutorial earlier).
How long does it take this Pumpkin Witch Crochet Pattern ?
About 2–3 hours for the standard size; 60–90 minutes for a mini keychain.
How do I stop the Witch hat brim from waving?
If it ripples, reduce one increase round or steam lightly and shape as it cools.
Is this Pumpkin Witch Crochet Pattern beginner-friendly?
Yes. It uses basic stitches, worked in the round, and includes step-by-step rounds plus photos you’ll add.
Loved this pumpkin witch crochet pattern? Keep the Halloween momentum with one quick treat and one cute gift next:
More Free Amigurumi Patterns You’ll Love


")
")
- Try the 30-minute crochet pattern for candy corn.
- Make a tiny amigurumi duck keychain—perfect stash buster!