


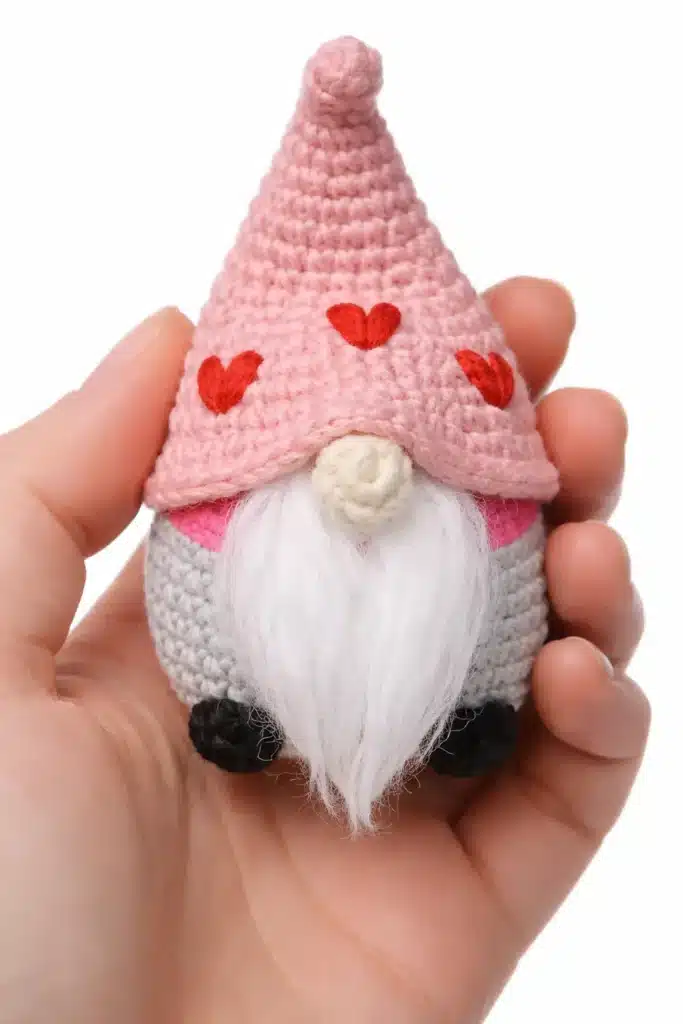
If you’re looking for a valentine gnome crochet pattern that’s quick, cute, and giftable, this mini gnome is the perfect little Valentine project. It has a cozy gray body, tiny black feet, a fluffy beard, and a light-pink hat finished with sweet red heart embroidery, basically… a tiny romantic gnome who’s ready to steal hearts (and desk space).
In this tutorial, you’ll get the full valentine gnome crochet pattern free in US terms, with clear sections and assembly help so you don’t second-guess the placement (especially the feet yes, we’ll keep the exact “old BO placement” notes).
Tip: If you’re new to reading patterns, my quick guide How to Read an Amigurumi Pattern will make everything feel way easier.
Jump to section
What You’ll Make
- Project: Mini Valentine Crochet Gnome
- Style: Amigurumi / desk decor / gift topper
- Skill level: Easy–Intermediate (mostly single crochet + shaping)
- Time: ~1–2 hours depending on your speed
- Best use: Valentine decor, small gift, keychain-size plush (if you add a loop)
If you love gnomes, you’ll also enjoy my Christmas version here: Santa Claus Gnome Pattern (same cozy vibe, different season!).
Materials
You can use worsted or DK yarn, the most important thing is using a smaller hook than usual so the stitches stay tight and the stuffing doesn’t show.
Yarn Colors
- Gray (body)
- Hot pink (trim)
- Light pink (hat)
- Black (feet)
- White (beard base)
- Cream/Beige (nose)
- Red (heart embroidery)
If you’re ever unsure what yarn weight + hook combo gives the neatest amigurumi fabric, check: Yarn Weight, Gauge, and Hook Size Guide.
Tools
- Crochet hook: 2.0–2.5 mm (smaller = tighter stitches)
- Fiberfill stuffing
- Yarn needle (sewing pieces)
- Scissors
- Stitch marker (highly recommended)
- Optional: white faux fur strip OR brushed yarn strands (for the beard)
Abbreviations (US Terms)
- MR = magic ring
- sc = single crochet
- inc = increase (2 sc in same st)
- dec = decrease (sc2tog)
- sl st = slip stitch
- BLO = back loop only
If you want the official standard list for abbreviations, you can reference Craft Yarn Council.
Notes Before You Start
- The body and hat are worked in continuous rounds (no joining), unless stated.
- Use tight tension for a firm, smooth finish.
- Place a stitch marker in the first stitch of each round.
- For cleaner shaping, you can use an invisible decrease (still counts as a normal dec). Here’s my tutorial: Invisible Decrease Crochet.
- The body includes BLO rounds to create clean ridge lines, super helpful for that “boot/trim” look.
And if your magic ring sometimes fights back, this comparison helps a lot: Magic Ring vs Chain Circle.
Valentine Gnome Crochet Pattern (Mini) — Full Instructions (US Terms)
Helpful tip: If you ever lose track of where you are, this guide makes counting so much easier: How to Count Rounds in Crochet.
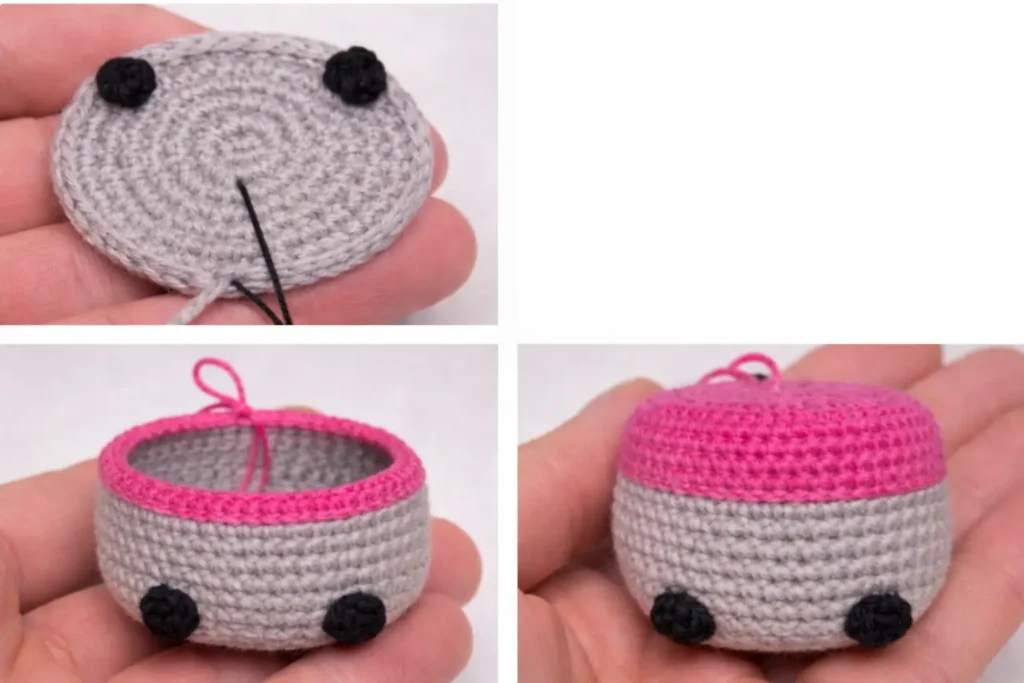
A) BODY (Start in GRAY)
Notes for clean results
- Work in continuous rounds (no joining).
- Use a stitch marker in the first stitch of each round.
- For a smoother color switch (gray → hot pink), you can use your preferred method, this tutorial helps if you want super clean transitions: Changing Colors in Amigurumi.
Rounds
- R1: MR, 8 sc (8)
- R2: inc around (16)
- R3: (sc, inc) x8 (24)
- R4: (sc, inc, sc) x8 (32)
- R5: (inc, 3 sc) x8 (40)
- R6 (BLO): sc around (40)
- R7: sc around (40)
- R8–R11: sc around (40) for 4 rounds
- R12 (BLO): change to HOT PINK, sl st around (40)
- R13 (BLO): sc around (40)
Shaping:
- R14: (3 sc, dec, 3 sc) x5 (35)
- R15–R16: sc around (35) for 2 rounds
- R17: (3 sc, dec) x7 (28)
- R18: (2 sc, dec) x7 (21)
- R19: (sc, dec) x7 (14)
- R20: dec around (7)
Finish: Fasten off. Stuff firmly, close the opening, weave in end.
B) FEET (Make 2) — BLACK
- R1: MR, 4 sc (4)
- R2: (inc, sc) x2 (6)
Fasten off, leave a long tail for sewing.
Optional (more puff):
- R3: sc around (6), then fasten off.
C) NOSE — CREAM / BEIGE (No stuffing)
- R1: MR, 6 sc (6)
- R2: inc around (12)
- R3: (dec, sc) x4 (8)
Fasten off, leave a long tail for sewing.
D) BEARD — WHITE
Cut 8 strands of white yarn (or use a small piece of faux fur).
Option 1: Yarn strands (closest to original look)
- Attach strands across the front between R15 and R16 (centered).
- Brush/tease to fluff.
- Trim into a beard shape (rounded triangle works best).
Option 2: Faux fur
- Cut a small triangle/teardrop shape.
- Glue or sew it under the nose area.
E) HAT — LIGHT PINK
- R1: MR, 6 sc (6)
- R2–R4: sc around (6) for 3 rounds
- R5: (inc, 2 sc) x2 (8)
- R6: (inc, 3 sc) x2 (10)
- R7: (inc, 4 sc) x2 (12)
- R8: (inc, 5 sc) x2 (14)
- R9: (inc, 6 sc) x2 (16)
- R10: sc around (16)
- R11: (inc, 7 sc) x2 (18)
- R12: (sc, inc, sc) x6 (24)
- R13: sc around (24)
- R14: (inc, 3 sc) x6 (30)
- R15: sc around (30)
- R16: (2 sc, inc, 2 sc) x6 (36)
- R17: sc around (36)
- R18: (5 sc, inc) x6 (42)
- R19: (2 sc, inc, 2 sc) x6 (48)
- R20: 23 sc, inc x3, 22 sc (51)
Finish: Fasten off, leave a long tail.
Optional: lightly stuff the hat tip if you want it more firm.
F) HEART EMBROIDERY — RED
Embroider 3 small hearts on the front of the hat using red yarn:
- 1 heart centered
- 2 hearts left/right
(You can do simple “V + V” stitches or tiny heart outlines—whatever looks cutest.)
Assembly (Step-by-Step) + Exact Foot Placement
This is the part that makes the valentine gnome crochet pattern look clean and professional. Follow the order below and your gnome will sit nicely, with the feet perfectly centered like your original BO placement.
If you ever struggle with placing pieces evenly, this quick guide is helpful: How to Attach Amigurumi Limbs Evenly.
ASSEMBLY
1) Decide the “Front” of the Gnome
- Put the body upright with the hot pink trim at the bottom.
- The front is where the beard and nose will go.
- If you used a stitch marker for BOR (beginning of round), keep it in place—it helps with foot positioning.
2) Sew the Feet (Make It Match the Old BO Placement)
Quick placement (easy method)
- Sew the two feet on the bottom edge, slightly toward the front.
- Leave a small gap so the gnome can stand without tipping.
Exact placement (your required stitch math ✅)
On Round 6:
- Left foot center = 4 stitches BEFORE the center-front marker
- Right foot center = 4 stitches AFTER the center-front marker
So the foot centers are at:
- stitch 16 and stitch 24 (if your BOR is stitch 1)
✅ This creates 7 gray stitches between the feet.
How to sew neatly
- Pin each foot in place first (or hold with a yarn tail).
- Use the long tail to stitch around the edge of the foot and attach it firmly to the body.
- Keep both feet at the same height so the gnome sits flat.
3) Add the Beard (Centered and Fluffy)
Option 1: Yarn strands beard (original style)
- Attach strands between R15 and R16, centered between the feet.
- Spread the strands slightly wider than the nose area.
- Brush/tease to fluff, then trim into a neat beard shape (rounded triangle is perfect).
Option 2: Faux fur beard
- Cut a small triangle/teardrop piece.
- Sew or glue it so the point aims downward and the top edge sits where the nose will cover it.
Pro tip: Don’t make the beard too long, or it hides the feet and makes the gnome look shorter.
4) Sew the Nose (Right Above the Beard)
- Place the nose centered above the beard.
- The bottom edge of the nose should slightly overlap the top of the beard (this hides messy joins).
- Sew all around using small stitches.
5) Put On and Sew the Hat (The “Cute” Tilt)
- Place the hat on top and tilt slightly forward so it covers the top of the beard area a bit.
- Make sure the heart embroidery faces the front.
- Sew around the bottom edge of the hat using small stitches (don’t pull too tight—keep it smooth).
Optional tip: Lightly stuff the hat tip if you want it to stand more (but a soft flop looks adorable too).
6) Final Shaping + Finishing
- Trim the beard into a clean shape.
- Hide and weave in all ends inside the body.
- Massage the gnome gently to even the stuffing.
Quick Styling Tip (Cute Valentine “Set” Idea)
if you want to pair this gnome with another Valentine-themed project, you can add a tiny heart accessory or gift it with one of these:
(They make an adorable “Valentine set” together!)
Customization Ideas (Make Your Valentine Crochet Gnome Unique)
1) Change the Size (DK vs Worsted)
Want a smaller or bigger gnome?
- Smaller mini gnome: use thinner yarn (sport/fingering) + smaller hook (1.75–2.0 mm)
- Bigger plush gnome: use worsted/bulky yarn + larger hook (but still keep stitches tight)
Tip: Keep the same stitch counts, just changing yarn + hook size changes the final size.
2) Hat Style Options (Easy Tweaks)
- More floppy hat: don’t stuff the hat tip
- More firm hat: lightly stuff the hat tip + sew the bottom edge a little tighter
- Extra cute: add a tiny pom-pom at the tip (pink or red)
3) Heart Variations (Instead of Embroidery)
If you want a different Valentine look:
- Embroider one big heart in the center (instead of 3 small ones)
- Use hot pink hearts instead of red
- Stitch tiny “X” stitches as “confetti” hearts
4) Beard Options (Different Textures)
- Yarn strands + brush: fluffy and soft
- Faux fur: very realistic gnome beard
- Brushed yarn strip: a good middle option if you don’t want faux fur
5) Make It a Keychain (Optional)
- Before closing the body, add a small loop at the top (chain + slip stitch, or attach a keychain clasp)
- Make sure all ends are woven tightly
For more tiny projects like this, you might also like: Amigurumi Duck Pattern Free Keychain.
Valentine Gnome Crochet Pattern FAQ
Is this valentine gnome crochet pattern beginner-friendly?
Yes! This valentine gnome crochet pattern uses simple shaping with single crochet, increases, and decreases. If you can crochet in the round, you can make it.
What yarn is best for a crochet valentine gnome?
Worsted or DK yarn works great. The key is using a smaller hook than usual so your stitches stay tight and the stuffing doesn’t show.
Can I use plush yarn?
You can, but the mini details (nose/beard/feet) become harder to keep crisp. If you want plush, make the gnome larger using bulky yarn and a slightly bigger hook.
How do I make my gnome bigger or smaller without changing the pattern?
Keep the same stitch counts and change only:
Yarn thickness (DK → worsted → bulky)
Hook size (still keep it tight)
Why does my hat look too wide or too tall?
Too wide: your tension is loose → go down 0.25–0.5 mm in hook size
Too tall: reduce stuffing or tilt the hat forward more during sewing
How do I keep the beard fluffy?
If you’re using yarn strands, brush/tease them gently, then trim. If you want maximum fluff with less work, faux fur is the easiest option.
")
")
")
")
Can I sell finished gnomes made from this pattern?
You can usually sell finished items you crochet yourself, but don’t redistribute the written pattern text as your own. (Add this as a small “permissions” note in your post.)
“Made this mini Valentine crochet gnome? Please save it for later on Pinterest and share it with a crochet friend, your support helps me keep posting more free patterns!”