


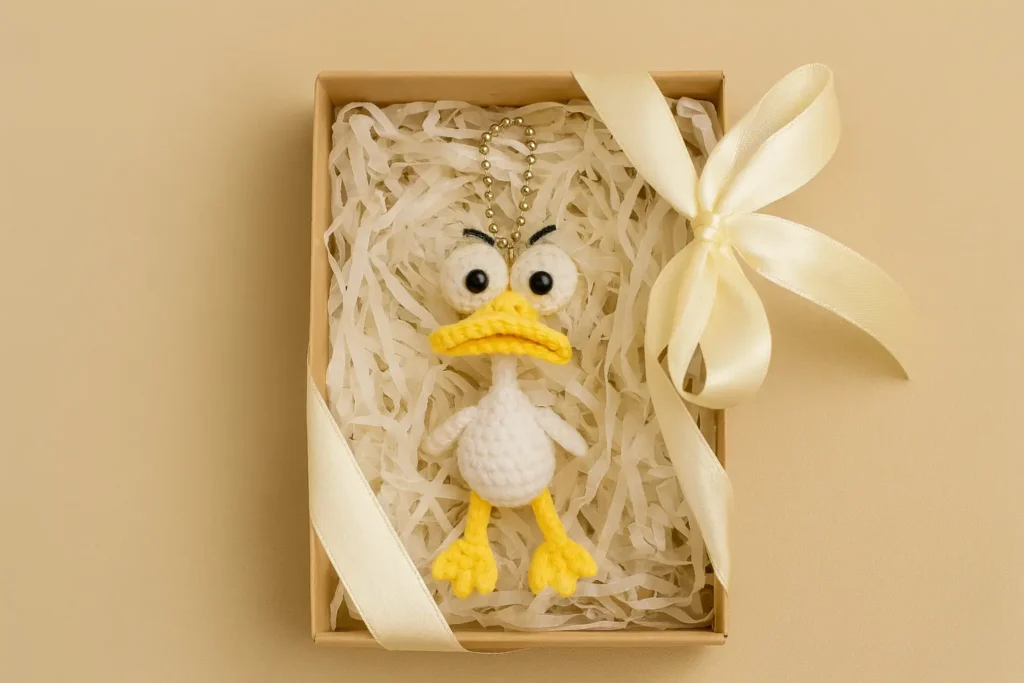
Looking for a cute and funny amigurumi duck pattern free? You’re in the right place! Today I’m sharing one of my most smile-worthy creations, a silly duck keychain with giant cartoon eyes, a quacky open beak, and stubby feet that look like they just waddled in from a children’s book. Whether you’ve been hunting down a duck amigurumi free pattern, or you’re completely new to the world of crochet duck amigurumi, this easy pattern will walk (or waddle) you through every step.
In this article, you’ll get a beginner-friendly amigurumi duck tutorial complete with a full pattern, clear stitch instructions, and visual style breakdown. Ready to stitch a duck that practically says “quack” on its own?
Jump to a section
How This Amigurumi Duck Pattern Free Made Everyone Laugh
It started with a scrap of yellow yarn and a quiet Sunday afternoon. I wasn’t planning to design anything new, I just wanted a small, satisfying project. But halfway through experimenting with some oversized eyes and a chubby little beak, I burst out laughing. This duck looked like it had something to say and probably a joke to tell!
That’s when I knew I had to refine this into a proper amigurumi duck pattern free and share it with the world. When I stitched on the feet and added the little ball chain to the top, it turned into a keychain that my grandkids demanded. Then their friends wanted one. So did their teachers.
I’ve written dozens of patterns over the years, like my owl amigurumi keychain and this sweet bunny plush, but none of them got the giggles that this one did.
And the best part? It’s super fast. You can whip up your own crochet duck amigurumi in under a day, even if you’re still new to amigurumi.
👉 In the next section, we’ll look at what makes this duck’s face so expressive, from the layered eyes to the cheeky little eyebrows and beak.
Building the Funny Face – Eyes, Eyebrows, and Beak
What gives this amigurumi duck pattern free its charm isn’t just the shape, it’s the face. The moment I attached the layered eyes, a floppy beak, and stitched those tiny eyebrows, I knew this duck had a personality all its own. With a slightly surprised look and a wide mouth like it’s mid-quack, this little fellow makes everyone giggle.
This duck amigurumi free pattern isn’t about perfection, it’s about playfulness. And building the face is where the magic happens.
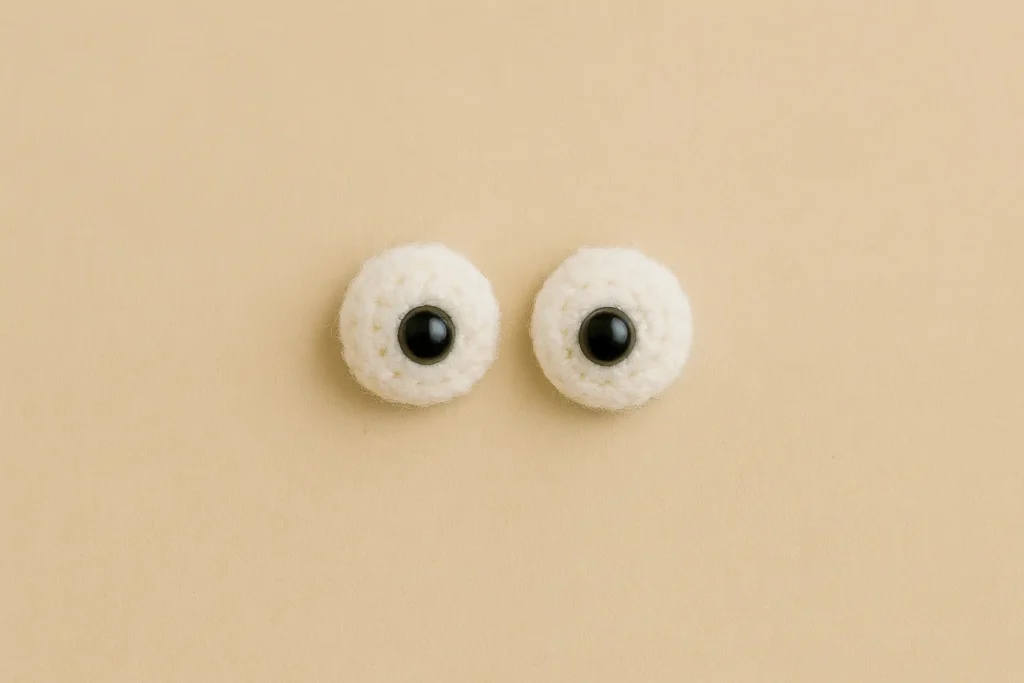
Step 1: Cartoon Eyes with Layers
Many crochet duck amigurumi projects use safety eyes alone. But in this amigurumi duck pattern free, we take it a step further by creating layered eyes. We use two parts for each eye, exactly as in the pattern: a flat yellow base (MR→12→one round even) and a white domed cap (MR→12→one round even), with a 6 mm safety eye inserted and a touch of stuffing before finishing with a round of slip stitches. Sew the white dome centered on the yellow base. Placing the eyes close together boosts that expressive, cartoony look.
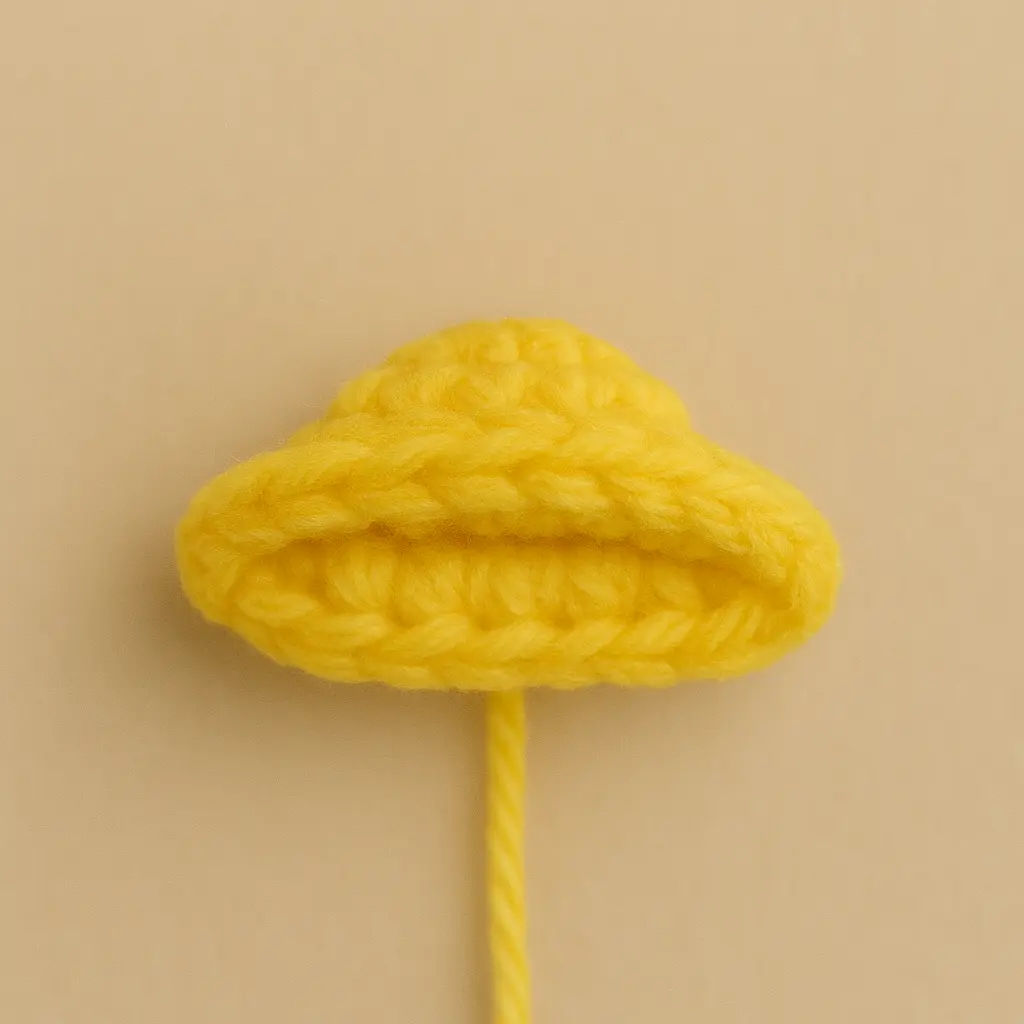
Step 2: A Beak That Talks Back
Rather than making two separate pieces, this duck’s beak is worked as one round circle that gets folded in half. Sew only the sides closed and leave the middle open. This creates an instant smiling mouth. When attached just beneath the eyes, the duck looks like it’s chatting or cracking a joke. It’s the key to that funny, wide-mouthed expression
Most duck amigurumi free pattern styles stop at a small stitched triangle. But this open-style beak adds charm and makes your duck stand out, especially in a collection of animal keychains.
Step 3: Don’t Skip the Eyebrows
Last but not least, eyebrows. Two short stitches using black thread or yarn give this amigurumi duck pattern free its sass. Place them slightly tilted for a curious expression or lift them high for surprise.
It’s such a small detail, but it adds a human-like touch that makes people laugh. When I stitched my first one, even my husband did a double take: “Why does that duck look like it’s judging me?”
That’s when I knew this wasn’t just another crochet duck amigurumi. It was something with a bit more spunk and worth sharing.
Once your face is done, you’re already halfway to creating something special. The eyes are bold, the beak is silly, and the whole vibe screams fun. Now it’s time to give that duck a body that waddles with pride.
👉 Next, we’ll build the body, wings, and webbed feet to complete your amigurumi duck pattern free in full form!
Waddling Body & Webbed Feet – Neck, Wings, and Assembly
With the expressive face done, it’s time to bring the full character to life, neck, chubby belly, wings, and those hilarious paddle feet. This part of the amigurumi duck pattern free is where your duck takes shape and finally looks like a toy you’ll never want to give away.
Everything in this duck amigurumi free pattern is designed to be simple, cute, and quick. The neck and body are worked in one go, the wings are flat and fast, and the feet bring the final charm.
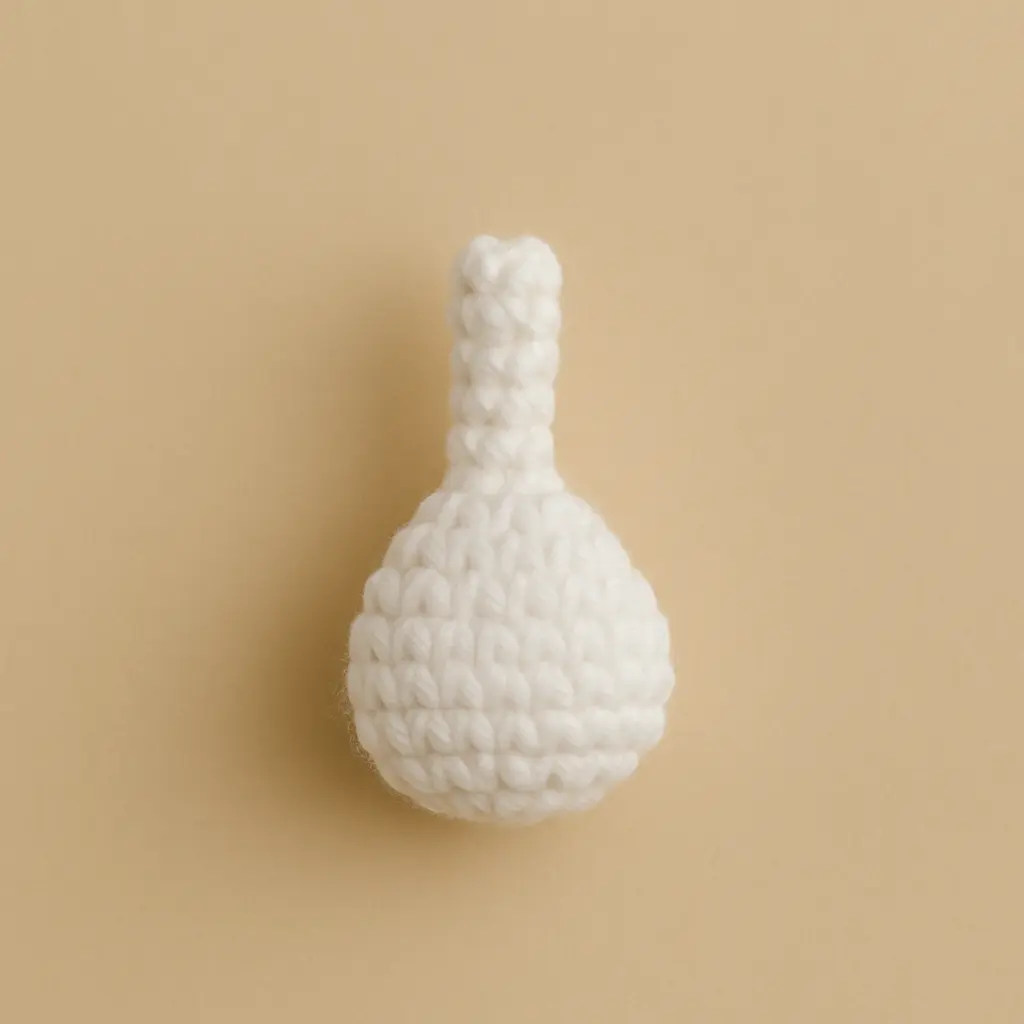
One-Piece Body – Fast, Smooth, and Beginner-Friendly
The body is worked seamlessly from the bottom up. Start with a magic ring and increase to 24 sts to form the round belly, then work a few even rounds to keep it plump. Decrease gradually to taper the top, stuff firmly, and then continue straight up to crochet the neck tube in one piece. This makes the whole build smooth, sturdy, and beginner-friendly.
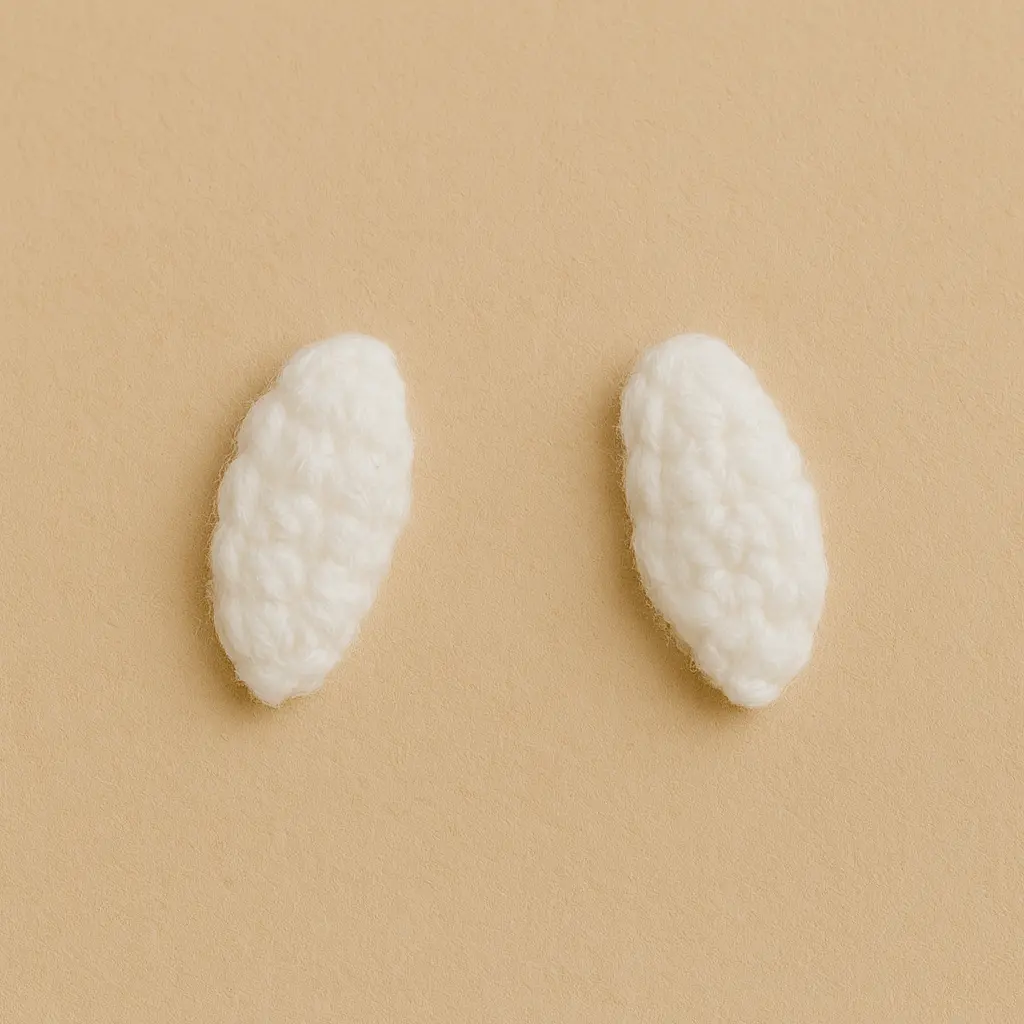
Flappy Wings That Bring the Duck to Life
You’ll make two simple wings using white yarn and just four rounds. They’re flattened and sewn onto the body slightly behind the center. In my experience, this slight backward angle makes your crochet duck amigurumi look like it’s about to take flight or flap for attention!
In this version of the free amigurumi duck pattern, the wing placement is everything. It gives your duck that animated, playful energy. If you want a more chilled look, try sewing them downward, like they’re folded close to the body.
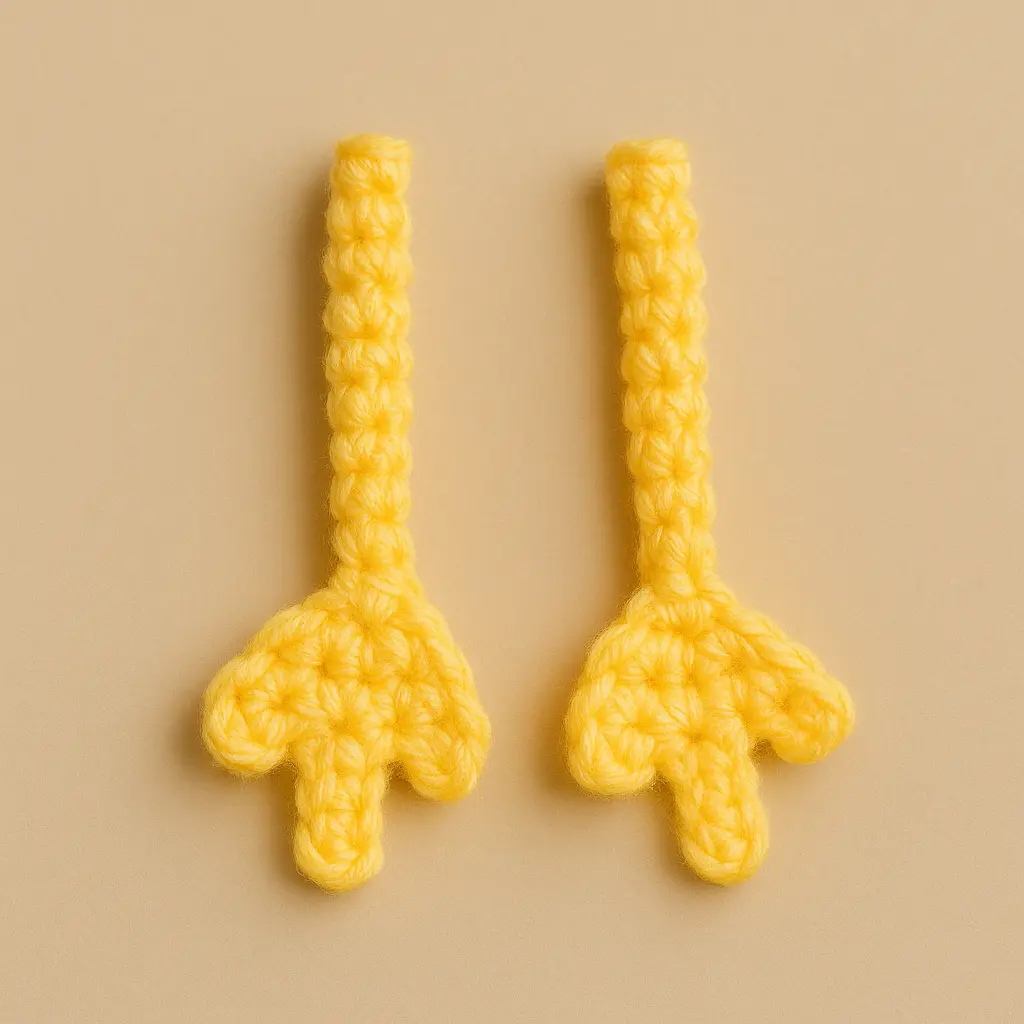
Webbed Feet – The Best Bit!
The feet and legs are also worked in one piece. Start by crocheting three little toes from chains, join them into a rounded foot pad, then continue crocheting upward in the round to form the leg tube. No sewing separate rectangles or rolling fabric it’s all smooth and seamless. Once stuffed and stitched under the body, the duck stands with goofy, webbed feet that make everyone smile.
This is the part where the duck truly comes together. It no longer looks like a random crochet ball it’s a full, waddling bird, ready for display, gift giving, or keychain hanging.
And yes, this quirky build style is why people keep coming back to this amigurumi duck tutorial. It’s beginner-friendly, but looks like something you’d find in a fancy handmade shop.
With body, wings, and feet in place, you’re ready to put it all together into one adorable project. The best part? It’s all small and portable, making this the perfect duck to crochet on a cozy afternoon.
👉 Coming up in the next section, I’ll walk you through the complete amigurumi duck pattern free step-by-step. Every piece, every stitch, clearly laid out!
Full Amigurumi Duck Pattern Free – From Eyes to Feet
You’ve stitched the face, shaped the belly, and given your duck wings to flap. Now it’s time for the full step-by-step amigurumi duck pattern free presented clearly so you can follow along with confidence. Whether you’re crocheting your first duck or your fifteenth, this format makes it easy to keep track.
Let’s begin with the materials you’ll need.
🧶 Materials
- White yarn (eyes, body, wings)
- Yellow yarn (beak, feet, legs)
- Black embroidery thread or fine yarn (eyebrows)
- 6 mm black safety eyes
- Fiberfill stuffing
- Crochet hook (2.0–2.5 mm recommended)
- Yarn needle for sewing parts
👁 EYES (Make 2)
Each eye is built in two parts and layered for a bold cartoon effect.
🔸 Yellow Flat Base (Make 2)
- With yellow yarn:
- Round 1: MR, 6 sc (6)
- Round 2: inc ×6 (12)
- Round 3: sc around (12)
- Fasten off and leave a tail.
🔸 White Dome (Make 2)
- With white yarn:
- Round 1: MR, 6 sc (6)
- Round 2: inc ×6 (12)
- Round 3: sc around (12)
- ➡️ Insert 6 mm safety eye in center
- ➡️ Lightly stuff with fiberfill
- Round 4: sl st to flatten edge
- Fasten off, leave long tail
- Sew dome centered on yellow base
😠 Eyebrows (Make 2)
- With black thread or yarn
- Stitch an angled line over each eye
- Sew or glue securely
💛 Beak (Open Mouth Style)
With yellow yarn:
- Round 1: MR, 6 sc (6)
- Round 2: inc ×6 (12)
- Round 3: (sc, inc) ×6 (18)
- (Optional for a larger beak → Round 4: (2 sc, inc) ×6 (24))
Assembly
- Flatten the circle into a half-moon shape.
- Sew only the left and right edges closed.
- Leave the center open → this forms the smiling beak opening.
- Sew the folded piece to the face.
👁 ➕ 💛 Join Eyes and Beak
- Sew yellow eye bases side-by-side
- Stitch beak across the bottom edges of both eyes
🦢 NECK + BODY (One Piece – White)
- Round 1: MR, 6 sc (6)
- Round 2: inc ×6 (12)
- Round 3: (1sc, inc) ×6 (18)
- Round 4: (1sc, inc, sc) ×6 (24)
- Round 5-8: sc around (24)
- Round 9: (1sc, 1dec, 1sc)x6 (18)
- Round 10-11: sc around (18)
- Round 12: (1sc, 1dec) x6 (12)
- Round 13-14: sc around (12)
- ➡️ Stuff firmly
- Round 15: dec ×6 (6)
- Round 16-21: sc around (12)
- Round 22: 3 dec (3)
- Fasten off and close
📌 Sew face section to top of neck
🪽 WINGS (Make 2 – White)
More Free Amigurumi Patterns You’ll Love


- Round 1: MR, 6 sc (6)
- Round 2: (sc, inc) ×3 (9)
- Round 3: sc around (9)
- Round 4: (sc, dec) ×3 (6)
- Fasten off, flatten, sew to each side of the body
🦶 FEET & LEGS (Make 2 – Yellow)
🔸 Feet
- Toe 1
Ch 4
Sc in 2nd ch from hook, sc 2 (3)
Keep on hook. - Toe 2
Ch 5
Sc in 2nd ch from hook, sc 3 (4)
Sl st into the base of Toe 1 (side of the last sc of Toe 1). - Toe 3
Ch 4
Sc in 2nd ch from hook, sc 2 (3)
Sl st to base of Toe 2.
Round 1 – around toes (forms the foot) - Working along the outer edges of all three toes, sl st evenly around.
- Put 2 sl st at each toe tip so they look rounded.
- End at the back/heel of the foot, roughly in the middle.
- You’ll have about 10–12 sl st total – exact count is not critical, shape is more important.
- This gives you the flat, three-toed foot
🔸 Legs
From where you ended Round 1 at the back of the foot:
- Ch 10 (this is the leg).
- Starting in the 2nd ch from hook, sl st in each ch down toward the foot. (9 sl st) – You are going from the top of the leg to the foot.
- Without turning, rotate your work and start working into the unused loops on the other side of the same chain: sl st back up to the top of the leg. (9 sl st)
🔸Finish:
- Fasten off, leave tail for sewing.
- Make 2.
🔗 Final Assembly
- Join both eyes and beak piece to top front of neck
- Attach wings to sides
- Sew feet and legs to underside of body
- Add a ball chain between eyes for a keychain loop
🎉 And there you go! This funny little duck is now ready to waddle its way into your heart—or onto your keys. If you loved this amigurumi duck pattern free, be sure to check out my other character-based patterns, like Molly the octopus next!
❓ Frequently Asked Questions (FAQ)
How do I make a crochet duck keychain for beginners?
This amigurumi duck pattern free is perfect for beginners! The parts are small, simple, and repetitive. You’ll start with eyes and beak, then build the body in one piece. Attach wings, feet, and a keychain loop at the end.
How long does it take to complete this amigurumi duck?
Most crocheters finish it in 3–5 hours. If you’ve done other projects, you’ll find this duck even faster.
Can I use plush yarn for this duck pattern?
You can, but it will make the duck larger and a bit less structured. Stick to cotton or acrylic yarn for the classic mini keychain look.
What size safety eyes should I use?
6 mm safety eyes work best for this crochet duck amigurumi. They fit perfectly inside the white dome and give that wide-eyed cartoon effect.
💛 Final Thoughts – Your Duck Is Ready to Quack!
That’s it, friend, your duck is stitched, fluffed, and fabulous! From its big eyes to its flappy wings and paddle feet, this amigurumi duck pattern free brings joy with every stitch. Whether you’re gifting it, keychaining it, or popping it on your craft shelf, it’s a tiny bundle of smiles.
If this duck made you giggle, you’ll definitely enjoy my other creature cuties—check out the amigurumi free pattern.
📌 Follow me on Pinterest for daily pin-worthy amigurumi tips and free patterns:
👉 TopAmigurumi on Pinterest
✍️ Want to read more behind-the-scenes stories and tips?
👉 Follow TopAmigurumi on Medium
Happy stitching! 🧵💕