


If you’ve ever searched for a cute and easy amigurumi owl free pattern, you’re in the right place. Whether you’re new to crochet or a seasoned yarn lover, this mini lavender owl will steal your heart. This step-by-step amigurumi owl free pattern is perfect for beginners, quick to make, and full of charm. I’ll guide you through the entire process from yarn choices to final stitches. With just a hook, some leftover yarn, and a little love, you’ll have a pocket-sized buddy ready to brighten someone’s day. Let’s dive into the joy of this adorable amigurumi owl free pattern together!
Jump to a section
✨ The Story of this Amigurumi Owl Mini Keychain
How a Tiny Owl Helped Me Reconnect With My Creativity
A few months ago, I found myself sitting at the kitchen table on a rainy afternoon. My hands missed the rhythm of crocheting, but I needed something light, not a big plushie, just a quick project to lift my mood. That’s when I started sketching what would become my favorite amigurumi owl free pattern to date.
The vision? A miniature lavender owl that felt soft in your hand and looked adorable on a keychain. I grabbed scraps of yarn, light purple for the body, mint for the wings, and just like that, a little owl was born.
That tiny owl meant more than I expected. It brought back the comfort of stitches, the calm of counting rounds, and the fun of imagining different versions. I remember smiling as I added the tiny beak. The moment that owl had a face, it had personality. And that’s the magic of a great amigurumi owl free pattern, it turns simple yarn into something lovable.
If you enjoy small, soothing projects, you’ll appreciate this amigurumi owl free pattern even more. It’s the kind of project you can finish in a cozy afternoon with a cup of tea and your favorite show playing in the background.
I even made five of them for my granddaughter’s birthday favors, each with different colored cheeks. The moms at the party loved them just as much as the kids! I paired them with silver keyrings, and suddenly they were mini treasures ready to gift.
You might’ve seen my amigurumi bunny free pattern, which is all about plush and hugs, but this amigurumi owl free pattern is about quick joy, easy stitches, and delightful results.
Why the Mini Owl Pattern is Perfect for Busy Crafters
We all have days when we crave a quick win. This amigurumi owl free pattern delivers just that. You don’t need special stitches, hours of free time, or even new supplies, it’s made with small yarn leftovers and a few basic techniques.
Even if you’re crocheting on a lunch break or waiting in the school pickup line, this project fits perfectly. And because it’s beginner-friendly, it’s a great way to introduce someone to the world of amigurumi owl free patterns without overwhelming them.
Looking for more tiny cuteness? You’ll love my Labubu crochet doll, a quirky character with lots of personality.
Trust me, once you make your first owl using this amigurumi owl free pattern, you’ll be tempted to make a whole parliament of owls (yes, that’s what a group of owls is called!).
🧶 Materials & Step-by-Step Instructions
All the Yarn & Tools You’ll Need for Your Mini Owl
Before diving into your stitches, let’s gather everything you need for this amigurumi owl free pattern. The materials are simple and budget-friendly you likely already have most of them in your craft basket.
Here’s a quick table for easy reference:
| Part | Yarn Color | Suggested Yarn |
|---|---|---|
| Body | Light Lavender | YarnArt Jeans 74 or Alize Cotton Gold 226 |
| Wings | Mint Green | YarnArt Jeans 29 |
| Eyes (Face) | Soft Cream White | YarnArt Jeans 03 |
| Beak | Honey Mustard | YarnArt Jeans 35 |
| Cheeks | Blush Pink (optional) | Embroidery floss or fine yarn |
| Lashes | Black Embroidery Thread | — |
🪡 Extras:
– Safety Eyes (6 mm)
– Crochet Hook (2.0 mm or 2.5 mm)
– Stuffing (Fiberfill)
– Yarn needle
– Keychain ring (silver or gold)
Easy Step-by-Step Crochet Instructions (With Tips!)
Now, let’s bring this tiny owl to life! This amigurumi owl free pattern is broken down by parts: body, eyes, wings, beak, and more, with each section quick and simple to follow.
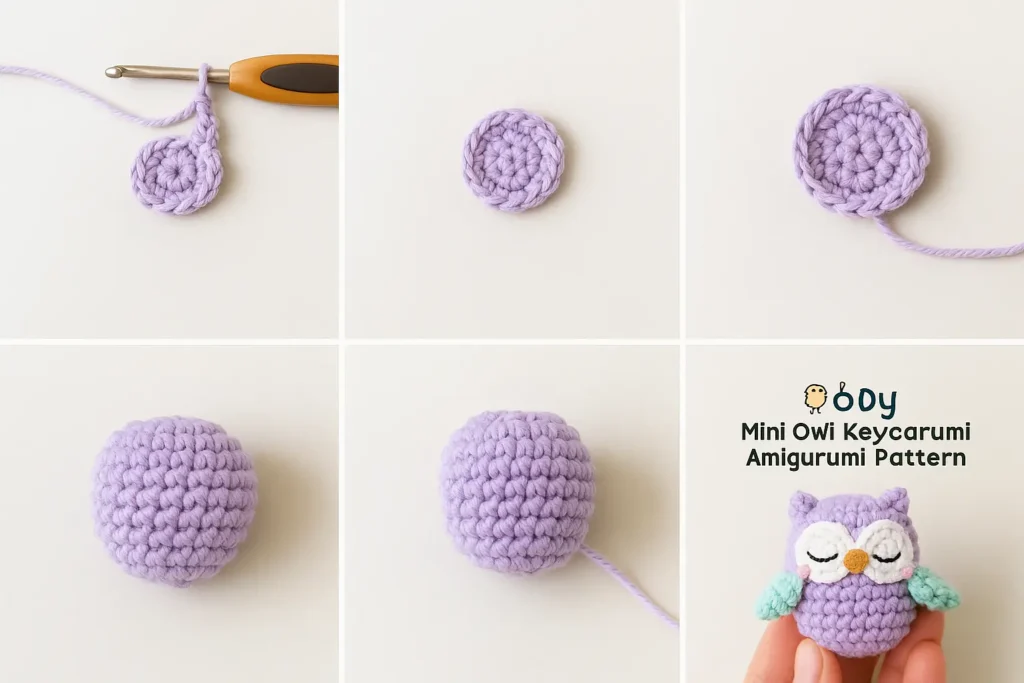
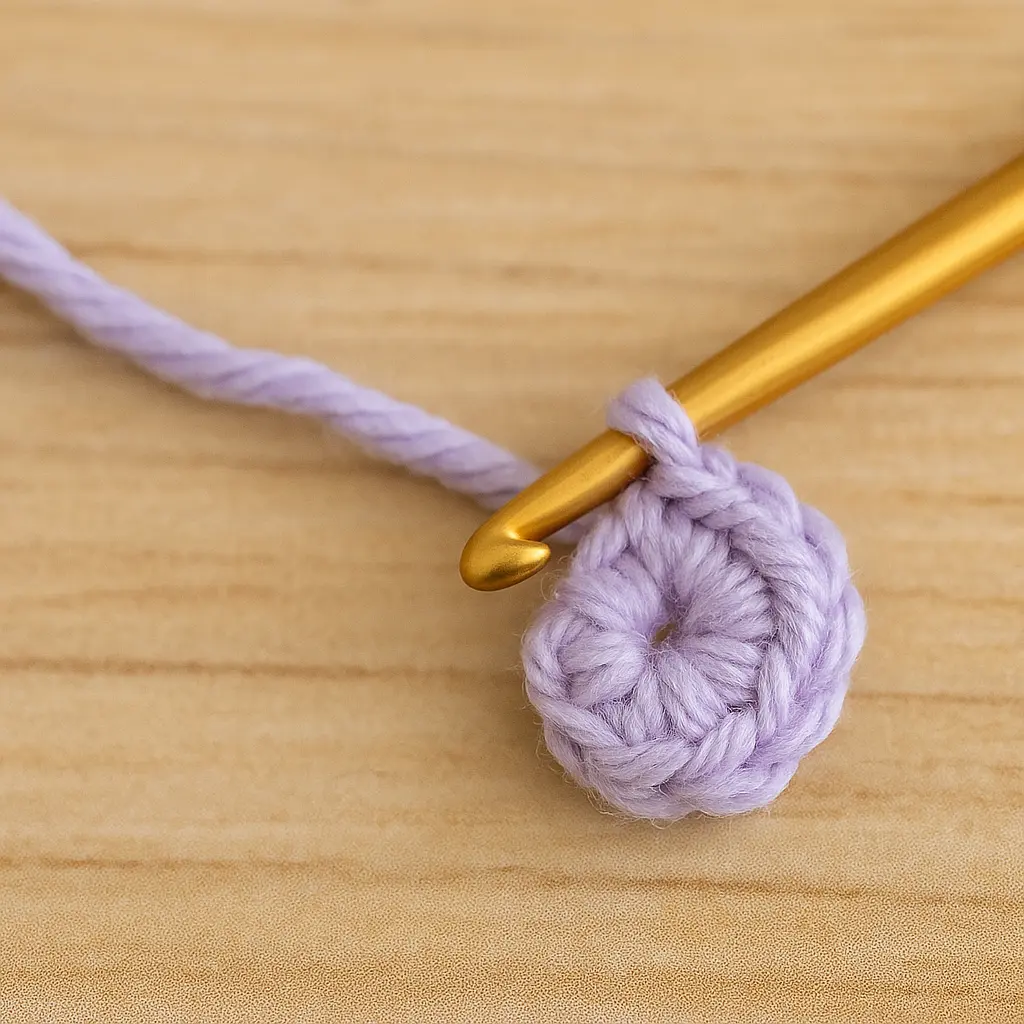
🧵 Body
Yarn: Light Lavender (YarnArt Jeans 74 or Alize Cotton Gold)
- MR, 6 sc in ring (6)
- inc ×6 → (12)
- (sc, inc) ×6 → (18)
- (2 sc, inc) ×6 → (24)
- (3 sc, inc) ×6 → (30)
6–12. sc in each st (30) - (3 sc, dec) ×6 → (24)
- (2 sc, dec) ×6 → (18)
- (sc, dec) ×6 → (12)
🧷 Stuff firmly - dec ×6 → (6)
Fasten off, close the hole with a needle
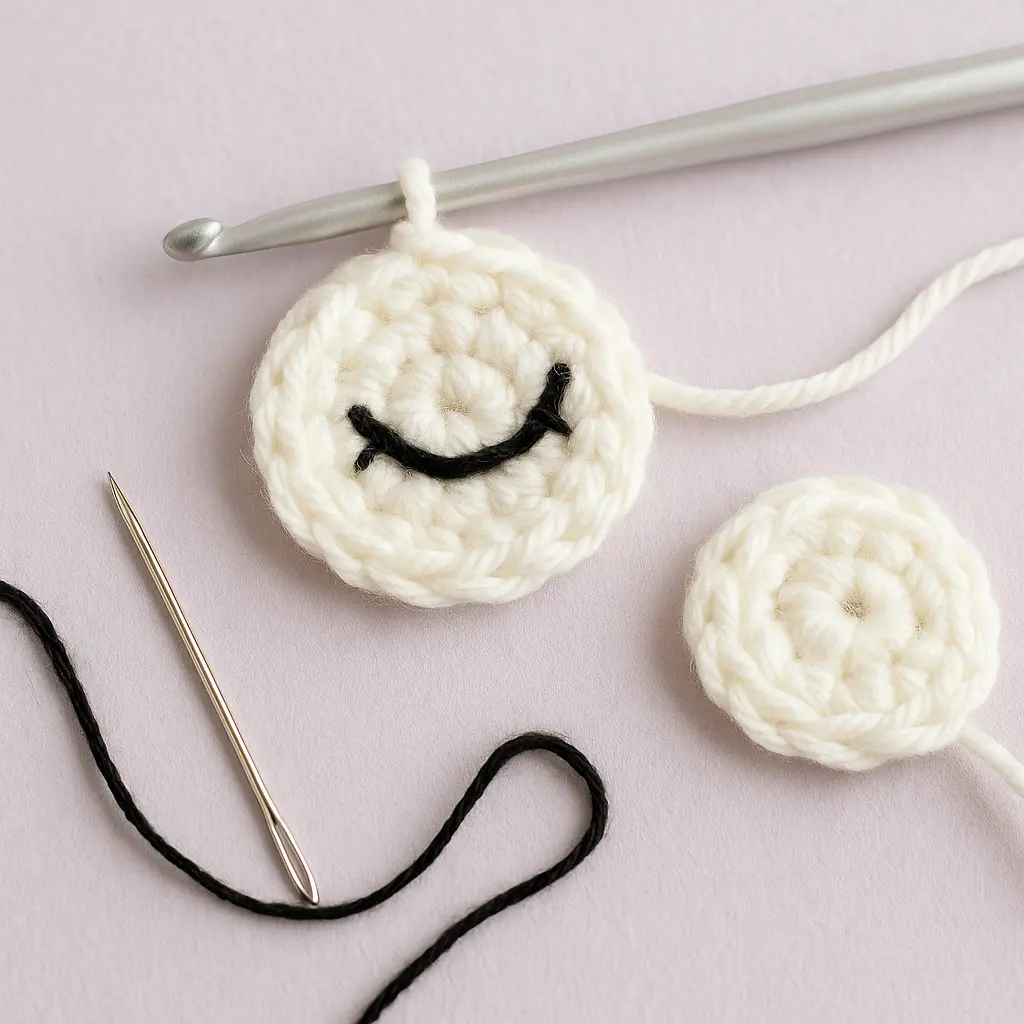
👁️ Eyes (Make 2)
Yarn: Soft Cream White
- MR, 6 sc in ring (6)
- inc ×6 → (12)
- (sc, inc) ×6 → (18)
Fasten off, leave a long tail for sewing
🪡 Add 6 mm safety eyes in the center or embroider black lashes with thread
🧵 Tip: Insert the safety eyes before attaching the white part to the body so you get a centered look.
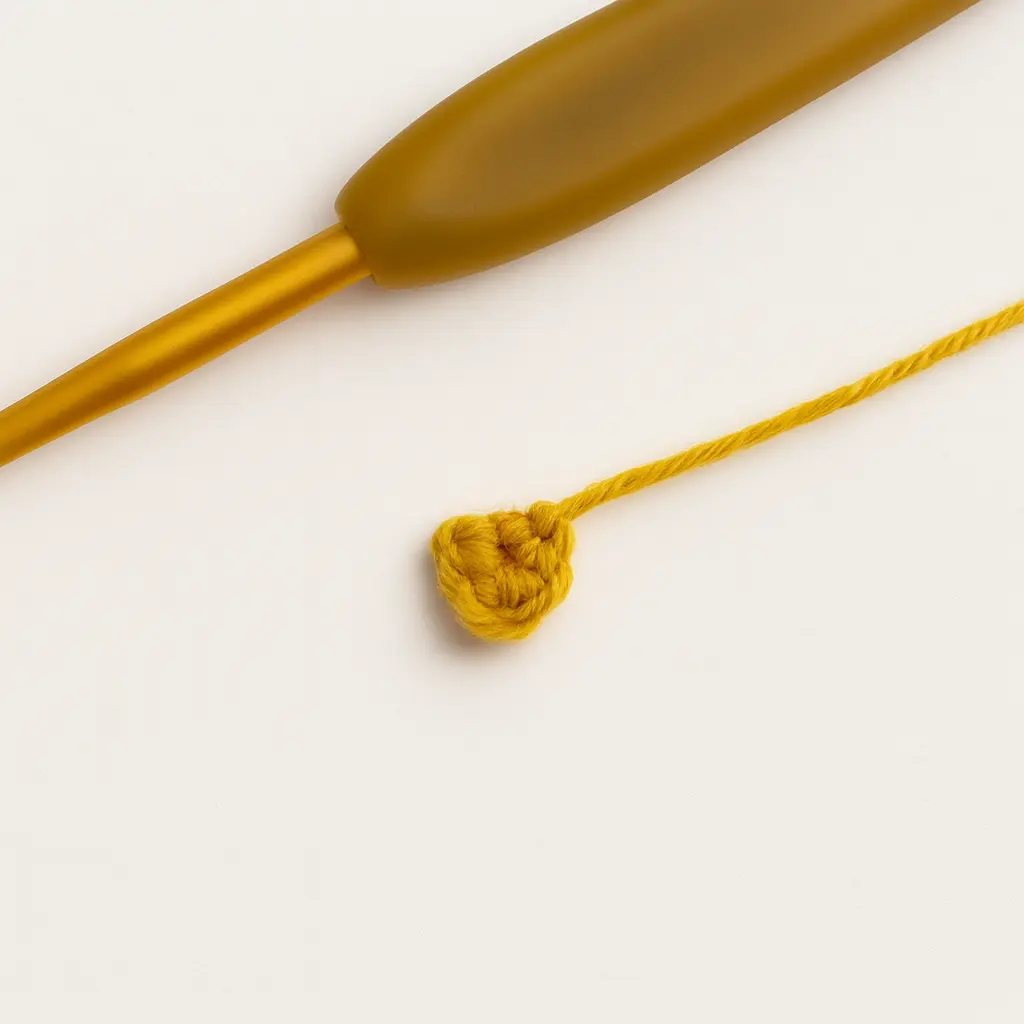
💛 Beak
Yarn: Honey Mustard
- Ch 2, 3 sc in second ch from hook
Fasten off and sew between the eyes
This little triangle adds so much personality! Even beginners can stitch it in just a minute.
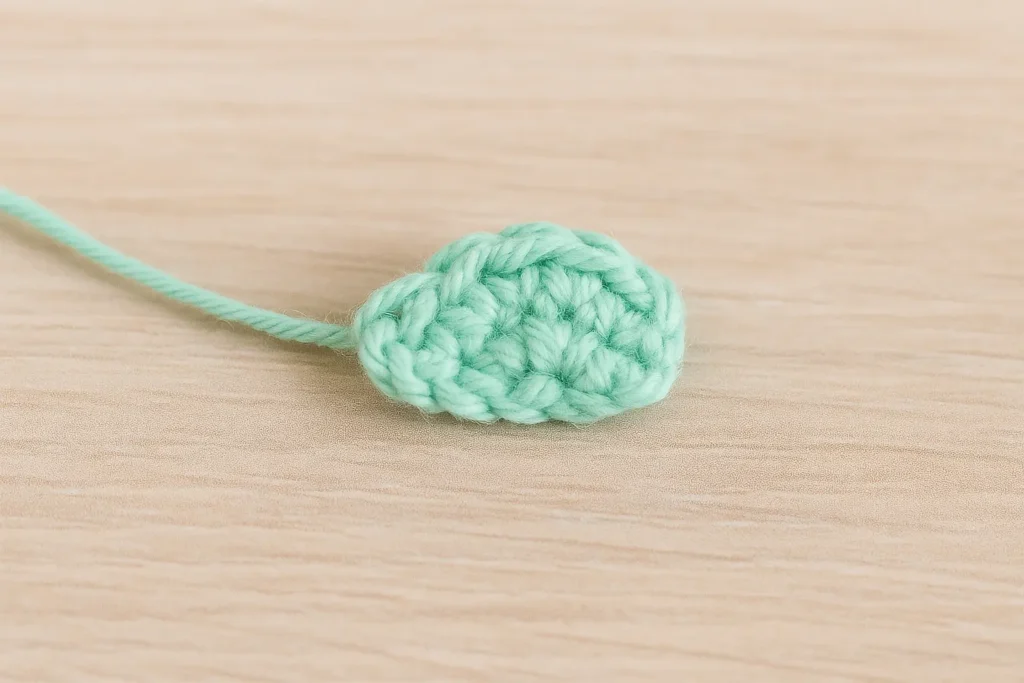
🪽 Wings (Make 2)
Yarn: Mint Green
- MR, 6 sc in ring (6)
- (sc, inc) ×3 → (9)
- sc in each st (9)
Flatten and sew to the sides of the body
They look adorable when slightly angled downward, like the owl is just about to flap!
🐾 Ears (Make 2)
Yarn: Light Lavender
- MR, 4 sc in ring (4)
- sc around (4)
Fasten off and sew to the top corners
The ears are tiny, but they give your owl its signature look. Sew them on at a slight diagonal angle.
🪝 Finishing Touches
– Embroider small pink cheeks with blush-colored embroidery floss
– Sew all pieces securely using matching yarn tails
– Attach a silver or gold keychain ring to the center top of the head using extra yarn for strength

You’ve now completed your first mini owl! And because this amigurumi owl free pattern is so quick, you’ll likely find yourself making a flock of them. I’ve done them in teal and mustard, lilac and silver, and even holiday colors like red and green.
If you’d like to give your owl a little extra flair, try gluing on felt eyelashes, using sparkly yarn for the wings, or adding a bow tie from ribbon. You can also personalize your owl with initials using surface embroidery, a perfect touch for gifts.
And don’t forget: if you’re a beginner, this amigurumi owl free pattern is a great way to practice shaping, stitch tension, and simple joins. It’s small, satisfying, and totally beginner-approved.
When you’re done, share your little creation on Instagram or Pinterest and tag it with #TopAmigurumi. I absolutely love seeing the creative spins others put on this pattern!
🎨 Customization & Crafty Ideas
Fun Variations: Colors, Accessories & Personality
One of the most delightful things about this amigurumi owl free pattern is how easily it adapts to your creativity. Once you’ve made one, you’ll want to experiment with all kinds of color combos and tiny personal touches that make each owl unique.
Let’s start with color. While my go-to owl is lavender and mint (because it feels soft and magical), I’ve also made versions in:
– Sky blue with sunflower yellow wings
– Forest green with cream eyes and a red heart belly
– Peach with silver sparkle yarn for the wings
The combinations are endless. And the best part? You only need small scraps of yarn, making this amigurumi owl free pattern perfect for stash-busting.
Want to add accessories? Here are a few fun ideas I’ve tried:
– Mini glasses: Bend thin craft wire into a small glasses shape, adorable for a nerdy owl vibe.
– Tiny bow tie or hair bow: Use ribbon or crochet a small chain circle to sew at the base of one ear.
– Graduation cap: Perfect for celebrating milestones, just a small black square stitched to a round base with a tassel.
– Heart belly patch: Cut a felt heart or crochet a mini heart and sew it to the front.
With just a little extra stitching or embellishment, your owl goes from basic to bursting with personality. And if you’re giving them as gifts, consider making each owl match the recipient’s favorite colors.
One of my readers recently used this amigurumi owl free pattern to create teacher appreciation gifts, complete with apple-red bellies and mini chalkboards made of felt. It melted my heart!
Turn Your Owl Into a Keychain, Gift, or Ornament
This amigurumi owl free pattern was originally designed as a keychain, but honestly, it works beautifully in so many other ways. Here are a few ways to use your finished owl:
1. Backpack Buddy
Use a metal keychain ring and strong yarn to loop through the top of the head. It makes a fun school bag charm or pencil case friend. My granddaughter loves hers clipped to her lunchbox!
More Free Amigurumi Patterns You’ll Love


2. Christmas Ornament
Add a loop of yarn or ribbon instead of a keychain and hang it from your holiday tree. Try making a set in red, green, and white for a festive vibe.
3. Party Favor or Baby Shower Gift
Need a bunch of quick handmade gifts? This amigurumi owl free pattern is perfect. Stitch up a flock and tie each one to a tag with a sweet thank-you note.
4. Desk Buddy or Stress Squisher
They’re just the right size to keep on your desk or nightstand. A small owl to hold in your hand during a busy day? Yes, please.
5. Charity or Craft Fair Seller
If you sell handmade items or donate to local causes, this amigurumi owl free pattern makes an excellent choice. It’s quick, eye-catching, and easy to personalize.
One maker I know crocheted 30 owls for a children’s hospital drive each one in a different color. The nurses said the kids loved naming their owl and sleeping with it in their hands.
The truth is, this amigurumi owl free pattern is more than just a cute toy. It becomes a keepsake, a smile-giver, and sometimes, a source of comfort.
And because it’s so beginner-friendly, it’s also a wonderful way to teach someone else how to crochet. I’ve used it with new students in my crochet circles. They finish it, feel accomplished, and immediately want to make more.
So whether you’re gifting, selling, decorating, or teaching, your little owl is ready to fly into someone’s day and make it brighter.
🧵 FAQs, Final Touches & Tips
Most Common Questions About This Pattern
Q1: Is this amigurumi owl free pattern beginner-friendly?
Absolutely! This amigurumi owl free pattern uses only basic stitches, magic ring, single crochet, increase, and decrease. It’s perfect for crocheters just starting out or anyone who wants a relaxing weekend project. If you can do a magic ring and count to 6, you’re ready.
Q2: Can I make this owl without safety eyes?
Yes! If you prefer a baby-safe or embroidery-only version, simply skip the plastic eyes. Instead, embroider the eyes using black thread or felt circles. The result is still just as charming and makes the amigurumi owl free pattern safer for infants and toddlers.
Q3: How long does it take to complete this owl?
For most crocheters, this amigurumi owl free pattern takes between 1.5 to 2 hours total. If you’re quick with your hook or batch-working several owls at once, it can take even less time. It’s one of those satisfying “made-in-a-day” patterns you’ll return to often.
Q4: Can I sell items made from this pattern?
Yes, handmade owls from this amigurumi owl free pattern can be sold especially at craft fairs or Etsy shops. Just don’t republish or sell the pattern itself. A friendly tag saying “pattern from TopAmigurumi.com” is always appreciated!
Final Assembly, Finishing Touches, and Care Instructions
Once all your pieces are stitched and attached, take a moment to fluff your owl gently. Tug the wings into shape, adjust the ears to tilt just right, and give it a soft squeeze. That’s when the real magic of this amigurumi owl free pattern shines.
🧼 Care Tip: If gifting to a child or using as a keychain, I recommend surface-washing only. Use a damp cloth and mild soap. Don’t soak the owl or run it through a washing machine, as it might distort the stuffing.
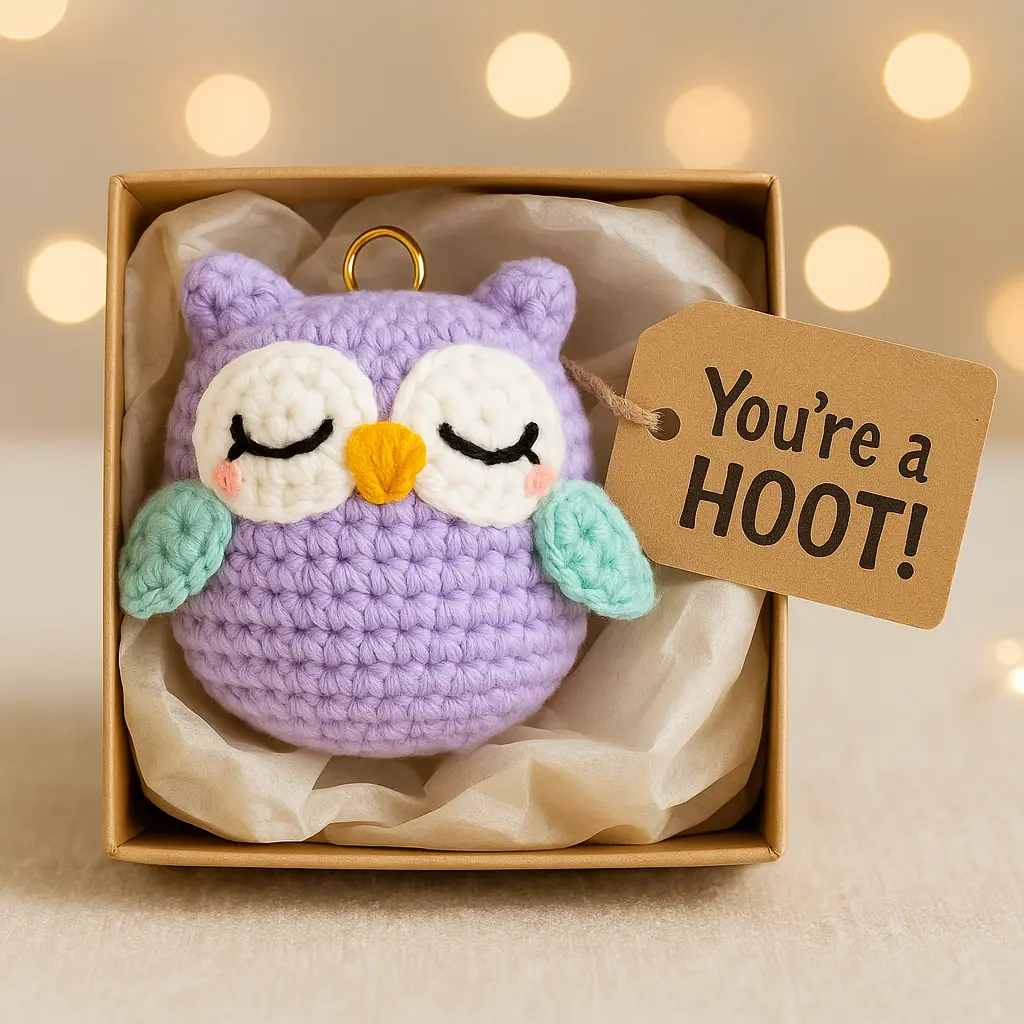
🎁 Gifting Idea: Wrap the owl in a kraft paper box with some soft tissue and a tag that says “You’re a Hoot!” I’ve done this and it never fails to get a smile.
💡 Storage Tip: If you’re making several to gift or sell, keep them in mesh laundry bags or unused shoe boxes to protect them from dust.
For more tips on amigurumi finishing and stuffing, I recommend checking out All About Ami, one of my favorite crochet blogs with excellent tutorials.
You can also revisit some of my other sweet and simple patterns or try your hand at the easy owl plush variation coming soon to the site.
And that’s it! Your tiny handmade owl is ready to be loved, gifted, or admired on your shelf. Small enough to fit in a pocket, cute enough to win hearts, this amigurumi owl free pattern has brought joy to so many crafters, and I hope it does the same for you.
💛 Final Thoughts
There’s something special about finishing a handmade project — especially one that fits in the palm of your hand and carries a whole lot of heart. This amigurumi owl free pattern isn’t just a cute crochet idea; it’s a moment of calm, a burst of joy, and a chance to turn leftover yarn into something meaningful.
Whether you made your owl in soft lavender or chose bold rainbow hues, I hope the process made you smile. I’d love to see your creations — tag me on Pinterest or Instagram with #TopAmigurumiOwls!
📌 Want more lovable free patterns like this one? Try my fan-favorite Free Crochet Labubu Pattern next — it’s a soft pink plushie that’s captured thousands of hearts.
📌 Follow me on Pinterest for daily pin-worthy amigurumi tips, free patterns, and adorable project inspiration:
👉 TopAmigurumi on Pinterest
✍️ Read more behind-the-scenes crochet stories and free tutorials on Medium:
👉 Follow TopAmigurumi on Medium