


Crochet mini Christmas stocking pattern fans, this little sock is about to become your new favorite last-minute Christmas project. These tiny stockings work up in 15–20 minutes, they eat up your leftover yarn, and they look ridiculously cute hanging on the tree, taped to a gift, or lined up on a garland over your mantel.
When I was decorating our tree this year, I realized I wanted something small enough to tuck candy and little notes inside, but simple enough that I could make a whole batch in one cozy evening. That’s how this mini Christmas sock crochet pattern was born: same classic stocking shape, but in four different color layouts so you can match every corner of your festive chaos.
If you’re still pretty new to amigurumi, don’t worry—this pattern only uses basic stitches and easy color changes. You can always warm up with my beginner-friendly guide First Amigurumi – Step-by-Step Guide and then come back to these tiny stockings when you’re ready. And if you’re wondering what this whole “amigurumi” thing is anyway, I explain it in plain language in What Is Amigurumi?.
In this tutorial we’ll walk through one simple base sock, then I’ll show you how to turn it into four different mini Christmas stockings using only color changes: a classic green sock with red toe and heel, a bold stripey version, a red sock with frilly white cuff, and a tiny candy-cane style check pattern. By the end, you’ll have a whole set of little Christmas socks ready for your tree, your advent calendar, or your gift wrapping station.
Jump to section
Materials & Finished Size
Before we dive into the stitches, let’s gather everything you need for this crochet mini Christmas stocking pattern. The good news: each little sock uses only a tiny bit of yarn, so it’s perfect for leftovers from other projects.
Yarn
You can use either DK or worsted weight yarn in classic Christmas colors:
- Red
- Green
- White (for cuffs and details)
- Optional: gold, silver or any fun accent color for extra sparkle
If you’re not sure which yarn you have in your stash, my handy yarn weight, gauge and hook size guide will help you match yarn and hook so your mini stockings come out neat and not too floppy. For official industry guidelines, you can also check the Craft Yarn Council yarn standards, which many designers use when writing crochet patterns.
Hook
- 3.0–3.5 mm crochet hook (or the size that gives you tight, even stitches with your yarn)
Tighter stitches help the socks keep their shape, especially if you’re hanging them on a garland or using them as tiny gift pockets.
Notions
- Yarn needle for weaving in ends
- Scissors
- Stitch marker (for marking the first stitch of each round)
- Optional: thin ribbon or string if you want to add extra hanging loops or tie them to gifts
Finished Size
With DK or light worsted yarn and a 3.0–3.5 mm hook, each little Christmas sock measures approximately:
- Height: 7–8 cm (about 3 inches) from toe to top of cuff
- Width: 4–4.5 cm (about 1.5–1.75 inches) across the foot
Size will vary slightly depending on your yarn, hook, and personal tension, but they’re all adorably tiny, which is exactly what we want.
Stitches & Techniques Used
This crochet mini Christmas stocking pattern utilizes only a handful of simple stitches, making it very friendly for confident beginners. If any of the abbreviations look scary, don’t worry, I’ve got full photo tutorials you can hop to and come right back.
- Chain (ch): We use chains mostly for starting the heel rows and making the hanging loop. If you need a refresher on how to make neat, even chains, you can follow my step-by-step tutorial in How to Crochet a Chain Stitch.
- Single crochet (sc): Almost the entire little sock is worked in single crochet. If you’re still mastering tension or working in the round, my photo guide How to Single Crochet shows each step slowly.
- Half double crochet (hdc): We use hdc in the heel patch to create a smooth, slanted triangle. You can see exactly how to yarn over and pull through in How to Half Double Crochet.
- Double crochet (dc): The taller stitches also appear in the heel, helping it grow quickly without adding bulk. If you’re new to dc, check the walkthrough in How to Double Crochet.
- Magic ring (MR): The toe starts with a magic ring, so there’s no hole at the tip of the sock. If you’re still fighting with that loop (we’ve all been there), my comparison post Magic Ring vs Chain Circle for Amigurumi explains both methods and how to tighten them.
- Increases & decreases (inc, dec): We use simple increases (2 sc in one stitch) to shape the toe, and regular decreases to keep the foot snug. For even neater shaping in other toys, you can learn the invisible method in Invisible Decrease Crochet.
- Color changes in the round: All four mini socks rely on clean color changes for the stripes and heel. If your joins look jagged, my tutorial Changing Colors in Amigurumi shows how to switch yarn on the last yarn-over of the stitch so the stripes stay crisp.
Once you’re comfortable with these basics, you’re ready to dive into the actual crochet mini Christmas stocking pattern and start the tiny toe.
Base Crochet Mini Christmas Stocking Pattern (US Terms)
Now it’s time for the actual crochet mini Christmas stocking pattern. All four little socks use this same base shape – we only change the colors later to get the different versions.
We’ll first crochet one plain mini sock (toe, foot, heel patch, leg, and cuff). In the next part, I’ll show you the exact color layouts for each of the four Christmas socks from the photos.
Abbreviations (US)
- MR – magic ring
- ch – chain
- sl st – slip stitch
- sc – single crochet (X in the chart)
- hdc – half double crochet (T in the chart)
- dc – double crochet (F in the chart)
- inc – increase (2 sc in same st) (V in the chart)
- dec – decrease, sc2tog (A in the chart)
Pattern notes
- Work in continuous rounds (spiral) unless it says to turn.
- Use a stitch marker to mark the first stitch of each round.
- Stuffing is optional for this pattern – these are more like flat little socks than thick amigurumi toys.
BASE MINI SOCK (works for all 4 versions)
TOE – Rounds 1–3
With your toe color:
- R1: MR, 15 sc in ring. (15)
- R2: sc in each st around. (15)
- R3: (4 sc, inc) × 3. (18)
From now on you have 18 stitches in every round.
FOOT & ANKLE – Rounds 4–12
Still in the round:
- R4–R12: sc in each st around. (18)
Fasten off your main color here (recommended), because the heel patch is joined separately and the leg section starts with “re-attach.” Weave the tail to the inside.
For now you can work these rounds all in one color, or already follow one of the stripe color layouts (we’ll detail them in the next part). The shape stays exactly the same.
HEEL PATCH – Rows 13–14 (worked flat)
This creates the cute little heel triangle on the side of the sock.
- Choose which side of the sock will be the heel side.
- On that side, count out the middle 10 stitches.
- Join your heel color in the first of those stitches.
Row 13 – heel increase row (in heel color):
- ch 1,
- sc in first st,
- hdc in next st,
- dc in next 2 sts,
- 2 dc in next st,
- dc in next 2 sts,
- hdc in next st,
- sc in last st.
- Turn.
You now have a small wedge shape.
Row 14 – heel shaping row (in heel color):
- ch 1,
- sc in first st,
- hdc in next st,
- dc in next 2 sts,
- dc2tog over next 2 sts,
- dc in next 2 sts,
- hdc in next st,
- sc in last st.
Fasten off the heel color and weave the ends to the inside of the sock.
The main sock body still keeps its original 18 stitches in the round. The heel patch simply sits on top like a little triangle.
LEG – Rounds 15–21
Re-attach your leg color anywhere along the top edge of the sock.
- R15–R21: sc in each st around. (18)
You can adjust the leg height by adding or removing a round or two, depending on how tall you want your mini stocking to be. In the color layouts later, I’ll tell you exactly which rounds to work in which color for each sock.
CUFF – Round 22
You have two options for the top of your little Christmas sock: a simple straight cuff or a frilly ruffled cuff.
Option 1 – Plain cuff
- R22: sc in each st around. (18)
Fasten off and weave in the yarn tail.
Option 2 – Ruffled cuff
- R22: (sc in next st, ch 3, sl st in same st) repeat around the top edge.
You’ll end up with 18 tiny ruffles.
Fasten off and weave in the yarn tail.
Hanging Loop (for ornament or garland)
With cuff color (or a contrast color):
- Join yarn at the back of the cuff.
- ch 10–12 (or more, if you want a longer loop).
- sl st back into the same stitch to form a loop.
- Fasten off and weave the end to the inside of the cuff.
Your base crochet mini Christmas stocking is complete! 🎄
Next, we’ll turn this same shape into four different little Christmas socks just by changing the color layout.
Color Layouts for the 4 Mini Christmas Socks
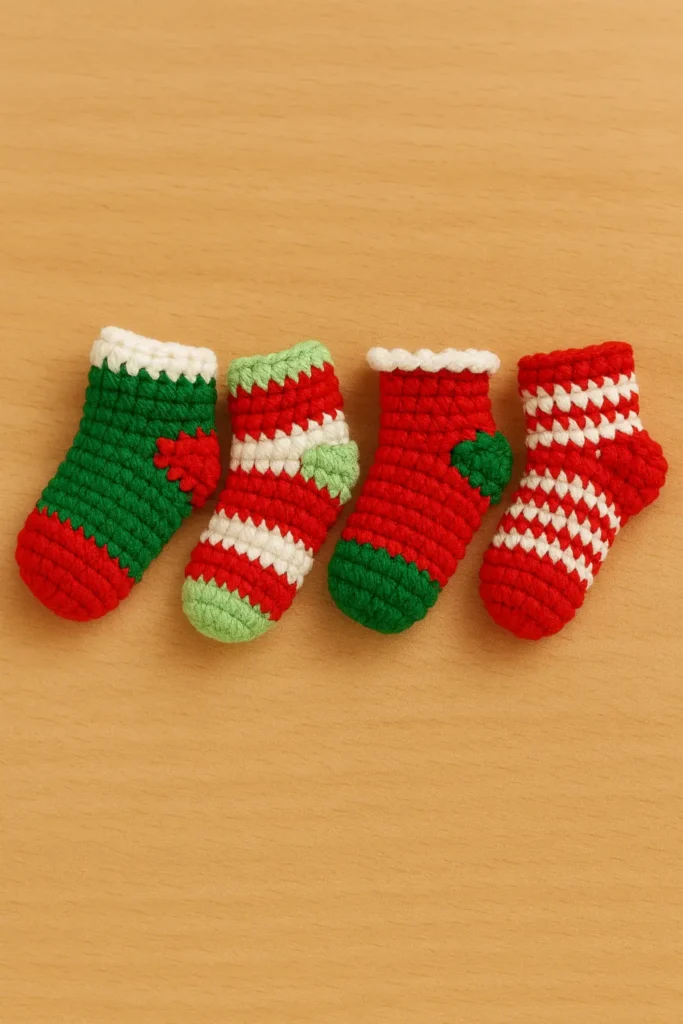
Now that you’ve got the base crochet mini Christmas stocking pattern, we’ll turn it into four different little Christmas socks just by changing the colors. The shape and stitch counts stay exactly the same – only the rounds and colors change.
You can follow these layouts exactly, or mix and match to create your own mini army of stockings to hang next to your free crochet Santa Claus gnome pattern and free crochet Christmas tree pattern on the mantel. 🎄✨
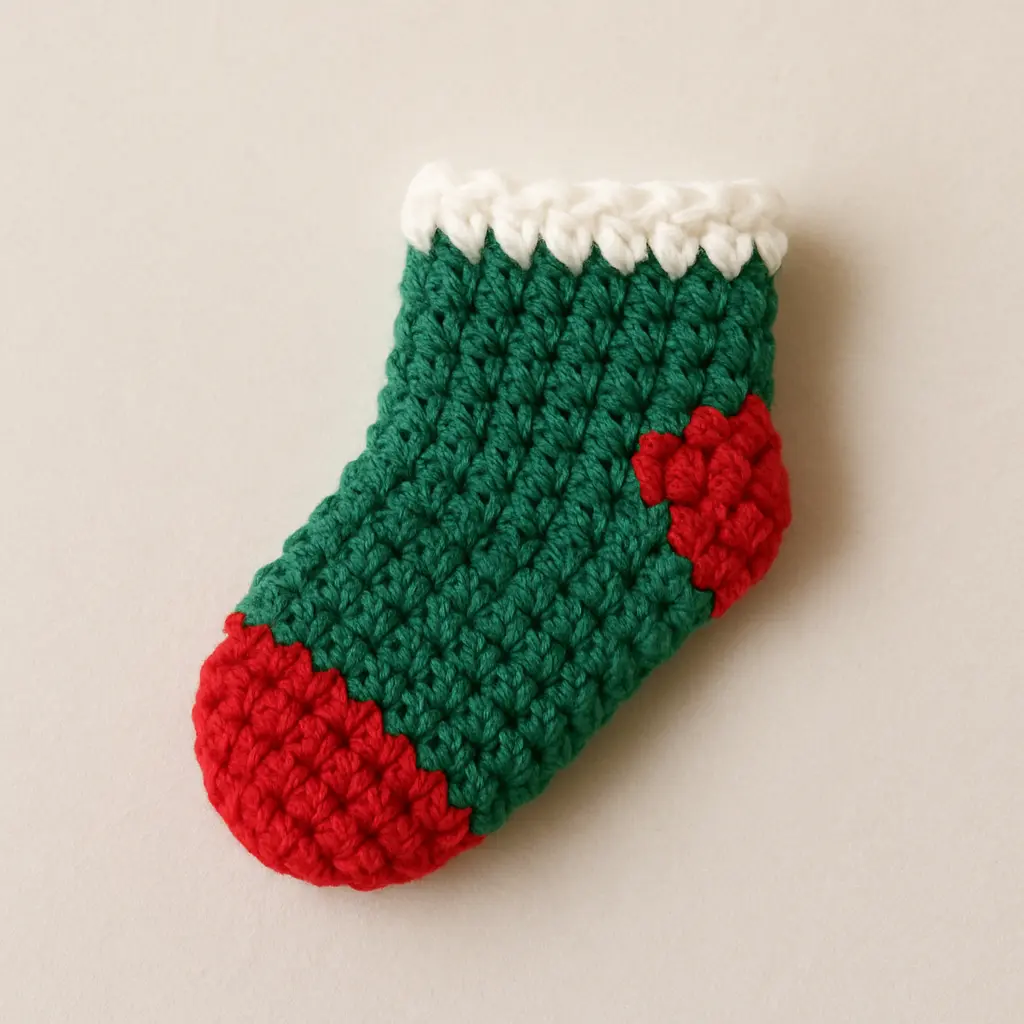
1️⃣ Green Sock with Red Toe & Heel, White Cuff
A classic little Christmas sock, simple and very “elf” looking.
- Toe (R1–R3): Red
- Foot & ankle (R4–R12): Green
- Heel patch (Rows 13–14): Red
- Leg above heel (R15–R21): Green – work all these rounds in green for a solid leg.
- Cuff (R22): White – use the plain sc cuff option.
You can stop after one round of white for a short cuff, or work a second white round if you want the cuff to look a bit taller and more snowy.
2️⃣ Green Toe, Red–White Wide Stripes, Green Heel & Cuff
This version looks like a tiny candy-striped sock – perfect if you love bold, graphic Christmas colors.
- Toe (R1–R3): Green
Foot stripes (R4–R12):
More Free Amigurumi Patterns You’ll Love


")

- R4–R6: Red
- R7–R9: White
- R10–R12: Red
- Heel patch (Rows 13–14): Green
Leg stripes above heel (R15–R20):
- R15–R17: White
- R18–R20: Red
- Cuff (R21–R22): Green – work 2 rounds of plain sc for a neat, solid green cuff.
Tip: always change to the new color on the last yarn-over of the last sc of the previous round so your stripes stay clean and you don’t get jagged color steps.
3️⃣ Green Toe & Heel, Red Body, White Ruffled Cuff
This is the “fancy” version of the mini Christmas stocking crochet pattern, with a fluffy white ruffled cuff that looks like snow.
- Toe (R1–R3): Green
- Foot & ankle (R4–R12): Red
- Heel patch (Rows 13–14): Green
- Leg above heel (R15–R21): Red
- Cuff (R22): White – work the ruffled cuff option:
- (sc in next st, ch 3, sl st in same st) repeat in every stitch around.
You’ll end up with 18 tiny ruffles around the top edge. This one looks especially cute hanging at the front of a garland or as the “center” stocking in a set.
4️⃣ Red Toe & Heel, Red–White Tiny Stripes
This mini sock has a tighter stripe pattern that gives it a little checkered, candy-cane vibe without being too busy.
- Toe (R1–R3): Red
Foot tiny stripes (R4–R12):
Work all rounds in sc, alternating colors every round:
- R4 – White
- R5 – Red
- R6 – White
- R7 – Red
- R8 – White
- R9 – Red
- R10 – White
- R11 – Red
- R12 – White
- Heel patch (Rows 13–14): Red
Leg stripes (R15–R21):
- R15 – Red
- R16 – White
- R17 – Red
- R18 – White
- R19 – Red
- R20 – White
- R21 – Red
- Cuff (R22): Red – work a simple plain sc cuff in red to frame all those small stripes.
This one looks amazing when you line up several stockings together and alternate it with the wide-stripe version.
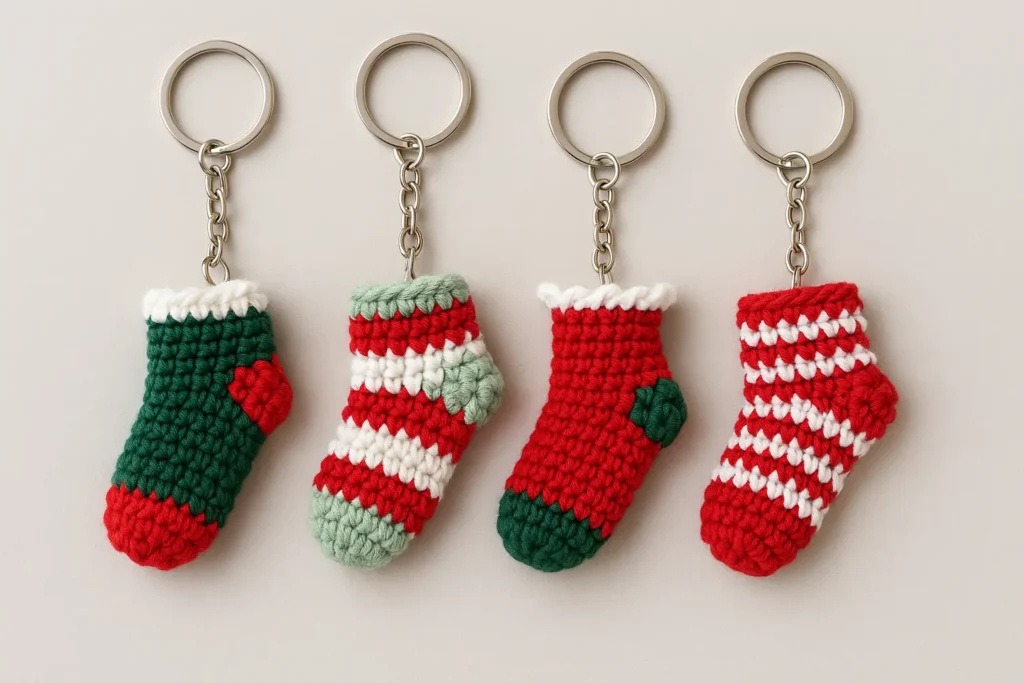
With these four layouts, you can make a whole set from the same crochet mini Christmas stocking pattern just by swapping colors. In the next part, we’ll talk about how to use your mini socks (garlands, advent calendars, gift toppers), and I’ll sprinkle in a few more ideas if you want to match them with other amigurumi friends.
How to Use Your Little Christmas Socks

Once you finish the crochet mini Christmas stocking pattern, you can use the tiny socks in lots of ways:
- Garland: String several mini stockings on a ribbon or twine and hang them over the mantel or on a shelf.
- Tree ornaments: Use the hanging loop to pop them straight onto the Christmas tree or a small tabletop tree.
- Gift toppers: Tie one little sock onto a wrapped present and tuck in a candy or tiny note.
- Mini advent calendar: Make 24–25 socks in different color combos and clip them to a long string or fairy lights, each with a small treat inside.
FAQ: Crochet Mini Christmas Stocking Pattern
Is this crochet mini Christmas stocking pattern beginner-friendly?
Yes, this crochet mini Christmas stocking pattern is great for confident beginners who know how to single crochet in the round and change colors.
How long does one mini Christmas stocking take to make?
Most crocheters can finish one little Christmas sock in about 15–20 minutes, so it’s perfect for last-minute gifts and decorations.
What yarn is best for this mini Christmas stocking crochet pattern?
Any DK or worsted acrylic or cotton yarn works well for this mini Christmas stocking crochet pattern. Just choose a hook that gives you tight stitches so the sock keeps its shape.
Can I sell items made from this free crochet mini Christmas stocking pattern?
Yes, you can sell finished stockings made from this free crochet mini Christmas stocking pattern. Please just link back to this page so other makers can find the original pattern too.
If you’re selling at markets, my article Top 10 Amigurumi Mistakes to Avoid has handy tips for neat finishing and secure sewing.
2 comments
Hi! I just made one of these mini stockings!! So cute! I was unsure if should fasten off after the “Foot&Ankle” part, before starting the “Heel patch”. But because the “leg” part started with the instruction “re-attache” i did fasten off and it worked great. Instead of plain or ruffled cuff, I did a round of white single crochets and a round of crab stitch. And I slipp stitched a letter on the stocking. It is part of a crocheted advent calendar. Thank you so much!
Hi Ilse!! Aww I love this so much 🥹🧦✨ And yes — you did it exactly right! Because the Leg section says “re-attach”, you can fasten off after the Foot & Ankle, then join the heel color for the heel patch, fasten off again, and re-attach for the leg.
Also your cuff upgrade (white sc + crab stitch) sounds gorgeous, and the slip-stitched letter for an advent calendar is SUCH a cute idea! Thank you so much for sharing — I’m really happy it turned out great for you! 🎄💛