


If you’ve ever wanted to crochet something sweet without the sugar, a mini cake amigurumi is the perfect project. It’s quick, colorful, and fun to make, no matter your skill level. In this guide, you’ll learn how to crochet mini cake amigurumi step by step, plus a strawberry variation for extra charm.
Jump to section
A Sweet Beginning: Why Crochet a Mini Cake Amigurumi?
Birthdays are all about joy, candles, and cake. A few years ago, I crocheted a tiny plush cake for my granddaughter’s birthday, and the sparkle in her eyes told me it was a hit. Since then, this has become one of my favorite quick projects, a mini amigurumi cake that looks just as delightful as the real thing.
These little cakes aren’t just decorations; they’re keepsakes. They make thoughtful gifts, fun play kitchen toys, and even quirky photo props. Best of all, this crochet birthday cake pattern is beginner-friendly, so anyone can stitch one up. If you’re just starting your journey, my guide on how to read an amigurumi pattern will make this project even easier.
The Complete Mini Cake Amigurumi Pattern
Materials, Tools & Stitches
To crochet a mini cake amigurumi, you will need:
- Plush or chenille yarn (white, light pink, dark pink, purple, yellow)
- Crochet hook: 6–8 mm (depending on yarn thickness)
- Fiberfill stuffing
- Tapestry needle
Stitches used:
- MR (Magic Ring)
- sc (single crochet)
- inc (increase – 2 sc in one stitch)
- dec (decrease – sc2tog)
- sl st (slip stitch)
- ch (chain)
- BO (bobble stitch – 4 dc in same st, closed together)
👉 This makes the pattern beginner-friendly amigurumi cake, since it only uses the most common crochet stitches.
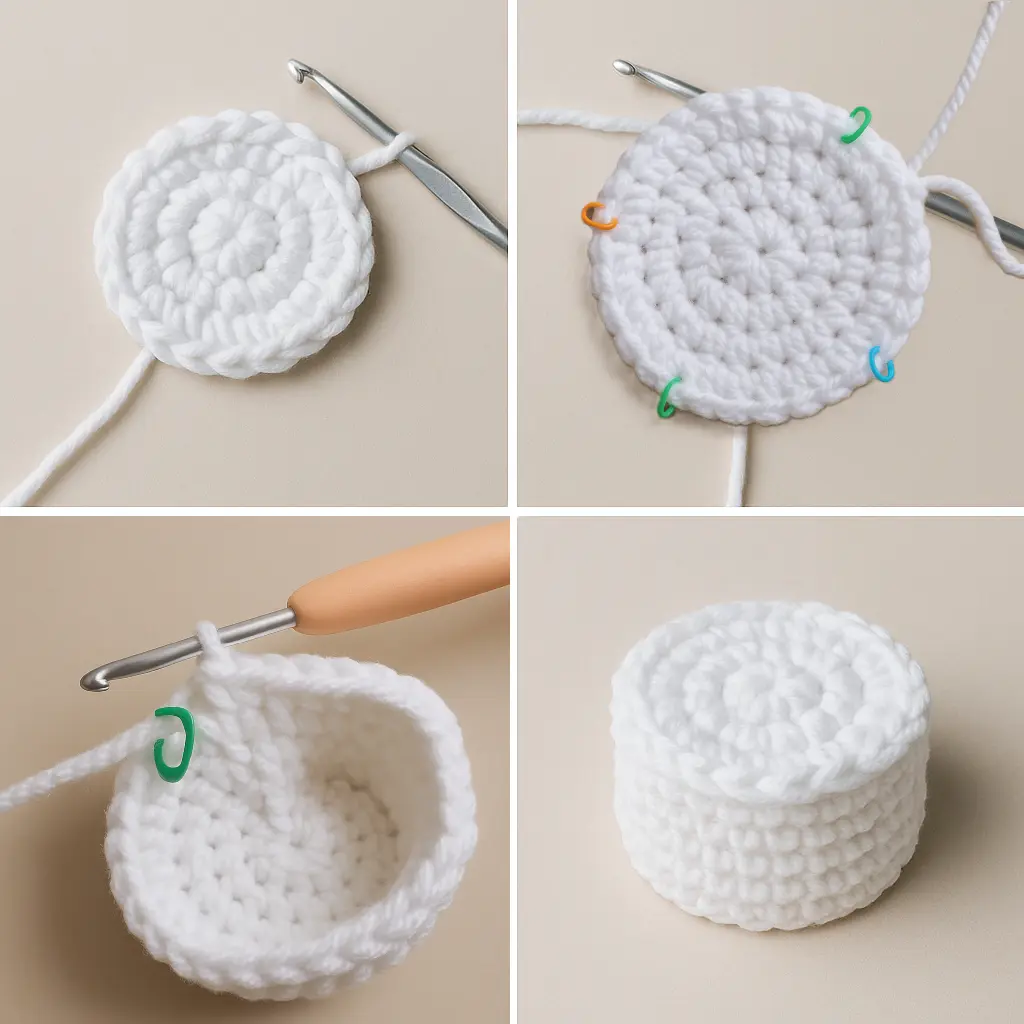
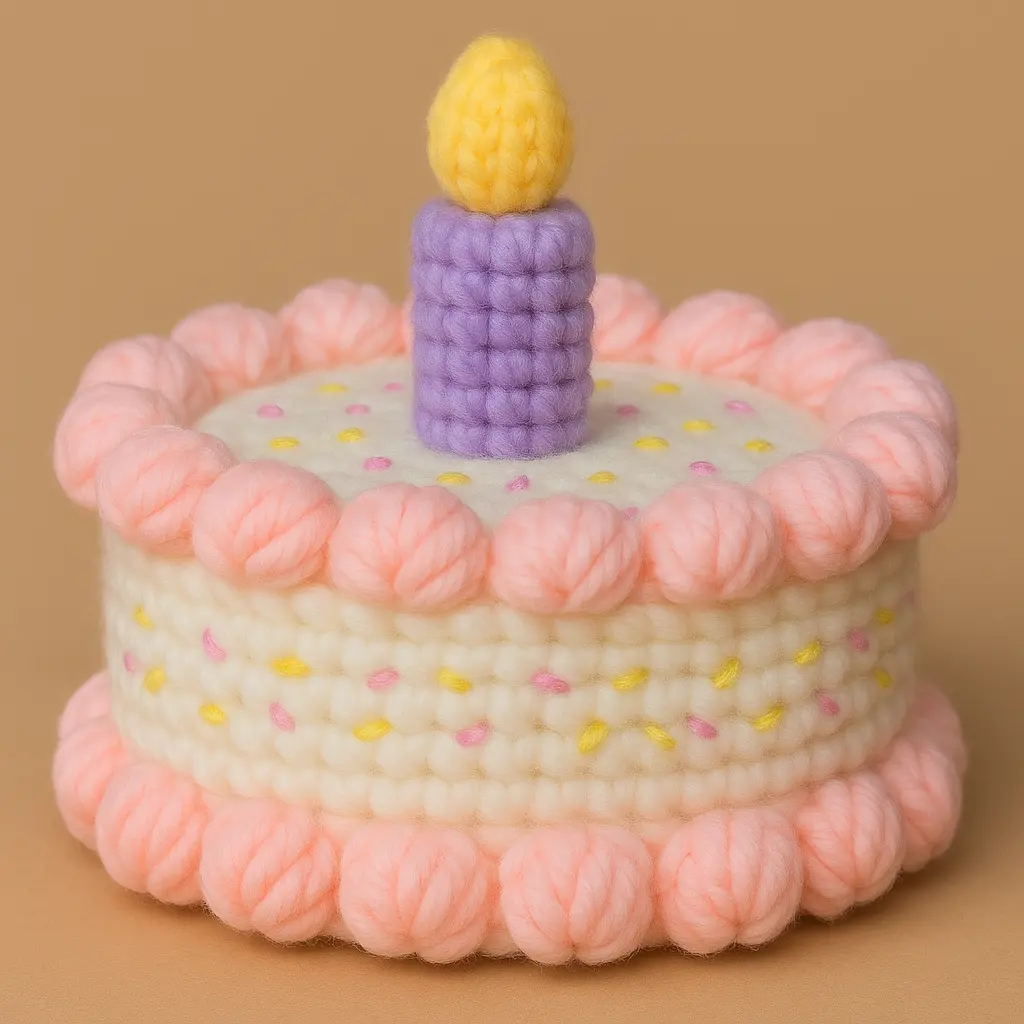
Step 1: White Cake Base
Bottom Circle
- R1: MR, 6 sc (6)
- R2: inc ×6 (12)
- R3: [sc, inc] ×6 (18)
- R4: [2 sc, inc] ×6 (24)
- R5: [3 sc, inc] ×6 (30)
- R6: [4 sc, inc] ×6 (36)
- R7: [5 sc, inc] ×6 (42)
➡️ Finish off (42 sts).
Cylinder Walls
- Attach white yarn to any stitch.
- R1: ch 1, sc around BLO, sl st (42)
- R2–R9: ch 1, sc in each st, sl st (42)
➡️ Adjust number of rounds for cake height.
Top Circle (separate piece)
- Work same as bottom circle until 42 sts.
- Do not cut yarn leave long tail for sewing.
Assembly of Cake
- Stuff cylinder with fiberfill.
- Sew top circle onto cake body with whip stitch or sl st.
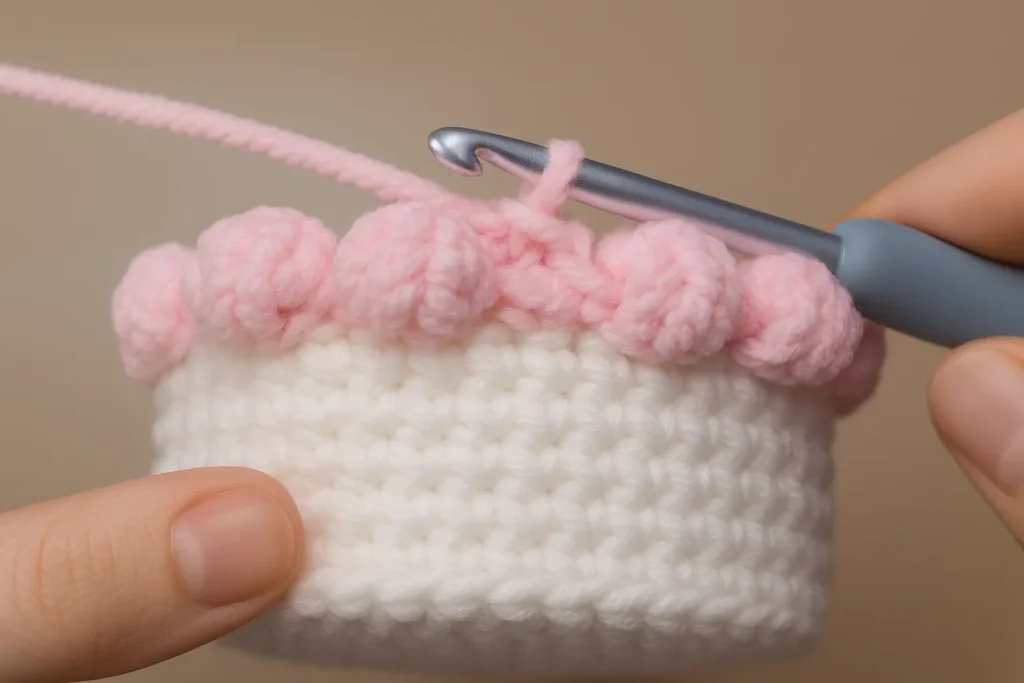
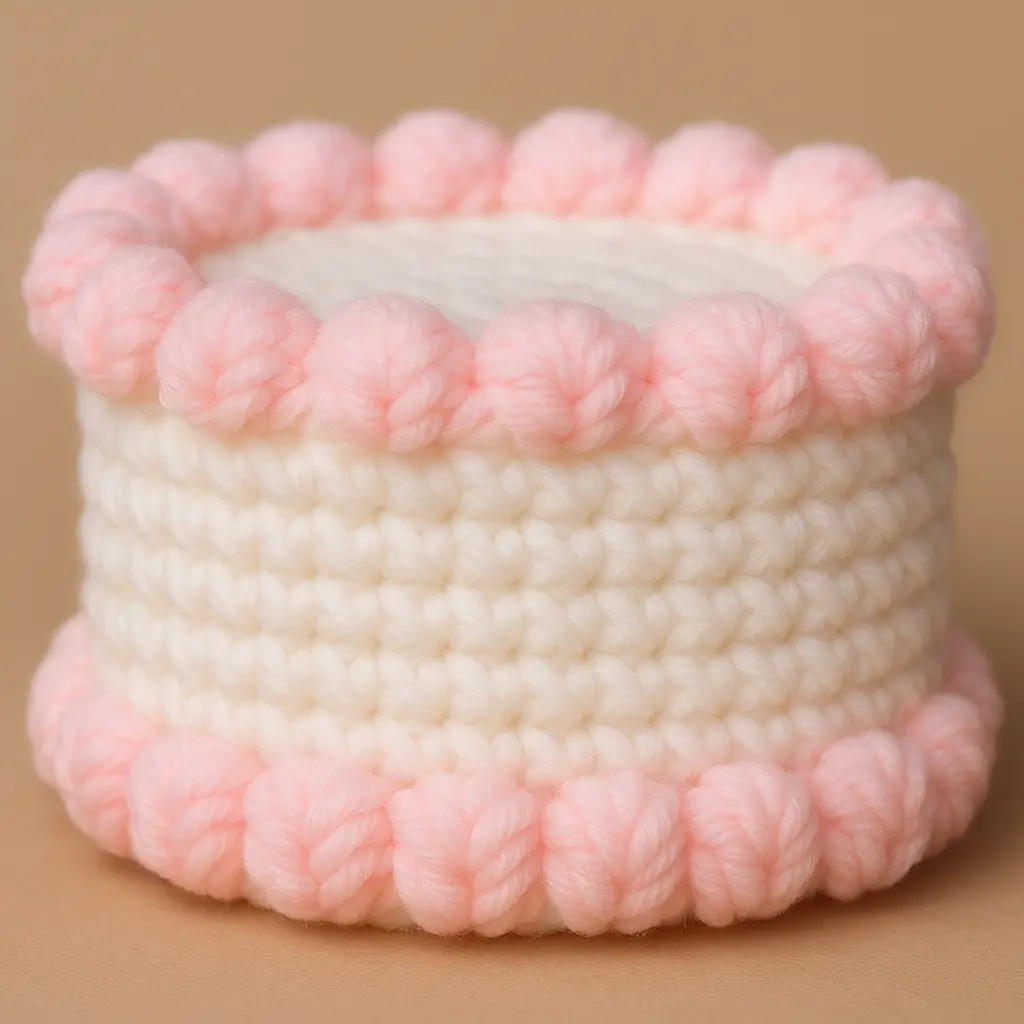
Step 2: Cream Frills
How do you make the cream frills on a mini cake amigurumi?
With pink yarn:
- (sl st, ch 3, BO (4 dc), sl st in next st) repeat around edge.
- First cream frill = light pink → crochet around bottom edge.
- Second cream frill = light pink → crochet around top edge.
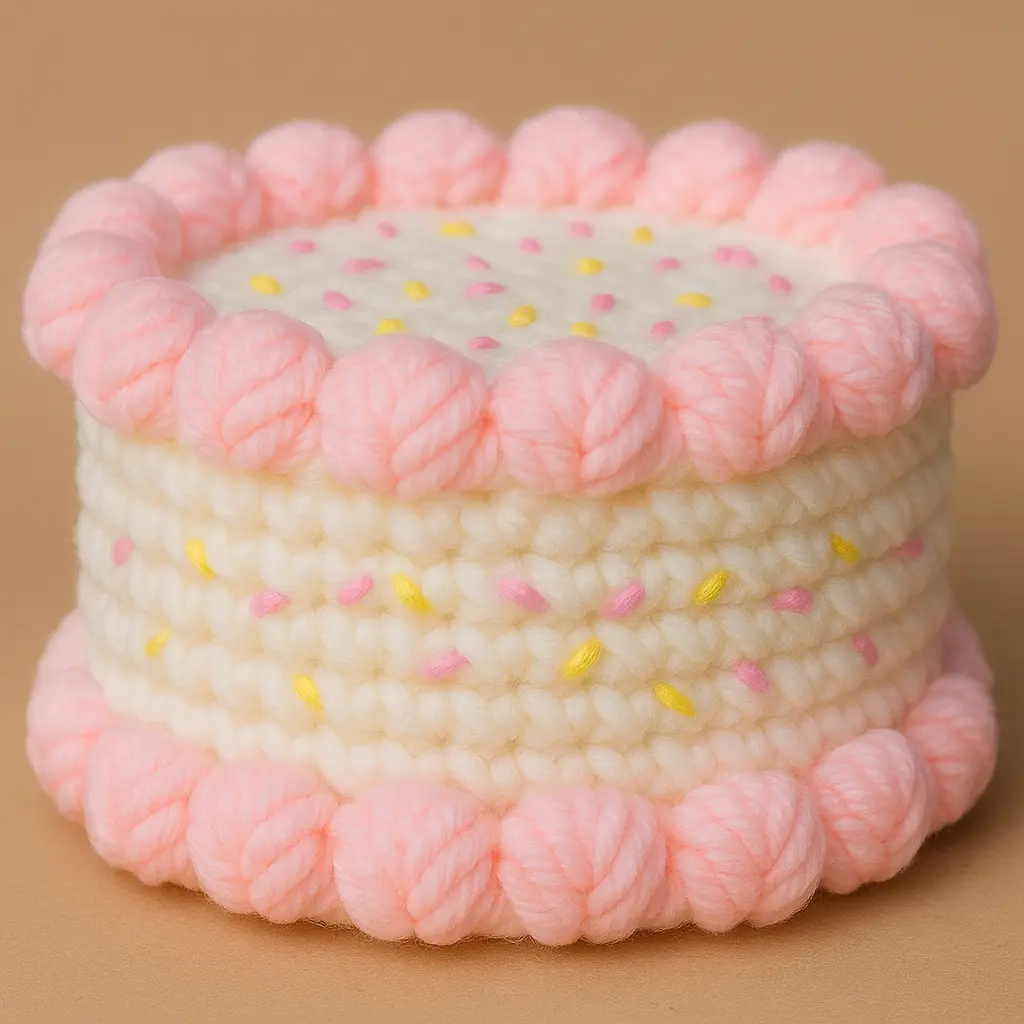
Step 3: Sprinkles
To add sprinkles:
- Use pink and yellow yarn.
- Make tiny French knots or surface slip stitches randomly on the cake base.
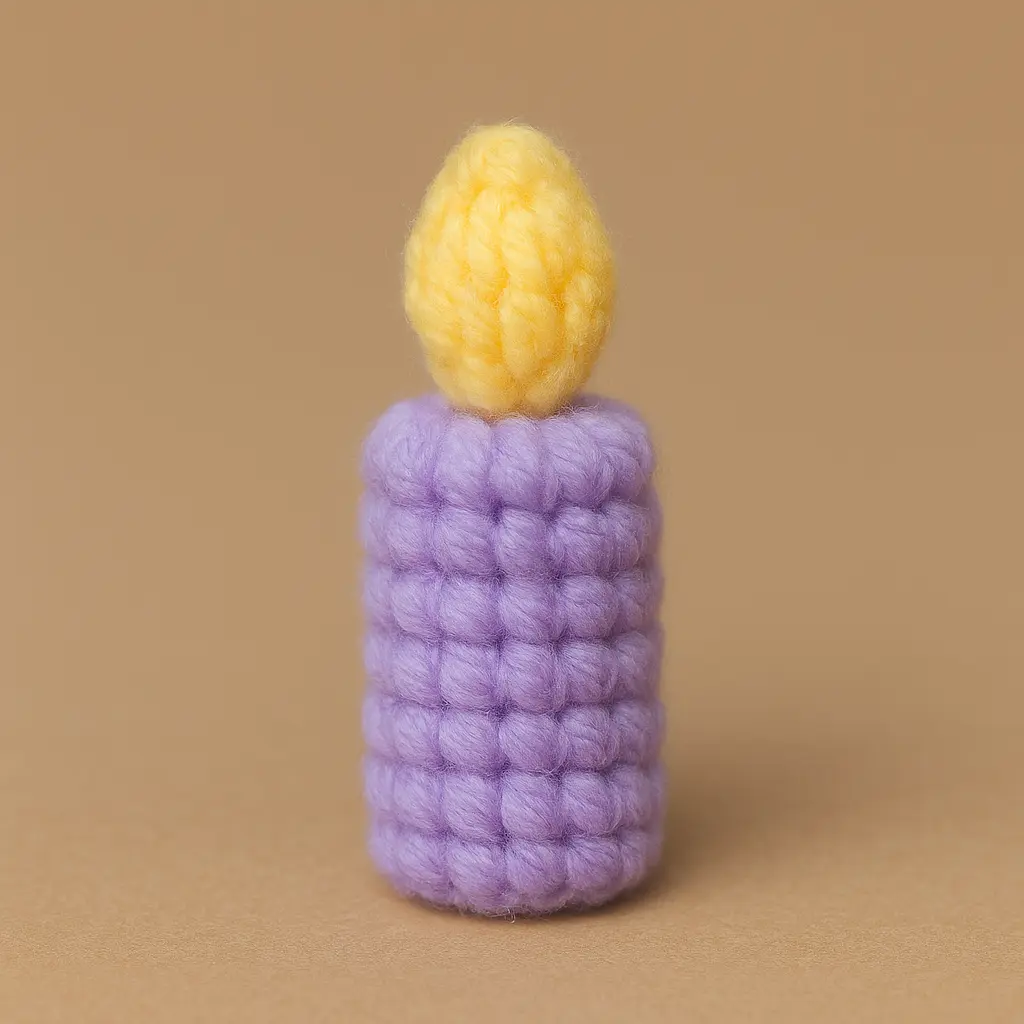
Step 4: Candle
How do you crochet a candle for a mini amigurumi cake?
Candle Body (purple):
- R1: MR, 6 sc (6)
- R2–R6: sc around (6)
➡️ Adjust length for taller candle. - Stuff lightly.
Flame (yellow):
- R1: MR, 4 sc (4)
- R2: (inc, sc) ×2 → (6)
- R3: sc around (6)
- R4: (sc, dec) ×2 → (4)
- R5: dec ×2 → (2), fasten off
- Fasten off, leave tail.
- Sew flame to candle, then sew candle to cake top.
Step 5: Final Assembly
- Add sprinkle embroidery.
- Sew candle in the center.
- Shape with hands to puff cream evenly.
✨ And you have your plush crochet birthday cake pattern finished, a soft, colorful amigurumi treat that looks adorable in any setting.
Fun Variations & Strawberry Cake Twist
Creative Ideas to Personalize Your Crochet Cake
One of the best parts about crochet food amigurumi is how playful and customizable it can be. Once you’ve mastered the base cake, you can easily change colors or add details to make it your own.
Here are a few quick variations:
- Chocolate Cake Amigurumi → Swap the white yarn for brown and use red for cherries on top.
- Rainbow Birthday Cake → Change yarn every 2–3 rounds in the base to create colorful layers.
- Party Tiered Cake → Make two cakes in different sizes and stack them with cream layers in between.
- Different Frosting Styles → If you’d like to try a unique frosting look, this free crochet cupcake pattern with realistic crochet frosting from Life With Bubbins shows a fun loop technique you can easily adapt to your mini cake.
👉 These small adjustments turn a single mini amigurumi cake pattern into endless birthday designs, keeping your projects fresh and fun.
Strawberry Cake Variation
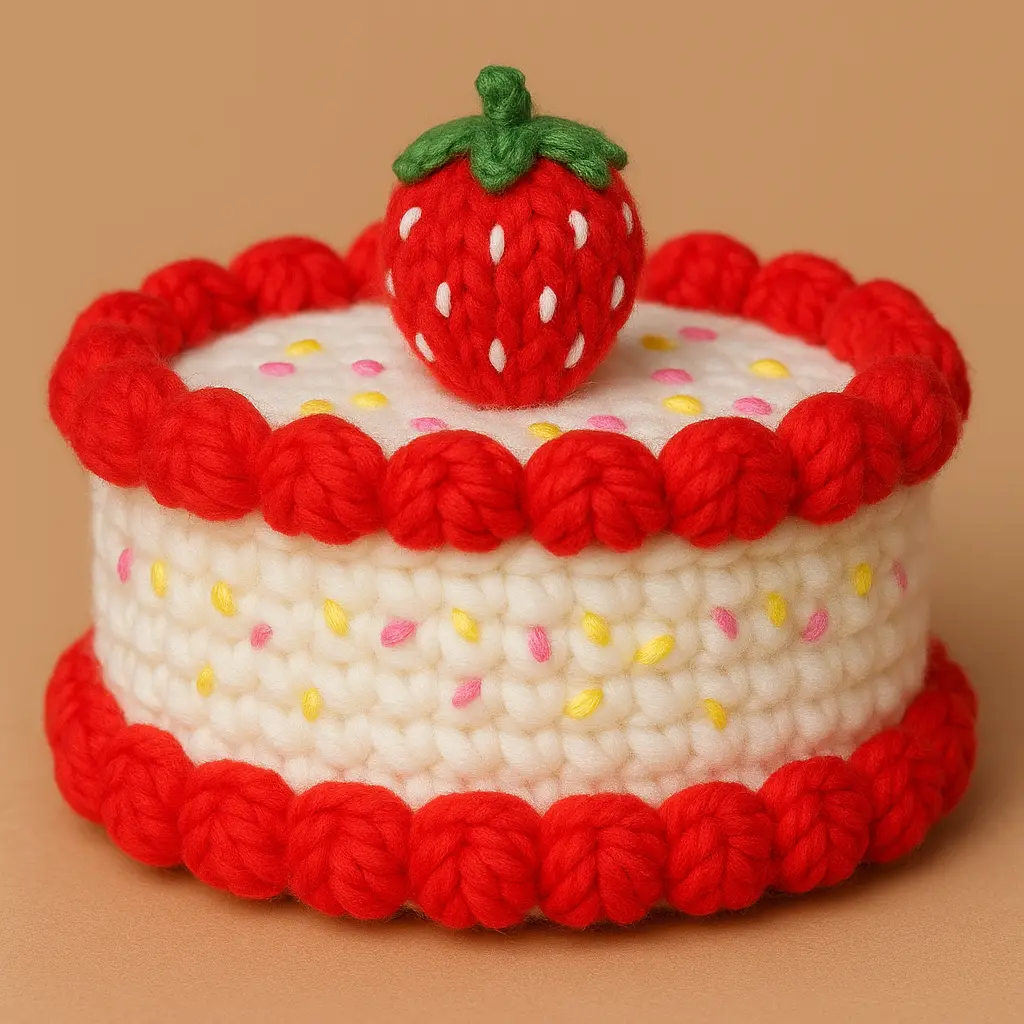
How do you crochet a strawberry cake amigurumi?
- Follow the same mini cake base pattern.
- Add a light red “cream” layer instead of pink.
- Crochet a small amigurumi strawberry (red with green leaves).
- Sew it securely on top instead of the candle.
This strawberry twist adds a fruity touch and makes the cake look even more adorable. It’s especially fun for summer birthdays or tea party play sets.
👉 See the strawberry amigurumi pattern for step-by-step details on crocheting the strawberry topper.
FAQs About Crocheting Mini Cake Amigurumi
How long does it take to crochet a mini cake amigurumi?
Most crocheters can finish a mini cake in 2–4 hours, depending on their skill level and the yarn size. Using plush yarn makes it quicker since the stitches are larger.
Is this mini cake amigurumi pattern beginner-friendly?
Yes! This beginner-friendly amigurumi cake only uses simple stitches like single crochet, increases, and decreases. Even first-time crocheters can complete it with patience.
What yarn is best for crocheting a plush birthday cake amigurumi?
Plush or chenille yarn works best to give the cake a soft, squishy look. You can also use cotton yarn if you prefer a tighter, more defined stitch.
How do I sew amigurumi pieces together neatly?
Use a tapestry needle and whip stitch through both loops of the stitches. Always stuff pieces before sewing, and check placement with pins first. For step-by-step help, see this sewing amigurumi tutorial.
Celebrate Every Stitch
Crocheting a mini cake amigurumi is more than just a craft project, it’s a way to capture the joy of birthdays in yarn form. Whether you stick with the classic candle-topped design or try the strawberry cake variation, each stitch carries a little celebration inside it.
So the next time you want to give a handmade gift, decorate a party table, or simply treat yourself to a fun crochet project, remember this sweet little pattern.
📌 Don’t forget to pin this crochet birthday cake pattern for later and share it with your crochet friends!


