


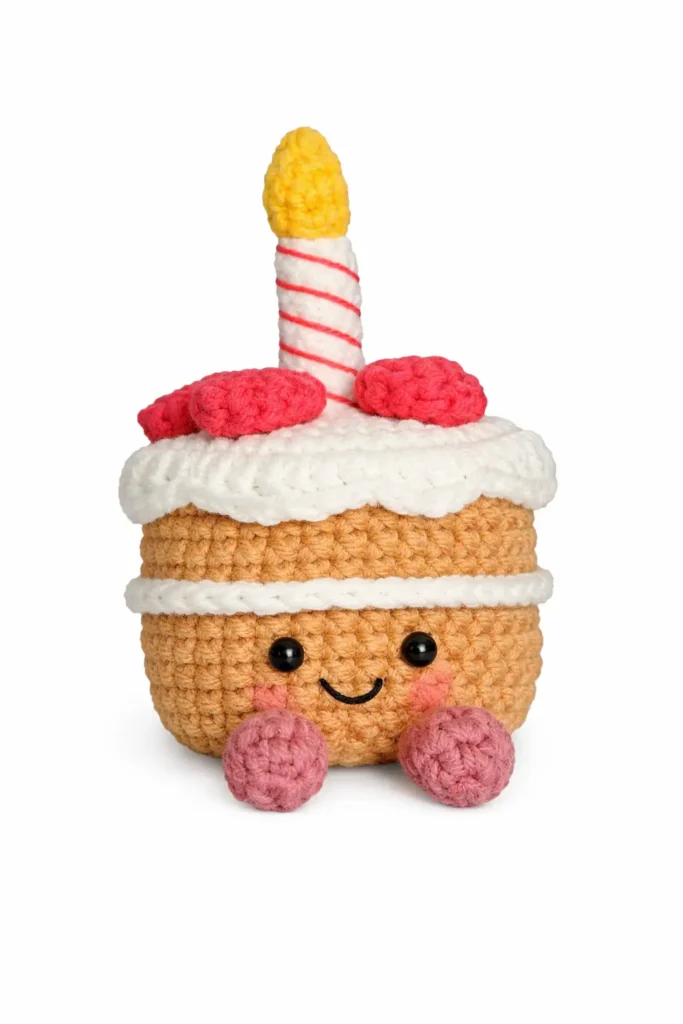
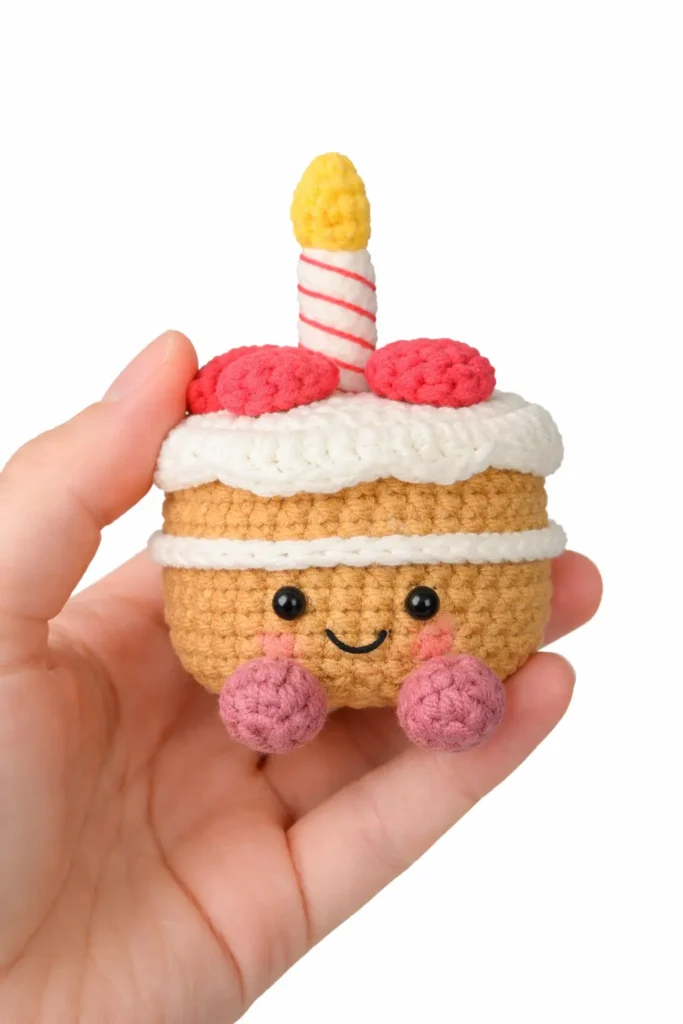
If you’re looking for a tiny, giftable crochet birthday cake, this mini cake keychain is the cutest little project. It’s made with smooth cotton yarn for clean stitches, topped with a drippy frosting lid, and finished with strawberries + a candle—plus those sweet little legs that give it that “amuseable” vibe.
(Fan-style, Jellycat-inspired look only — not affiliated with any brand.)
If you’re newer to amigurumi, this quick guide helps a lot before you start: First Amigurumi Step-by-Step Guide.
Jump to section
Materials (Yarn + Hook + Notions)
Yarn: 100% cotton 4-ply / sport / fine (milk cotton style)
Hook: 2.0 mm (2.5 mm works too, but the cake will be slightly bigger)
If you’re unsure about yarn size + hook pairing for tight stitches, check: Yarn Weight, Gauge & Hook Size Guide.
Notions
- Keychain ring (optional)
- Stuffing
- Stitch marker
- Yarn needle
- 6–8 mm safety eyes (or embroider eyes)
Abbreviations (US Terms)
- MR = magic ring
- sc = single crochet
- inc = 2 sc in same st
- dec = sc2tog
- sl st = slip stitch
- hdc = half double crochet
- dc = double crochet
- tr = treble crochet
- BLO = back loop only
- FLO = front loop only
Notes
- Work in continuous rounds unless stated.
- Use a stitch marker and count carefully (this helps keep the cake perfectly even).
For cleaner shaping, I recommend using this method for decreases: Invisible Decrease Crochet.
For standard crochet abbreviations, you can also check the Craft Yarn Council’s crochet abbreviations list.
Free Crochet Birthday Cake Pattern (Step 1: Cake Body)
1) Cake Body (tan)
- R1: MR, 6 sc (6)
- R2: inc x6 (12)
- R3: (sc, inc) x6 (18)
- R4: (sc, inc, sc) x6 (24)
- R5: (3 sc, inc) x6 (30)
- R6: (2 sc, inc, 2 sc) x6 (36)
- R7: 36 sc BLO (36)
- R8–R12: 36 sc (36)
- R13: 36 sc BLO (36)
Step 2 — White “Cream Stripe” (from the free front loops of R13)
Join white yarn in any free front loop left from Round 13:
- Repeat 6 times: (5 sc, sl st)
- Fasten off.
Step 3 — Back to Tan Body
- R14–R16: 36 sc (36)
- Fasten off, leave a long tail.
Stuff firmly, but don’t close the top yet — we’ll sew the frosting lid on later (and add a little more stuffing right before closing).
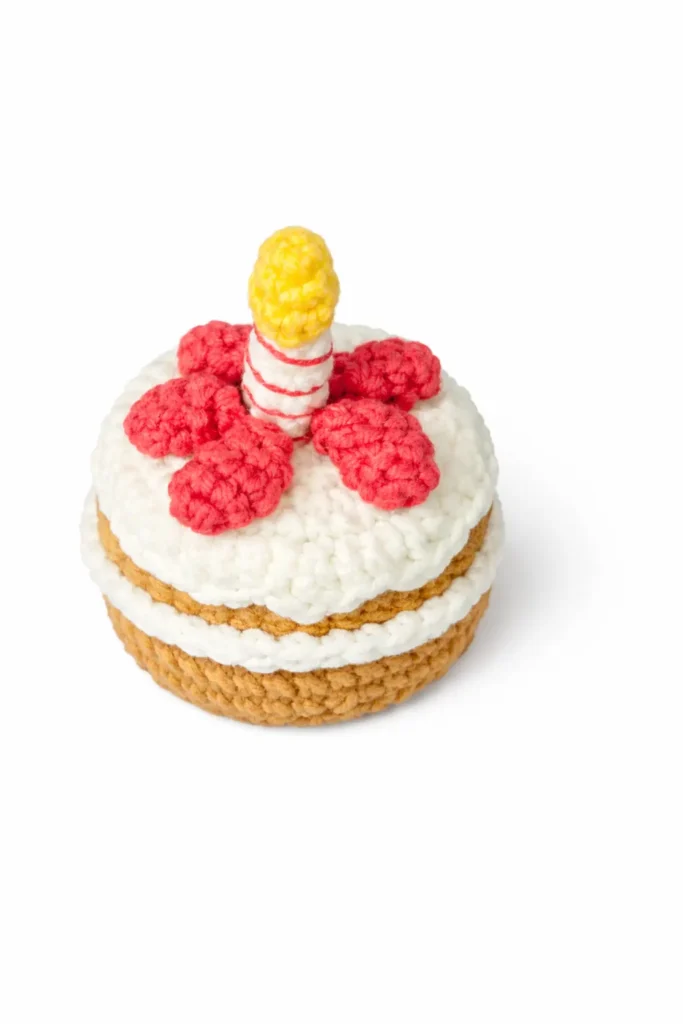
Step 4 — Frosting Lid / Top (White) + Drippy Edge
This frosting lid is what gives your crochet birthday cake that cute “Jellycat-inspired” look. We’ll crochet a flat circle up to 36 stitches, then add the drippy edging in the last round.
If you need a quick refresher on tall stitches used in the drips, these guides help:
2) Frosting Lid / Top (White)
- R1: MR, 6 sc (6)
- R2: inc x6 (12)
- R3: (sc, inc) x6 (18)
- R4: (sc, inc, sc) x6 (24)
- R5: (3 sc, inc) x6 (30)
- R6: (2 sc, inc, 2 sc) x6 (36)
R7 — Drippy Edge (Signature Frosting Look)
Repeat 4 times this sequence:
- sc
- 2 dc in next st
- hdc
- sc
- hdc
- dc
- 2 tr in next st
- dc
- hdc
Fasten off, leave a long tail for sewing.
Tip: Don’t pull this round too tight—soft drips look better and hang more naturally when you sew the lid onto the cake body.
Step 5 — Strawberries (Make 3)
These tiny strawberries sit on top of the frosting and instantly make the birthday cake crochet look more “Jellycat-inspired” and playful. If you want more strawberry inspiration (and extra shaping ideas), you’ll love this: Strawberry Crochet Pattern.
3) Strawberries (Red/Pink) — Make 3
- R1: MR, 4 sc (4)
- R2: (sc, inc) x2 (6)
- R3: 6 sc (6)
- R4: dec x3 (3)
- Fasten off. Light stuffing optional. Pull closed.
Mini tip (optional): Before you close the last round, add just a tiny pinch of stuffing to keep the strawberry slightly puffy (but still small and neat).
Step 6 — Candle (White) + Red Spiral Stripes
This little candle is what turns the project into a true crochet birthday cake (and it looks adorable on a keychain!).
4) Candle (White)
- R1: MR, 6 sc (6)
- R2: 6 sc BLO (6)
- R3–R5: 6 sc (6)
- Fasten off, lightly stuff.
Red Spiral Stripes (Easy Method)
Using red yarn, wrap it diagonally around the candle (like a candy-cane twist) and secure it with a few tiny stitches so it stays in place.
Step 7 — Flame (Yellow)
The flame is a tiny puff shape that sits on top of the candle.
5) Flame (Yellow)
- R1: MR, 3 sc (3)
- R2: inc x3 (6)
- R3: 6 sc (6)
- R4: dec x3 (3)
- Fasten off, lightly stuff, pull closed.
Step 8 — Legs (Brown) ×2
These little legs are the detail that gives your crochet birthday cake that cute “amuseable” character feel. Keep them small and lightly stuffed (or unstuffed) so they don’t look bulky.
6) Legs (Brown) — Make 2
- R1: MR, 6 sc (6)
- R2: (sc, inc) x3 (9)
- R3–R6: 9 sc (9)
- R7: (sc, dec) x3 (6)
- R8: 6 sc (6)
Flatten opening and close with 3 sc through both layers.
Fasten off, leave a tail.
Stuffing tip: Add only a tiny pinch of stuffing at the “foot” end (optional). This keeps the legs cute and flat, not puffy.
If you ever struggle attaching limbs evenly (especially on mini keychains), this guide helps a lot: Attach Amigurumi Limbs Evenly.
Step 9 — Face (Eyes + Smile + Cheeks)
This is where your birthday cake crochet pattern really comes to life.
Safety Eyes
- Insert 6–8 mm safety eyes between about Rounds 10–12 of the cake body.
- Adjust slightly based on your preference (closer = cuter, wider = more “surprised”).
Smile + Cheeks
- Embroider a small smile with black yarn.
- Add cheeks using pink yarn or a little blush.
If you want to be extra careful with stitch placement, counting rounds makes it much easier: How to Count Rounds in Crochet.
Step 10 — Assembly (Frosting + Toppings + Legs + Keychain Loop)
This is the final (and most satisfying) part! We’ll put everything together so your crochet birthday cake looks clean, balanced, and super cute from every angle.
Assembly Order (Recommended)
- Sew the legs to the cake body
- Place the two legs on the lower front of the cake body.
- Angle them slightly outward for a cute stance.
- Stitch firmly so they don’t wobble.
- Attach the candle to the frosting lid
- Sew the candle to the center of the frosting lid (top).
- Make sure it sits straight.
- Sew the flame onto the candle
- Stitch the flame right on top of the candle.
- Keep it centered so it doesn’t lean.
- Sew the strawberries around the candle base
- Arrange 3 strawberries evenly around the candle.
- Sew each one down securely (especially if this is a keychain).
- Sew the frosting lid to the cake body
- Align the cake body opening with the frosting lid around Round 6 of the lid (so the drips hang nicely).
- Start stitching around with the long tail from the frosting lid.
- Before fully closing, add a final pinch of stuffing to keep the cake nicely firm.
- Finish sewing closed neatly.
Keychain Loop (Best Placement)
You have two great options:
- Option A (cleanest): Sew a small yarn loop on the top-back of the frosting, behind the candle.
- Option B (extra secure): Sew the loop behind the candle base (hidden but very strong).
Attach your keychain ring to the loop and you’re done!
If you love tiny “food keychains,” you might also enjoy making a matching dessert charm like this Ice Cream Cone Crochet Pattern.
Quick Finishing Tips (Make It Look Professional)
- Weave in ends slowly and hide them inside the cake body.
- Keep stuffing firm but not overstuffed (overstuffing can stretch stitches).
- If using safety eyes on a keychain, make sure the backs are pressed in tightly.
Cute Variations (Same Pattern, Different Looks)
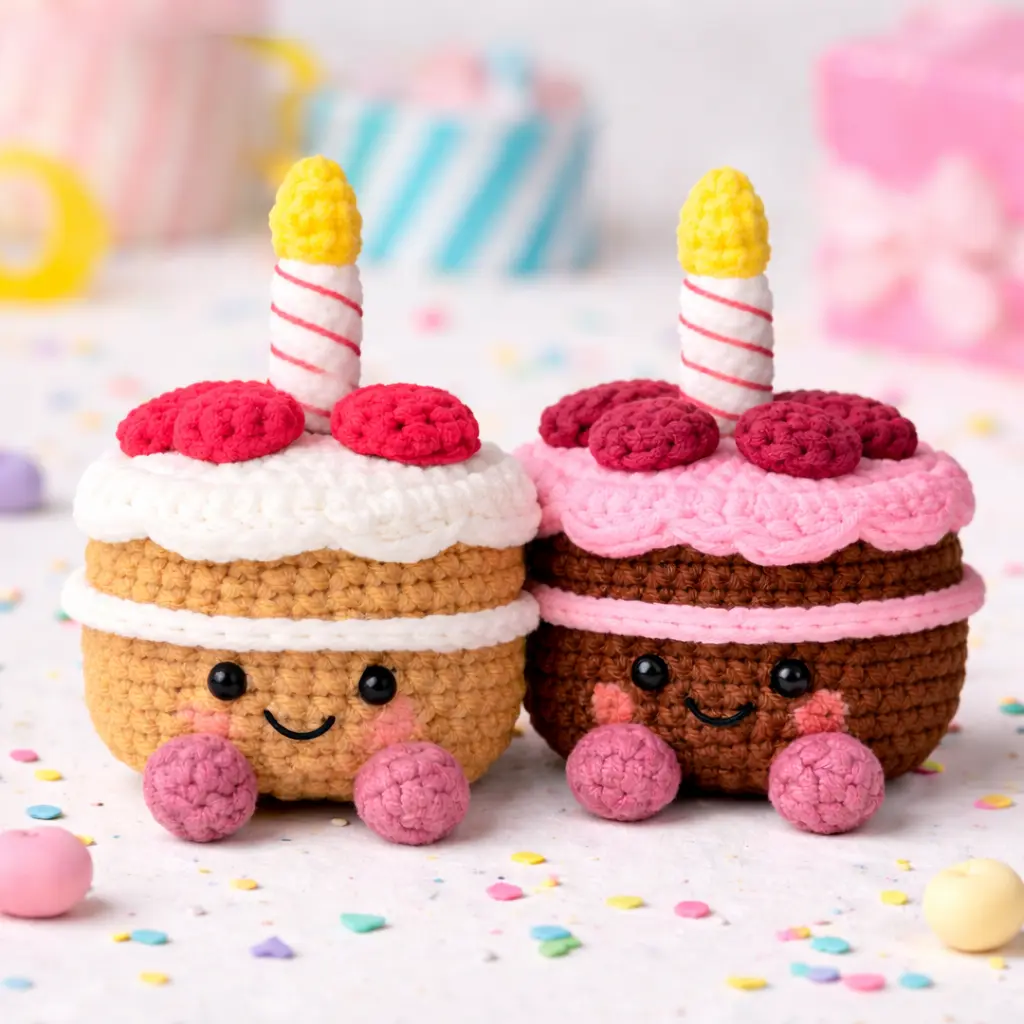
You only need one crochet birthday cake pattern to create lots of fun styles. Here are easy variations you can do just by changing colors (no pattern changes needed):
1) Strawberry Shortcake Cake
- Keep the cake body tan
- Make the frosting lid light pink
- Use red strawberries (classic look)
2) Chocolate Birthday Cake
- Make the cake body chocolate brown
- Keep frosting white (or do light tan “vanilla drizzle”)
- Add sprinkles with tiny straight stitches in pastel colors
3) Rainbow Party Cake
- Change cake body colors every 2 rounds (for the straight section)
- Keep frosting white so the drips pop
- Make the flame bright yellow/orange for contrast
4) “Happy Birthday” Pastel Cake
- Pastel cake body (light peach / mint / baby blue)
- White frosting
- Strawberries in soft pink for a gentle look
5) Mini Keychain Gift Set Idea
Make 2–3 cakes in different colors (same exact pattern) and gift them together—super cute for birthdays, party favors, or crochet markets.
If you like adorable “amuseable” style minis, you might also enjoy this quick, cozy project: Amuseable Acorn Crochet Pattern Free.
FAQ (Quick Answers)
Can beginners make this crochet birthday cake?
Yes! If you know single crochet, increases, decreases, and basic sewing, you can do it. If you’re totally new, start here first: What Is Amigurumi?.
What yarn is best for a mini crochet birthday cake keychain?
Smooth cotton sport/fine yarn is perfect because it gives clean stitches and holds shape well.
How do I make this cake baby-safe?
Skip safety eyes and embroider the eyes and smile instead. Also stitch toppings extra firmly (or leave off the candle for very young kids).
My frosting drips don’t look even—what should I do?
That’s normal! The drips look best after you sew the lid on and gently shape them with your fingers. Keep tension relaxed in the drip round.
Can I make the crochet birthday cake bigger?
Yes—use a 2.5 mm hook or thicker yarn. You can also add one extra increase round on both the body and the frosting lid to scale up.
Conclusion
I hope you enjoyed this crochet birthday cake keychain pattern! It’s quick, adorable, and perfect for gifting—plus the drippy frosting and tiny toppings make it look so “Jellycat-inspired” without being complicated.
More Free Amigurumi Patterns You’ll Love


If you make one, leave a comment and tell me your color choice (strawberry, chocolate, or rainbow!). And if you want another cute keychain project next, you’ll love this one: Amigurumi Duck Pattern Free Keychain.