


If there’s one thing that instantly brightens up my crochet basket, it’s a new Labubu crochet pattern. I don’t know about you, but something about that mischievous little grin and those fluffy ears just pulls at my yarn-loving heartstrings. A few weeks ago, I found myself staring at a ball of beige YarnArt Jeans, thinking… “What if I could turn Labubu’s wild charm into a tiny keychain?”
I started sketching. Then I started stitching. And before long, a new Labubu crochet pattern was born, one that fits in your palm, puffs up with Alize Softy fur, and brings a burst of joy whether clipped to your bag or gifted to a friend. In this post, I’ll walk you through everything: from the fuzzy face base to the tiny ears, wide grin, and even how to attach the keychain ring.
So whether you’re just as obsessed with quirky characters or looking for a quick win project, this mini Labubu crochet pattern will absolutely deliver.
By the way, if you’re into full-size Labubu plushies, don’t miss this detailed plush version tutorial with ears, hood, and all. And if you’re brand new to reading patterns, I also shared a step-by-step guide on reading amigurumi patterns to help you get started with confidence.
Table of Contents
The Story & Intro
How I Fell in Love with the Labubu Look
Let me take you back to one late-night Pinterest scroll. My fingers were already tangled with yarn, but my brain? Fully distracted by a picture of a wild-eyed, grinning creature with pointy ears and a big mop of hair. Labubu! I didn’t know what it was called at first, just that I needed to make it mine… in yarn. That night, the idea for this tiny Labubu crochet pattern keychain took root. I grabbed a beige skein and began shaping the face.
I knew I didn’t want something too complex or time-consuming, just soft, scrappy, and full of personality. The more I worked on it, the more it made me smile. It became my “purse project,” something to stitch between sips of tea or while waiting in the car pickup line. It was small, satisfying, and so much fun.
Why a Labubu Crochet Pattern Was the Perfect Keychain Idea
Most Labubu crochet patterns you’ll find are for big plush dolls, but I wanted a mini version with the same wild spirit. That’s where this keychain shines. It keeps all the cute: the ears, the grin, the puff of hair… but it’s easy to finish in a couple of sessions. It also makes a terrific handmade gift. I added one to my granddaughter’s backpack and another to my craft room keychain hook. Each one is different, and that’s the magic of it.
And the best part? You don’t need fancy materials. A little YarnArt Jeans for the face, Alize Softy for the fuzzy hood, and you’re good to go. Plus, it’s a great stash-buster for leftover pink, white, and black yarn bits.
Ready to bring this little rascal to life? Let’s start with the materials and face base in the next section, where the full labubu crochet pattern begins.
Pattern Essentials + Face & Fur Details
Materials & Yarn Tips for Crochet Labubu
Before we dive hook-first into the stitches, let’s gather the essentials for this Labubu crochet pattern. This version focuses on small details, so picking the right yarn and tools really matters. I used a combination of sturdy cotton blend for structure and Alize Softy for that iconic fuzzy hood. It brings the Labubu crochet keychain to life in the cutest way.
Here’s a breakdown of materials for your own crochet Labubu pattern adventure:
| Item | Yarn / Tool |
|---|---|
| Beige Yarn | YarnArt Jeans – for face & ears |
| Fuzzy Yellow Yarn | Alize Softy – cut strands for hood |
| White Yarn | For eye whites and teeth |
| Pink Yarn | For the nose |
| Black Yarn | For smile and eye embroidery |
| Crochet Hook | 2.0 mm or 2.5 mm |
| Notions | Yarn needle, scissors, fiberfill, stitch marker, keyring |
✨ Finished size: approx. 7–8 cm tall — varies slightly with tension and stuffing.
Working with Alize Softy for this Labubu crochet pattern free version can be a little tricky for beginners, but don’t worry, once you get the hang of lark’s head knots, you’ll fly through the fluff! For extra tips on handling textured yarns in amigurumi, you might also enjoy my post on amigurumi mistakes you should avoid.
Step-by-Step: Creating the Beige Face Ball and Fluffy Hood
Time to get stitching! The face base is the foundation of our Labubu crochet pattern. It’s a classic stuffed ball shape, firm and neat. Then we’ll attach fluffy strands of Alize Softy to create the wild fur hood Labubu is known for.
Here’s the full face section, formatted exactly how I crocheted it:
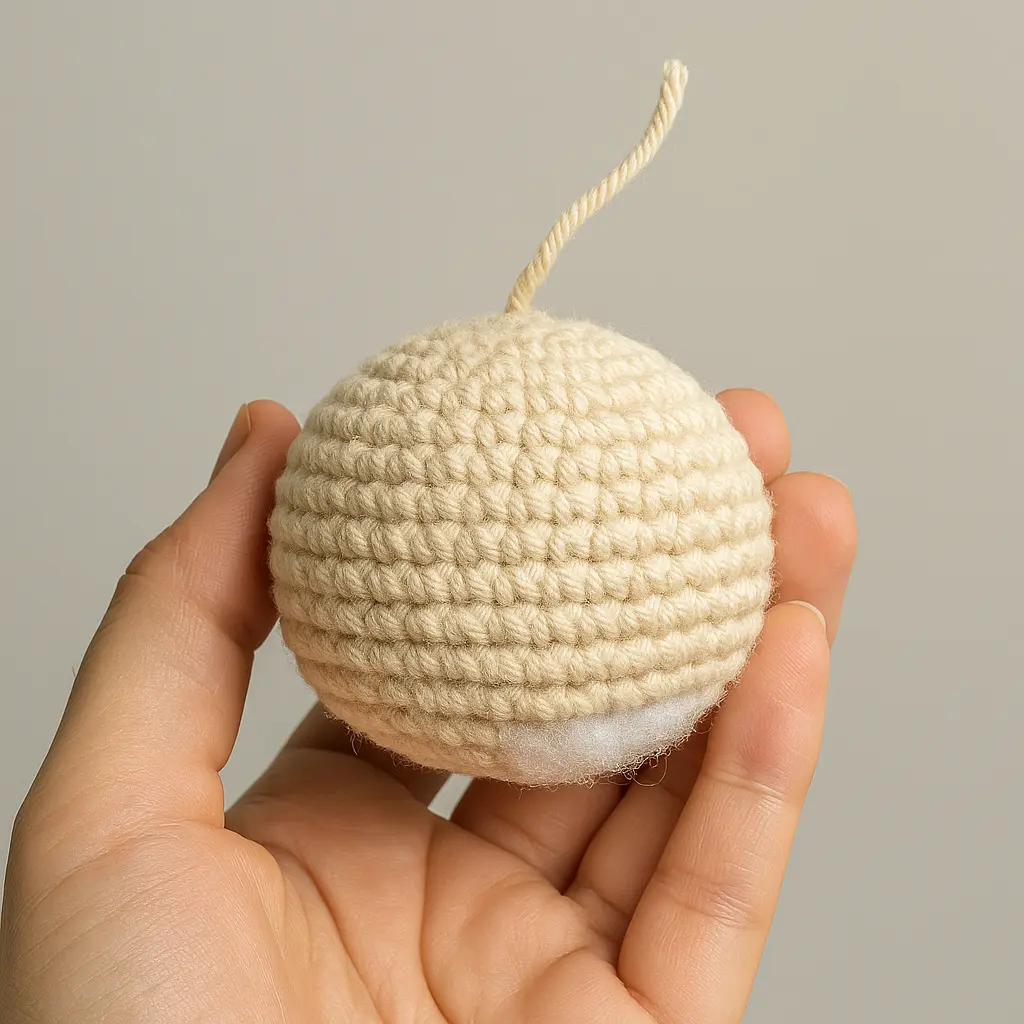
🧠 STEP 1: Beige Ball Face Base (YarnArt Jeans)

R1. MR, 6 sc → (6)
R2. inc ×6 → (12)
R3. (sc, inc) ×6 → (18)
R4. (2 sc, inc) ×6 → (24)
R5. (3 sc, inc) ×6 → (30)
R6. (4 sc, inc) ×6 → (36)
R7–9. sc around → (36)

R10. (4 sc, dec) ×6 → (30)
R11. (3 sc, dec) ×6 → (24)
R12. (2 sc, dec) ×6 → (18)
📌 **Stuff firmly with fiberfill**
R13. (sc, dec) ×6 → (12)
R14. dec ×6 → (6)

Fasten off and close the top neatly.
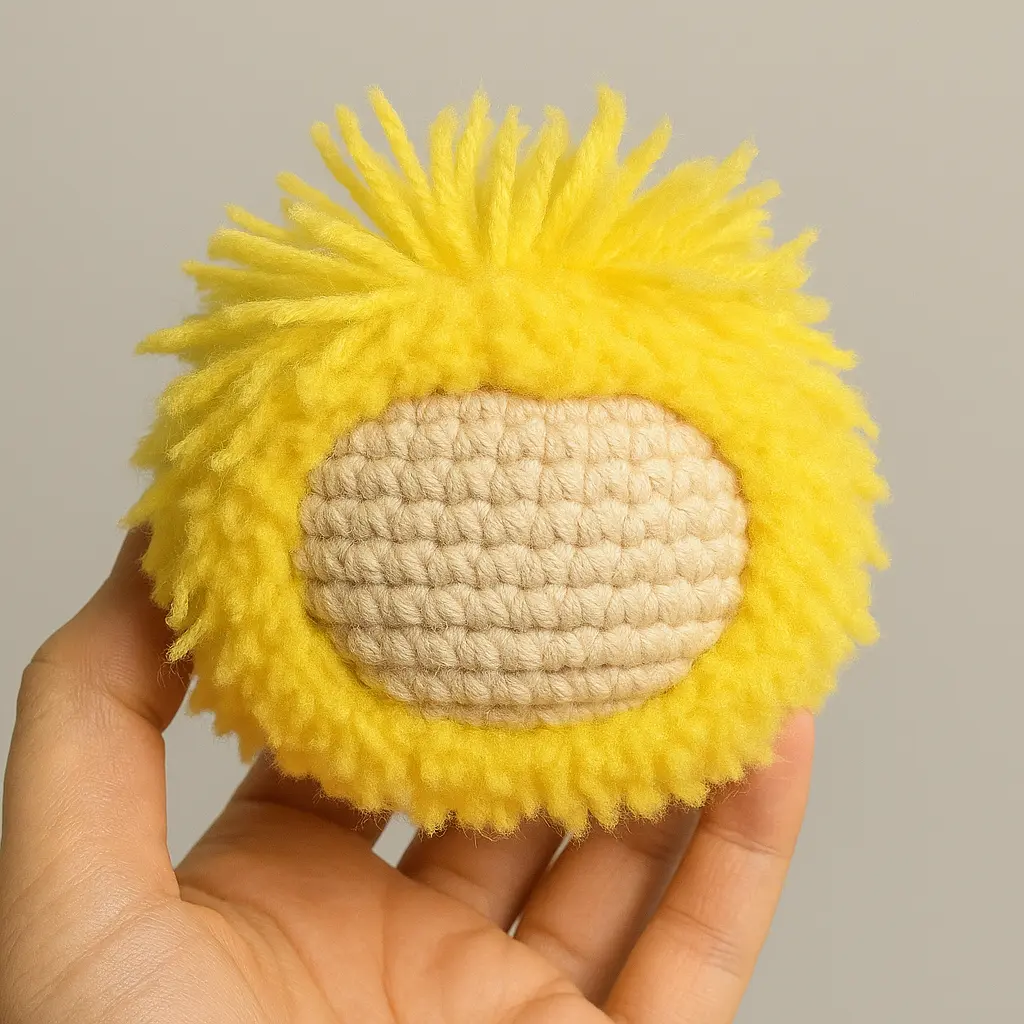
🟡 STEP 2: FUR ATTACHMENT (Alize Softy)

✂️ Prepare:
Cut ~100 strands of Alize Softy, each about 3–4 cm

🧶 Attach like fringe:
Use a small hook
Insert hook under stitch on the side/back/top (not the face)
Fold strand in half and pull loop through
Pull ends through loop to form a lark’s head knot

✅ Cover:
Top, sides, and back of head
🚫 Do NOT attach fur on front face area

🧽 Trim fur neatly around the front to define a soft hood line
This free crochet Labubu pattern section is the heart of the entire design. Once you fluff up that face, your keychain already looks halfway done! You can leave it minimal or go wild with trimming. Either way, this part makes the character pop.
And if you’re curious how different yarn textures change the look, take a peek at my soft bunny version in this bunny Labubu pattern, which uses plush yarn for a different kind of puff, but follows the same structure.
Now that we’ve finished the face and fur section of the Labubu crochet pattern, it’s time to give this mischievous cutie a face eyes, nose, smile, and of course, ears, all coming up in Part 3!
Ear Construction and Fuzzy Finish
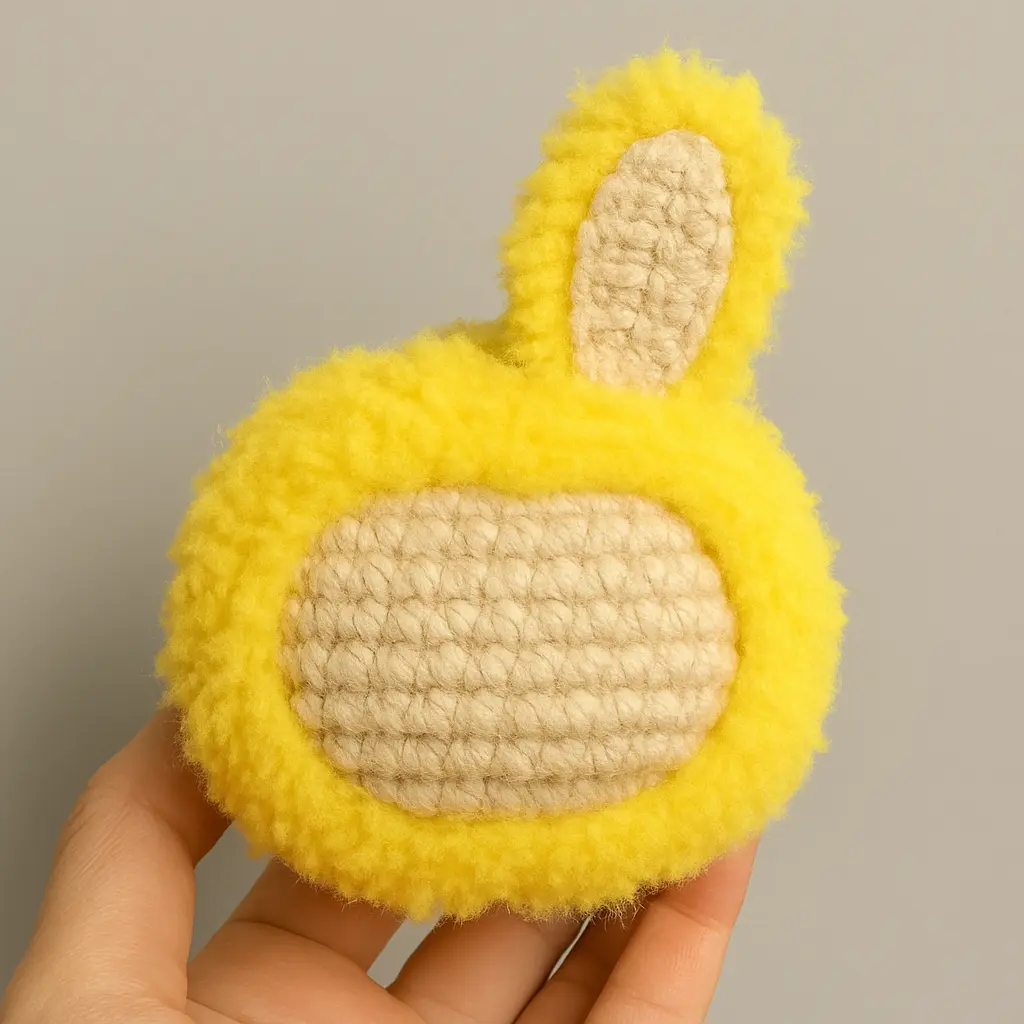
The ears are a big part of the Labubu charm. They’re long, a little floppy, and trimmed in fur to match the hood. This labubu crochet pattern version keeps them soft and fluffy, with optional inner ear detail and surface fuzz.
🐰 STEP 3: Ears (Make 2)
Ear Base (Beige – YarnArt Jeans):

Row 1: ch 5
Row 2: sc in 2nd ch, sc 3 → (4)
Row 3: ch 1, turn, inc, 2 sc, inc → (6)
Row 4: ch 1, turn, sc across → (6)
Row 5: ch 1, dec, 2 sc, dec → (4)
Row 6: ch 1, dec ×2 → (2)
Row 7: ch 1, dec → (1)

Fasten off, leave tail for sewing.
✨ Optional Inner Ear:
Use a bit of pink surface stitching or small felt patches to define the inner shape.
✨ Optional Fuzz:
Attach Alize Softy strands around the edge of the ears using lark’s head knots, just like the hood. Trim gently.
🧵 Sew ears on top of the hooded head. You can angle them upright or curve them back slightly for a relaxed look. Your labubu amigurumi pattern is starting to show real character now!
If you’re having fun with this small-scale version, you might also love the full-size Labubu plush pattern. It follows the same styling, but with bigger features and a full body. Both versions use the same cute ears, so you’ll be able to reuse your new skills.
This part of the labubu crochet pattern free project is where your creativity can shine. Feel free to modify the expression, ear placement, or even add a little blush if you’re feeling fancy. It’s all part of what makes amigurumi magical.
Eyes, Nose, Smile, and Ears
How to Crochet Labubu’s Signature Eyes & Smile
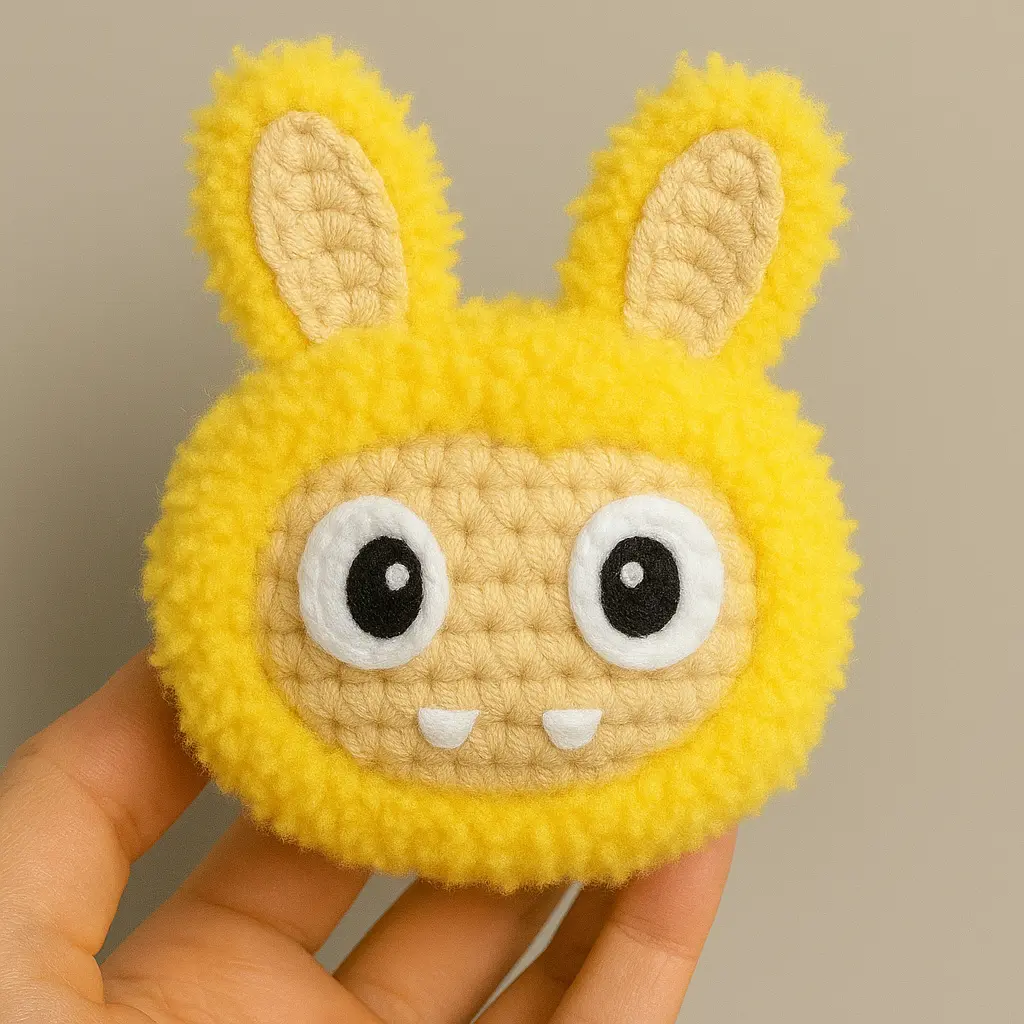
With the fuzzy hood complete, your mini labubu crochet pattern is ready for its mischievous personality! The face is where everything comes together: those wild eyes, the cheeky smile, and the cute teeth. It’s what makes this labubu amigurumi pattern so fun to create.
We’ll begin with the white eye base, add black pupils, then place a small pink nose between them. You’ll finish it off with a stitched smile and three tiny teeth, the signature grin of any good labubu crochet pattern free project!
👁 STEP 4: Eyes (Make 2)
White Eye Base (YarnArt Jeans – White):

R1. MR, 6 sc
R2. inc ×6 → (12)

Fasten off and sew to face.
Pupils (Black):
Use black yarn or felt circles. Secure in the center of each eye.
Optional: Add a white dot using embroidery or a dab of fabric paint for extra shine.
👃 STEP 5: Nose (Pink)
With pink YarnArt Jeans:
MR, 5 sc (tight), sl st to join
Sew between the eyes.
🦷 STEP 6: Mouth + Teeth
Smile:
Embroider a wide curved line with black yarn

Teeth (Make 3):
ch 2, 2 sc in 2nd ch from hook
Fasten off, sew below the smile
This step gives your labubu crochet piece a friendly but chaotic vibe, just like the real character! It’s also a chance to personalize. Want a sneaky Labubu? Tilt the smile. A sleepy one? Narrow the eyes.
For more face embroidery ideas, visit my octopus amigurumi tutorial, where I share tips on getting cute expressions using just a few stitches. It’s perfect for small pieces like this crochet labubu pattern free keychain.
Next up in Part 4, we’ll wrap it up with keychain assembly, FAQs, and where to show off your finished Labubu!
Final Touches + FAQ + Final Thoughts
Adding the Keychain and Optional Details
Now that your mini labubu crochet pattern free model has its ears, smile, and fuzz, let’s turn it into a practical charm! You can easily transform it into a keychain, bag clip, or even a backpack buddy.
🔗 STEP 7: Add Keychain

Before closing the face or just after fur is attached:

– Pull a loop of beige yarn at the top of the head
– Attach a keyring or lobster clasp through it
✅ You can also sew in a label if you like
For extra cuteness, you can personalize your free Labubu crochet pattern with:
- Embroidered eyebrows for expression
- Blush using pink yarn or soft makeup
- A sewn-on mini tag for gifting

Want more easy giftable crochet pieces? You might enjoy this amigurumi owl pattern, which is also super customizable, or my duck keychain tutorial for another palm-sized crowd-pleaser.
This crochet Labubu pattern free version is a fast, lovable project you’ll want to repeat in different colors or moods. Some of my readers even stitched them in pastel colors for Easter baskets!
Frequently Asked Questions (FAQ)
How tall is the finished Labubu crochet pattern keychain?
It usually comes out around 7 to 8 cm in height, depending on your tension and stuffing firmness. Using a 2.0 mm hook and YarnArt Jeans gives the best size for keychains.
Can I use velvet yarn instead of Alize Softy for the hood?
You can, but the look will change! Velvet won’t give the same fluffy, puffed-up effect. If you’re recreating the original Labubu look, Alize Softy or similar fuzzy yarns work best.
Is this Labubu crochet pattern beginner-friendly?
Yes — most steps are simple shapes: spheres, ovals, and basic embroidery. The only tricky part is attaching the fur, but you can skip that and still have a cute result!
Where can I find more crochet Labubu patterns free to download?
You can check TopAmigurumi’s Labubu category for free patterns. There’s also character background info available on Wikipedia if you want to explore the lore behind Labubu.
Final Thoughts
There’s something magical about watching a small, stitched face come to life. With just some yarn, fluff, and a few clever knots, your labubu crochet pattern transforms into a soft, smiley keychain that brings joy wherever it hangs.
I hope you had fun making this tiny fluff ball with me. Whether you followed every stitch or added your own twist, you’ve created something special and maybe a little wild. 🧶
📌 Follow me on Pinterest for daily pin-worthy amigurumi tips, free patterns, and adorable project inspiration:
👉 TopAmigurumi on Pinterest
More Free Amigurumi Patterns You’ll Love


✍️ Read more behind-the-scenes crochet stories and deep dives on Medium:
👉 Follow TopAmigurumi on Medium