


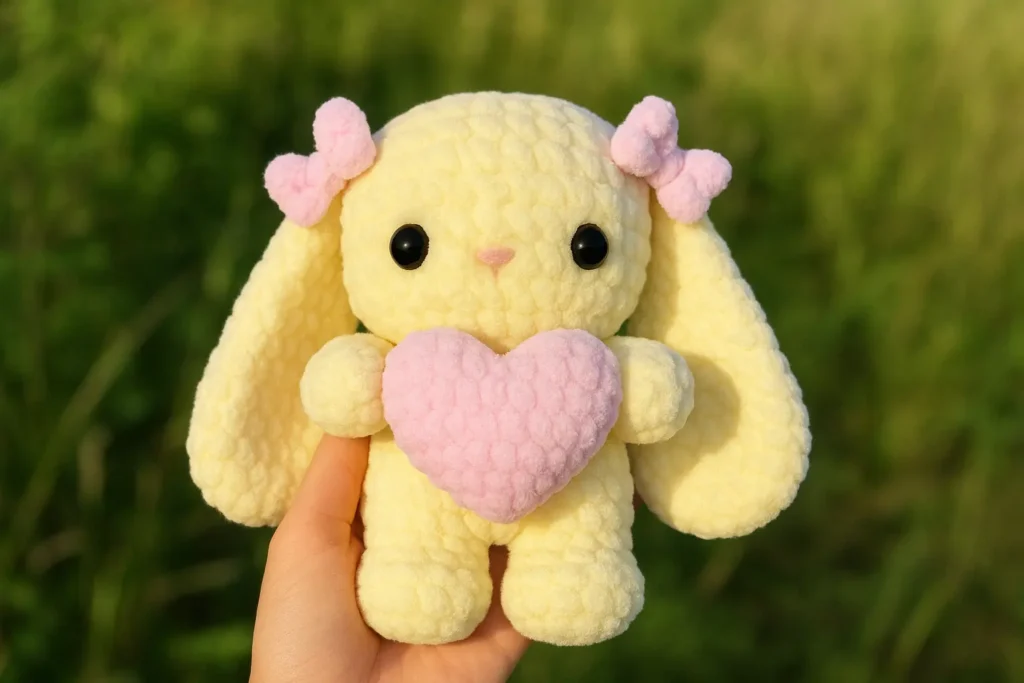
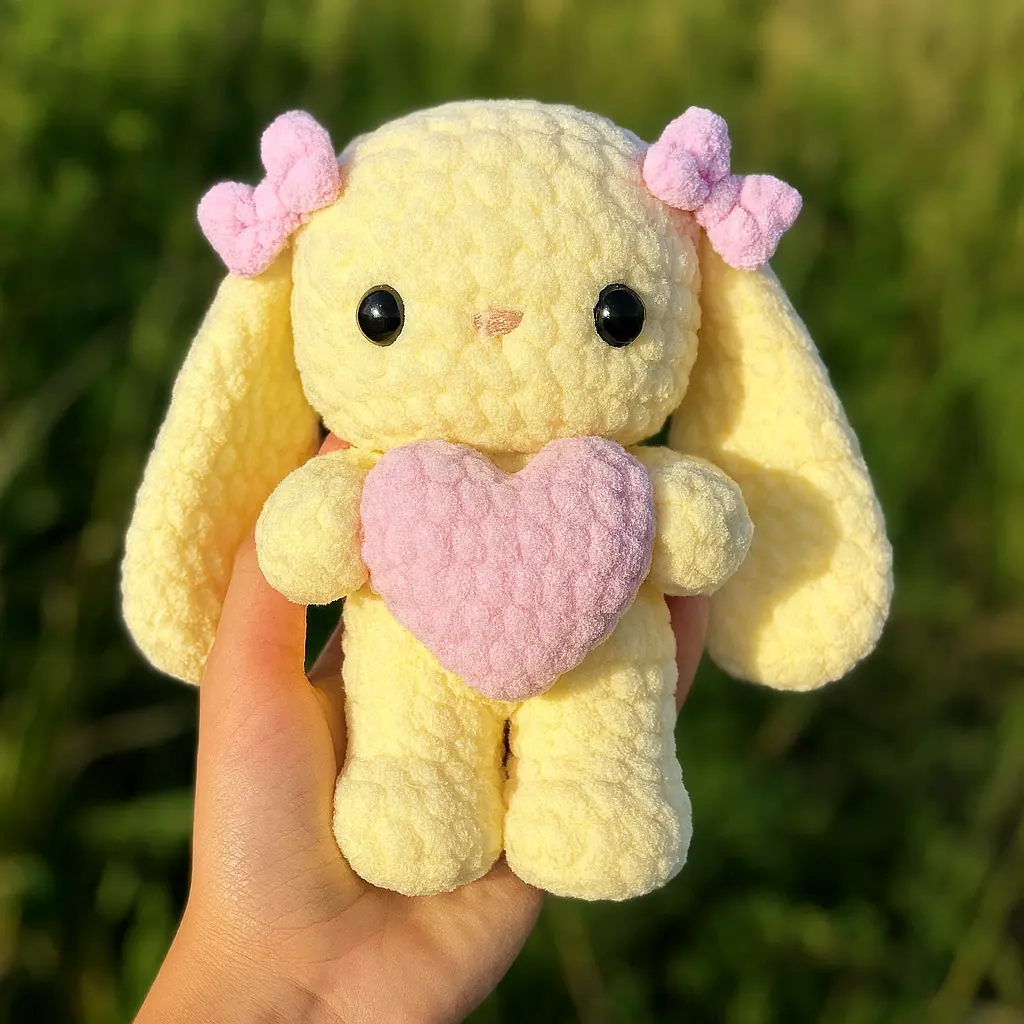
If you’re looking for the amigurumi bunny free pattern everyone is raving about, you’re in the right place! Meet Bunny Love, the ultimate plush bunny that’s beginner-friendly and irresistibly cute. With her floppy ears, soft body, and a heart right between her paws, she’s everything you want in a handmade toy. This amigurumi bunny free pattern uses plush yarn, simple stitches, and a lot of love. Whether you’re making your first bunny amigurumi or adding to your growing bunny family, you’ll adore this soft friend.
In this guide, I’ll show you exactly how to bring Bunny Love to life, step by step. From materials and stitches to bows and final assembly, this amigurumi bunny free pattern is written with clarity and care. And yes, it’s totally free, so grab your yarn and let’s get started.
Jump To a Section
The Story & Intro – Amigurumi Bunny Free Pattern
There’s something magical about making a toy from scratch. When I crocheted my Bunny Love using this amigurumi bunny free pattern, I didn’t expect her to come out so full of personality. She’s made from Himalaya Dolphin Baby yarn in cream and light pink, stitched together with simple single crochets, and a whole lot of heart.
One sunny afternoon, I sat in my favorite chair with my yarn basket, sipping tea and working the rounds of the head. The soft plush yarn worked like a dream with my 4.5 mm hook. This wasn’t just any bunny amigurumi crochet, this was something special. And when I embroidered the nose and attached her floppy ears, it felt like she was smiling right back at me.
This amigurumi bunny free pattern isn’t complicated. In fact, it’s written with beginners in mind. You’ll start with a magic ring, work through classic increase rounds, and stitch together arms, legs, ears, and a sweet little heart. Unlike some dense amigurumi bunny crochet pattern guides that overwhelm you with options, Bunny Love keeps it simple and sweet.
The bows on her ears were a last-minute touch, but they made her look extra playful. That’s the beauty of a well-made amigurumi bunny free pattern, you can personalize it endlessly. Change up the yarn colors, embroider little cheeks, or even add a tiny flower crown if you’re feeling fancy.
Amigurumi Bunny Crochet Tips
To crochet your own bunny amigurumi, start with a sturdy magic ring, especially when working with plush yarn. Insert 10 mm safety eyes between rounds 9 and 10 of the head to give her that innocent, cuddly expression. And don’t overstuff the pieces, soft shaping is what gives this amigurumi bunny free pattern its gentle, squishy charm.
Why This Bunny Feels So Personal
I’ve made dozens of toys over the years, but this bunny amigurumi pattern free is one I keep returning to. Maybe it’s the heart, maybe it’s the bows, or maybe it’s because every stitch reminds me of why I fell in love with crochet in the first place.
Customizing Bunny Love – Style, Yarn & Color Ideas
One of the reasons I love this amigurumi bunny free pattern so much is how adaptable it is. With just a few tweaks, yarn, hook size, or even a color swap, you can give your Bunny Love an entirely new look. Whether you’re making a birthday gift, a nursery toy, or even a keepsake, this amigurumi bunny free pattern is designed to be both versatile and beginner-friendly.
Let’s talk about how to choose the perfect yarn, play with seasonal color palettes, and personalize your bunny to match any mood or occasion.
🧶 Choosing the Best Yarn for Your Bunny Amigurumi
For the original Bunny Love, I used Himalaya Dolphin Baby, a plush chenille-style yarn that’s soft enough to cuddle but sturdy enough to hold shape. Bernat Blanket Yarn is a fantastic alternative with similar thickness and texture. Both are perfect choices for this amigurumi bunny free pattern, especially if you’re aiming for that ultra-soft, velvety finish.
These plush yarns work best with a 4.0 to 5.0 mm hook. If your stitches feel too loose or the stuffing starts to peek out, drop down to a smaller hook size to tighten things up.
Want something more traditional? Go with a worsted-weight cotton like Paintbox Yarns Cotton Aran or Scheepjes Catona. Cotton yarn gives a firmer, more defined stitch and is great if you’re planning to add embroidered details, surface crochet, or accessories.
You can find an excellent yarn comparison guide from LoveCrafts here: Best Yarn for Amigurumi – LoveCrafts
🎨 Color Variations That Make Each Bunny Unique
The original amigurumi bunny free pattern uses cream for the body and light pink for the heart and bows, but don’t let that limit you. Think beyond the neutrals!
- Pastel Palette: Lavender, mint, baby blue, and blush pink. Perfect for Easter baskets or spring gifts.
- Bold & Bright: Teal, hot pink, mustard yellow. Great for a modern, vibrant nursery.
- Classic Neutrals: Light gray, beige, ivory. Add a gingham ribbon or bow for a timeless look.
If you’re making more than one bunny, try mixing and matching heart and bow colors. One of my testers used a lemon yellow heart with a soft lilac bunny body, and it turned out absolutely adorable.
This bunny amigurumi crochet pattern is perfect for seasonal themes too. For Halloween, go with orange and black; for Christmas, red with a snowy white scarf. You can even add tiny embellishments like stars or snowflakes.
And don’t forget: this amigurumi bunny free pattern looks amazing in variegated yarns or self-striping plush yarns. The color transitions create fun surprises as you stitch and make each bunny one-of-a-kind.
✨ Textures and Tension: How They Change the Look
The same amigurumi bunny crochet pattern can look entirely different depending on the texture and hook size.
If you’re using a plush yarn and a larger hook, your Bunny Love will come out chubby and squishable. Want a mini version? Switch to sport weight yarn and a 2.25 mm hook, you’ll end up with a pocket-sized bunny perfect for keychains or dollhouses.
You can even try a mix of yarns. I once made a bunny with a plush body and cotton limbs, and it added a beautiful contrast. The bows in cotton yarn kept their shape better too. If you’re looking to experiment, this bunny amigurumi pattern free is a great starting point.
🧵 Little Details That Add Big Personality
Here are a few fun additions you can try:
- Add a pom-pom tail using leftover yarn or faux fur
- Stitch a name on the bottom of one foot for a personalized gift
- Use pink blush or pastel chalk to add rosy cheeks
- Tie a tiny scarf or cape around your bunny’s neck
- Turn the heart into a star, a flower, or even a plush carrot
Since the amigurumi bunny free pattern is so simple in structure, these small details make a big visual difference. It’s a blank canvas that welcomes your creativity.
🔁 Make It Seasonal or Themed
Planning gifts? This bunny amigurumi crochet pattern works beautifully year-round:
- Valentine’s Day: red bunny with heart-shaped foot pads
- Baby Shower: pastel bunny with embroidered initials
- Spring: add a flower crown to the ears
- Winter: give her a snowflake bow and a scarf
Each time you make it, this amigurumi bunny free pattern becomes a little more special, and if you gift it, people will never guess it came from the same base pattern!
Want more yarn help? Read our Beginner’s Guide to Yarn Selection
Step-by-Step Amigurumi Bunny Free Pattern – Bunny Love
Let’s dive into the full, beginner-friendly amigurumi bunny free pattern for Bunny Love. This bunny is made with plush yarn, simple rounds, and a few basic stitches, but the result is an adorable friend full of personality.
This bunny amigurumi is stitched in the round, which means you’ll work in a spiral instead of joining rounds. If you’re new to working in the round, a stitch marker can help you track the beginning of each round easily. This guide includes detailed steps for the head, body, limbs, ears, heart, bows, and final assembly.
Whether you’re new to plush yarn or crafting your fifth amigurumi bunny crochet pattern, this design is a fun and rewarding project you can finish in a weekend.
🧶 Materials
To make this amigurumi bunny free pattern, gather the following supplies:
- Plush yarn: Himalaya Dolphin Baby (or Bernat Blanket)
• Cream – for body, head, limbs, ears
• Light Pink – for heart and optional bows - Hook size: 4.0–5.0 mm (adjust depending on yarn and tension)
- 10 mm safety eyes
- Embroidery thread: pink, for nose
- Stuffing: polyester fiberfill
- Yarn needle and scissors
- Stitch marker (helpful for spiral rounds)
Tip: Make sure your stitches are tight enough that the stuffing doesn’t peek through. A smaller hook than recommended for the yarn works best with plush yarns in any bunny amigurumi pattern free.
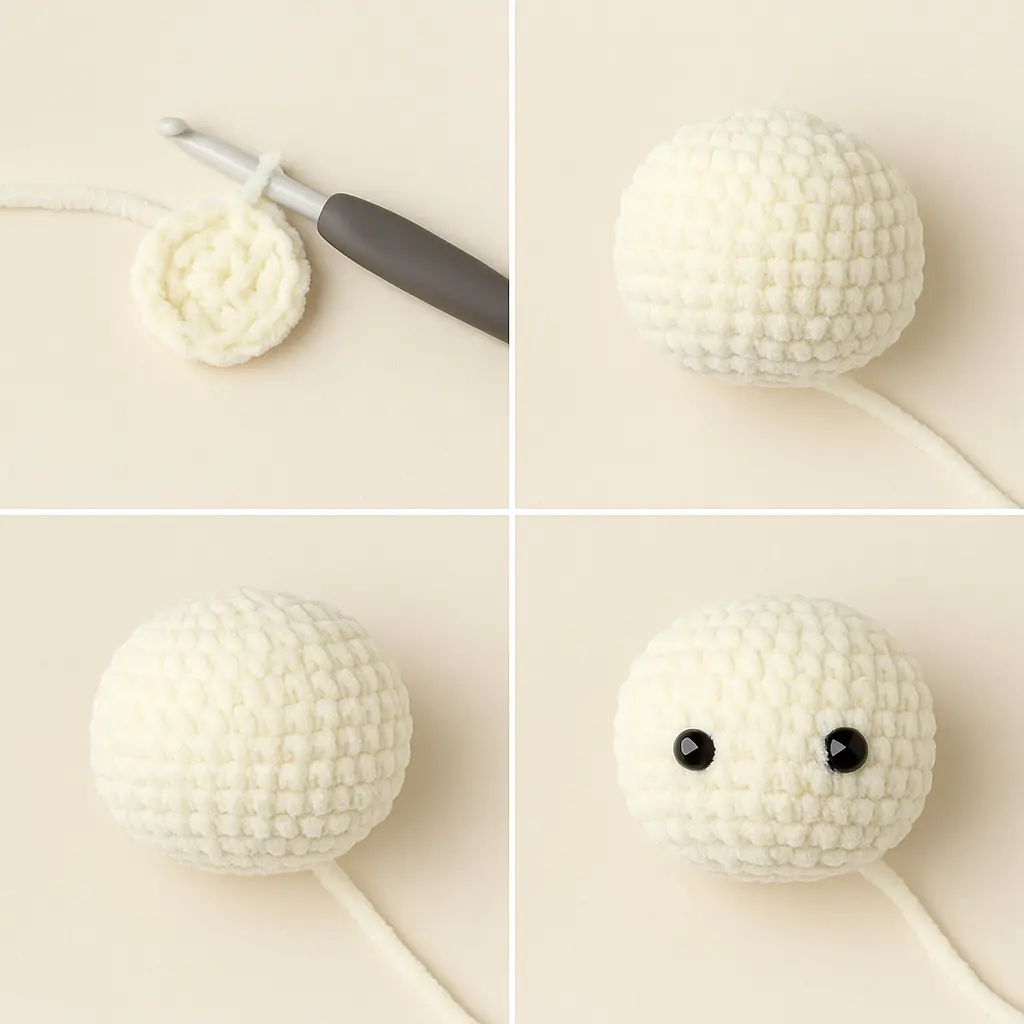
✅ Head
This round shape creates a perfect bunny head using just single crochet, increases, and decreases.
- MR (Magic Ring), 6 sc → (6 sts)
- inc in each stitch → (12 sts)
- (sc, inc) x6 → (18 sts)
- (2 sc, inc) x6 → (24 sts)
- (3 sc, inc) x6 → (30 sts)
- (4 sc, inc) x6 → (36 sts)
7–12. sc in each st around (36 sts per round)
Tip: Use a stitch marker to track your round starts. It’s especially helpful when following this type of amigurumi bunny free pattern with spiral rounds.
- (4 sc, dec) x6 → (30 sts)
- (3 sc, dec) x6 → (24 sts)
- (2 sc, dec) x6 → (18 sts)
👉 Insert safety eyes between rounds 9 and 10, spacing them about 8 stitches apart.
👉 Begin stuffing the head now, packing gently to avoid bulging.
- (sc, dec) x6 → (12 sts)
- dec x6 → (6 sts)
Fasten off. Use the yarn needle to weave the remaining yarn through the front loops and pull tight to close the hole.
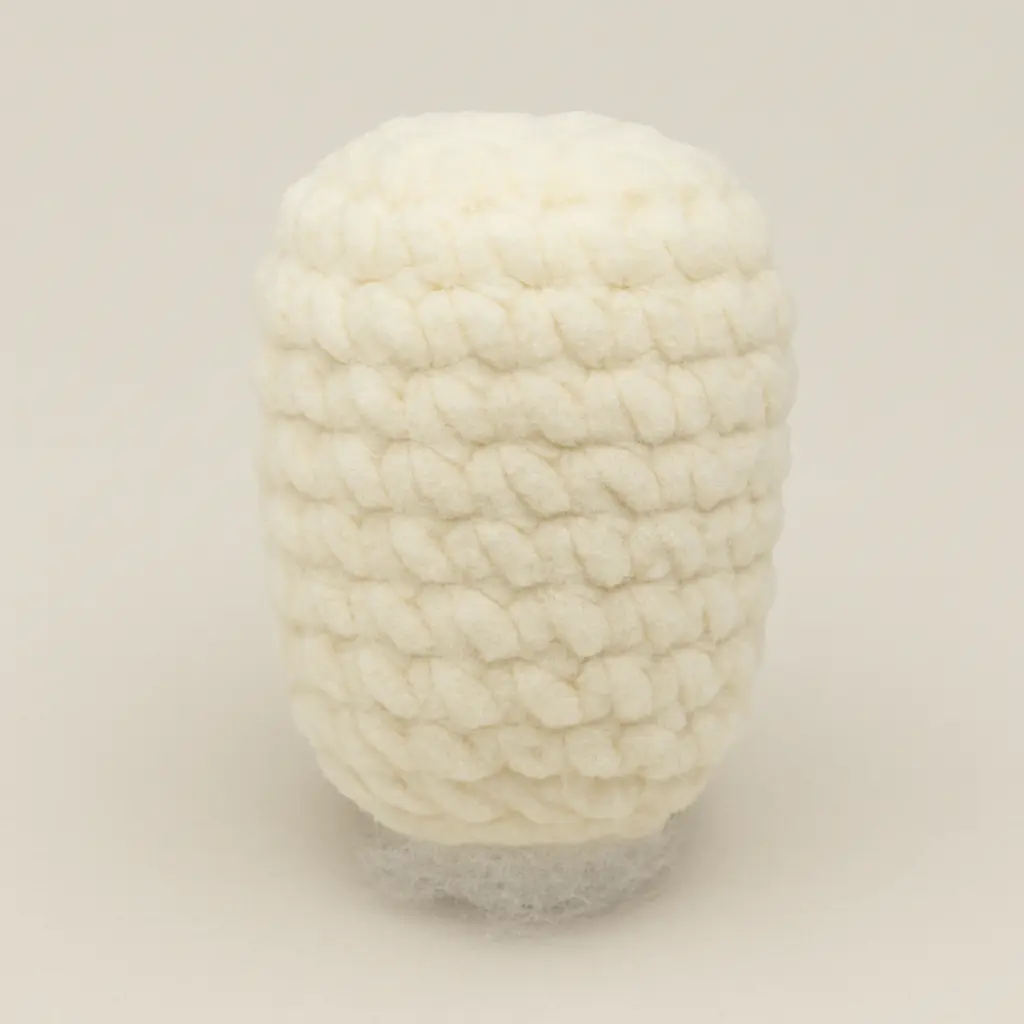
✅ Body
This body shape keeps things simple while staying nicely proportioned to the head.
- MR, 6 sc → (6 sts)
- inc x6 → (12 sts)
- (sc, inc) x6 → (18 sts)
- (2 sc, inc) x6 → (24 sts)
5–9. sc around → (24 sts) - (2 sc, dec) x6 → (18 sts)
11–13. sc around → (18 sts)
Stuff the body firmly. Fasten off and leave a long tail to sew to the head.
This body style is common in most amigurumi bunny crochet pattern templates, but it really comes to life with the addition of the arms, heart, and floppy ears.
✅ Legs (make 2)
Legs give Bunny Love her sturdy base. You’ll only need light stuffing.
More Free Amigurumi Patterns You’ll Love
")

")

- MR, 6 sc → (6 sts)
- inc x6 → (12 sts)
3–6. sc around → (12 sts)
Stuff lightly and fasten off, leaving a long tail for sewing. Flatten the opening slightly when sewing to the body.

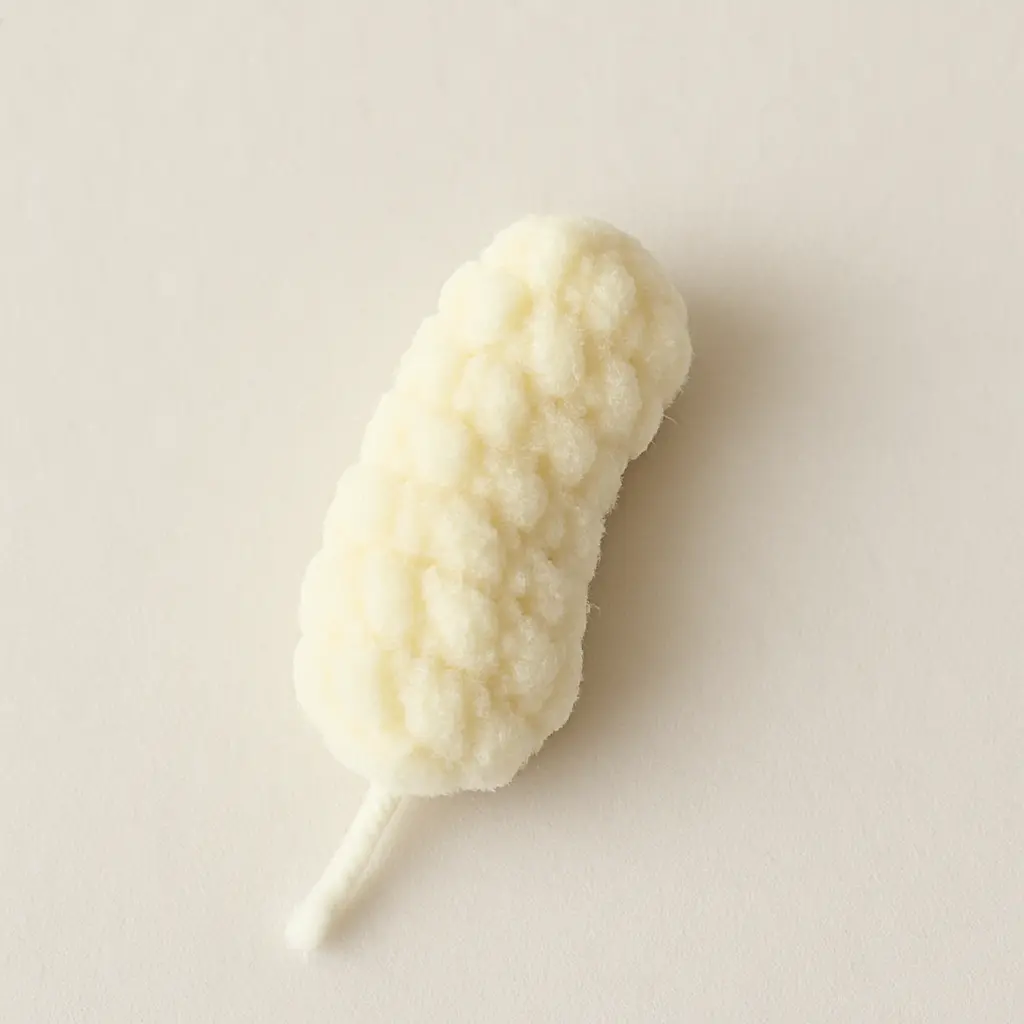
✅ Arms (make 2)
These little arms are stitched similarly to the legs, just a bit shorter and slimmer.
- MR, 6 sc → (6 sts)
- (sc, inc) x3 → (9 sts)
3–5. sc around → (9 sts)
Lightly stuff only the bottom part. Keep the tops unstuffed to make sewing easier. These will later wrap gently around the heart, which is one of the highlights of this amigurumi bunny free pattern.
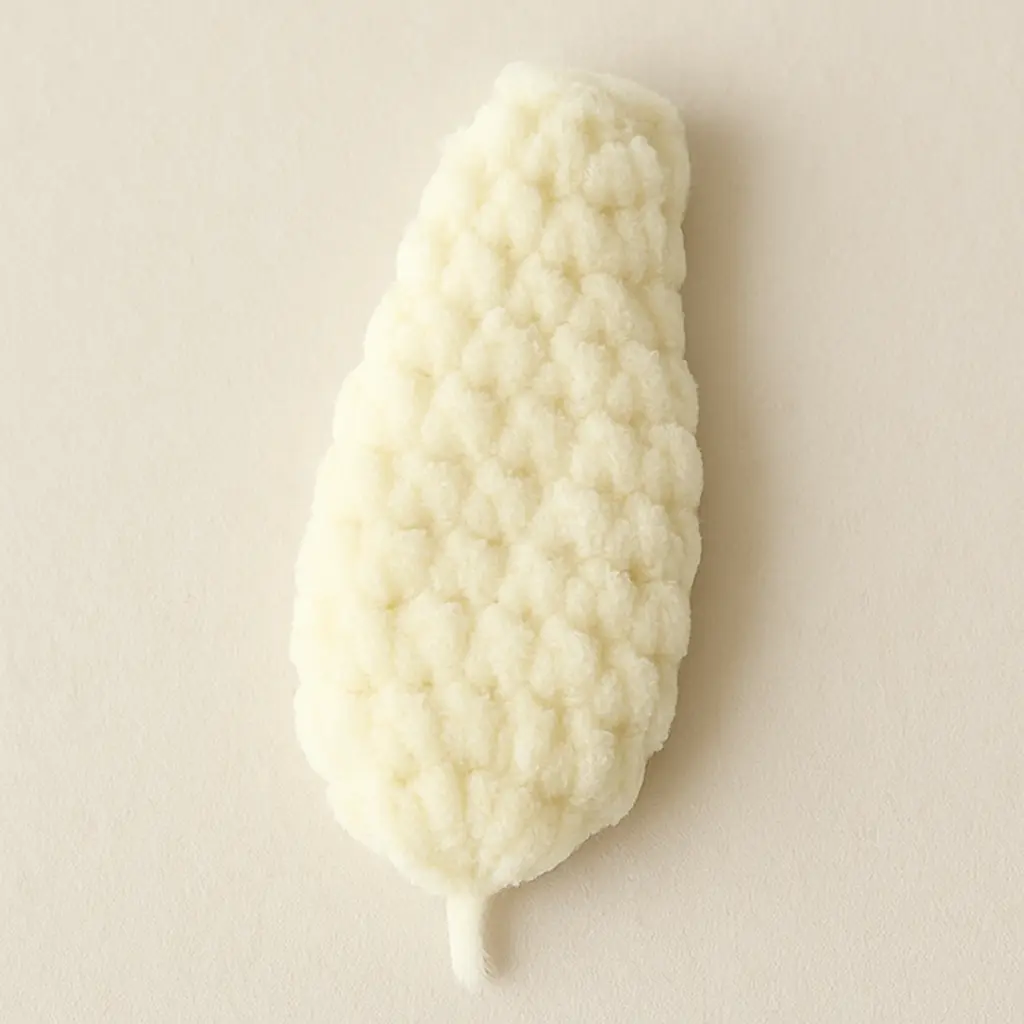
✅ Ears (make 2 – floppy and long)
The signature look of Bunny Love is her floppy, oversized ears. They are crocheted in the round and slightly tapered.
- MR, 6 sc → (6 sts)
- inc x6 → (12 sts)
- (sc, inc) x6 → (18 sts)
4–12. sc around → (18 sts) - (sc, dec) x6 → (12 sts)
14–18. sc around → (12 sts)
No stuffing needed. Flatten the ears before sewing. Attach them slightly to the side and back of the head for that classic droop you’ll often see in a bunny amigurumi crochet.
✅ Heart (light pink)
Here’s how to crochet a soft 3D heart held between Bunny Love’s arms. It makes this amigurumi bunny free pattern especially sweet.
Make two heart lobes:
- MR, 6 sc → (6 sts)
- inc x6 → (12 sts)
- (sc, inc) x6 → (18 sts)
- sc around → (18 sts)
Fasten off the first lobe but leave yarn attached to the second.
Join the lobes:
- Crochet around both lobes → (36 sts total)
- (4 sc, dec) x6 → (30 sts)
- (3 sc, dec) x6 → (24 sts)
- (2 sc, dec) x6 → (18 sts)
- (sc, dec) x6 → (12 sts)
- dec x6 → (6 sts)
Stuff gently as you go. This soft heart really completes the bunny amigurumi pattern free vibe, it’s gentle, adorable, and fits just right in the arms.
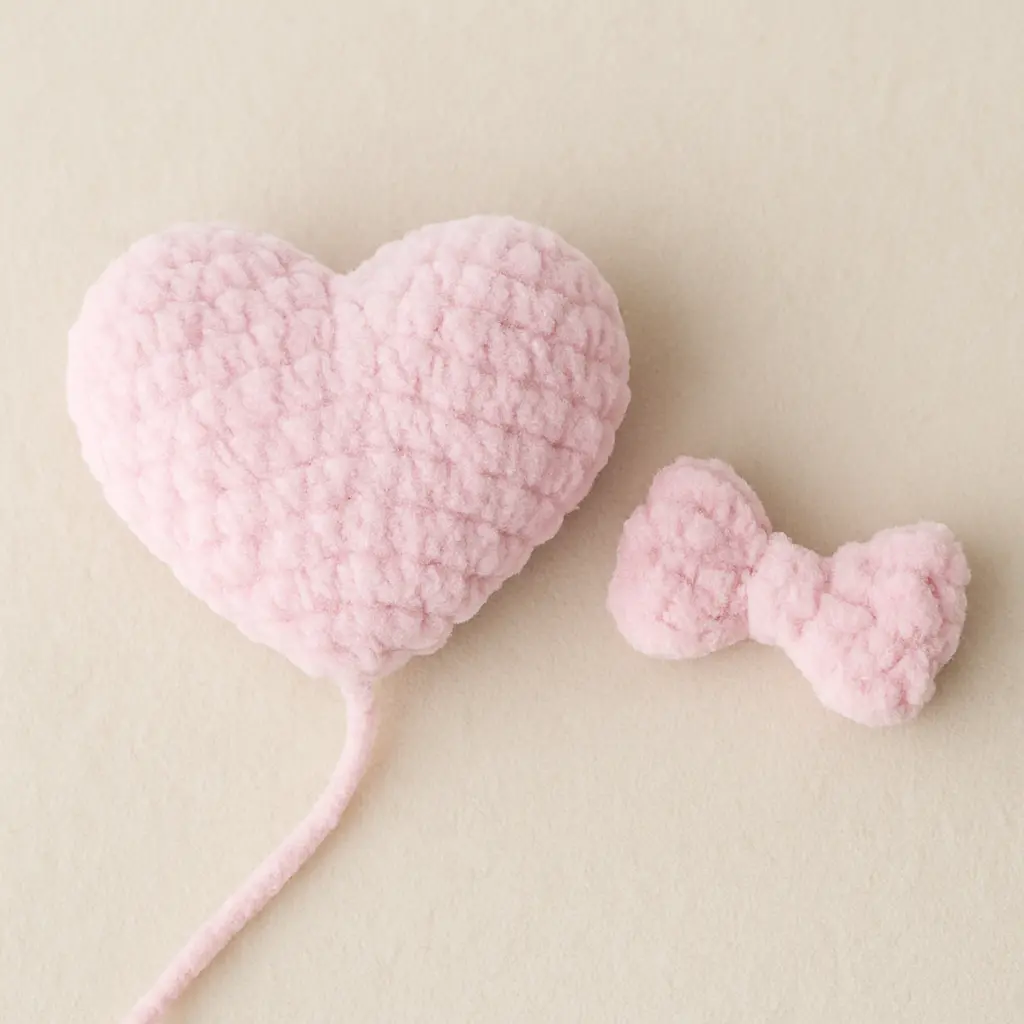
✅ Optional Bow (make 2 for ears)
These bows give your bunny extra character. You can add them to the ears or under the chin.
- Chain 5
- Row 1–3: sc 5 across, ch 1, turn
- After Row 3, fasten off.
- Wrap yarn around the center tightly 8–10 times, tie and secure.
Sew carefully to the base of the ears.
🧵 Assembly Instructions
This is where your amigurumi bunny free pattern comes to life! Follow these steps in order:
- Sew the head to the body using a yarn needle. Align the stitches and sew securely.
- Attach the arms to the upper sides of the body. Curve them forward so they’ll hug the heart.
- Sew the legs to the lower sides of the body. Flatten them slightly as you stitch for better stability.
- Attach the ears to the sides of the head between rounds 3 and 5. Stitch firmly but keep them floppy.
- Use pink embroidery thread to add a small triangle nose between the eyes.
- Sew the heart between the arms, centered at the belly. You can use pins to position it before stitching.
- Add the bows wherever you like: ears, neck, or side.
Congratulations! Your amigurumi bunny free pattern is complete, and Bunny Love is ready to cuddle.
Frequently Asked Questions About Amigurumi Bunny Free Pattern
Q1. What is the best yarn for amigurumi bunnies?
For a soft, squishy result like Bunny Love, plush yarns like Himalaya Dolphin Baby or Bernat Blanket are ideal. They’re easy to work with and create a velvety finish. If you prefer something smaller or firmer, try DK-weight cotton. Many bunny amigurumi crochet fans mix yarns, cotton for accessories, plush for the body.
Q2. Can I make this amigurumi bunny free pattern as a baby toy?
Yes, but with adjustments. Swap out safety eyes for embroidered eyes to avoid choking hazards, and double-knot all your stitches and joins. Always use hypoallergenic stuffing. This bunny amigurumi pattern free design is soft and huggable, making it a great gift with these baby-safe tweaks.
Q3. How do I attach arms and legs securely?
Use a yarn needle and mattress stitch for a tight, nearly invisible seam. Flatten the ends of the limbs slightly and sew around the entire edge. For this amigurumi bunny crochet pattern, pin the limbs in place first to ensure symmetry.
Q4. Can I make this bunny larger or smaller?
Absolutely! Use thicker yarn and a larger hook to make a giant cuddle bunny, or finer yarn and a smaller hook for a keychain version. The pattern remains the same. That’s the magic of a well-written amigurumi bunny free pattern, it scales beautifully.
💛 Final Thoughts
There’s nothing more heartwarming than finishing a project and watching it come to life with a smile, a squish, and a tiny pair of ears. Bunny Love was born from a quiet afternoon, some leftover plush yarn, and a desire to create something soft and sweet.
Whether you follow the original or tweak it with bows, hearts, or pastel shades, this amigurumi bunny free pattern is meant to bring joy—not just to the maker, but to anyone lucky enough to hold the finished bunny in their arms.
I hope you loved making her as much as I did. And if you did… don’t stop here!
👉 Ready for your next project? Check out my FREE Crochet Labubu Pattern , it’s packed with step-by-step photos, a translated layout, and tons of personality. If you liked Bunny Love, you’re going to adore Labubu!
📌 Follow me on Pinterest for daily pin-worthy amigurumi tips, free patterns, and adorable project inspiration:
👉 TopAmigurumi on Pinterest
✍️ Read more behind-the-scenes crochet stories and deep dives on Medium:
👉 Follow TopAmigurumi on Medium
Happy stitching, my friend. And thank you for bringing Bunny Love to life 💕
From my yarn basket to yours,
— Martha 🧶
1 comment
Hi! I just wanted to say that all of these crochet projects are really cute and easy to create. I have made most of them already! The bunny is the cutest one of all! Please add more crochet projects to this website!