


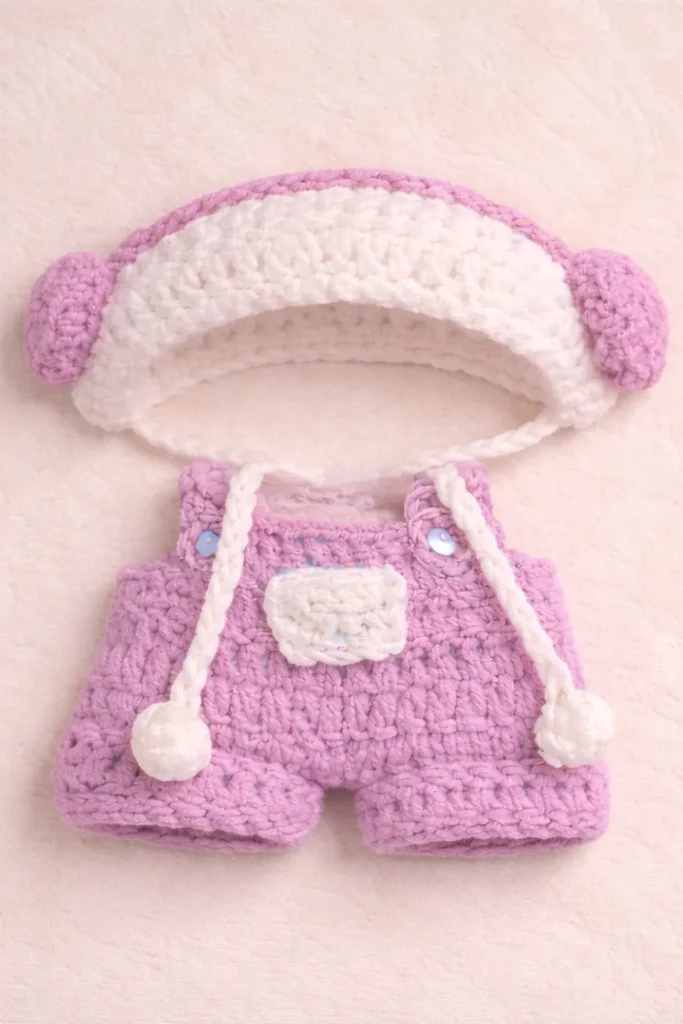
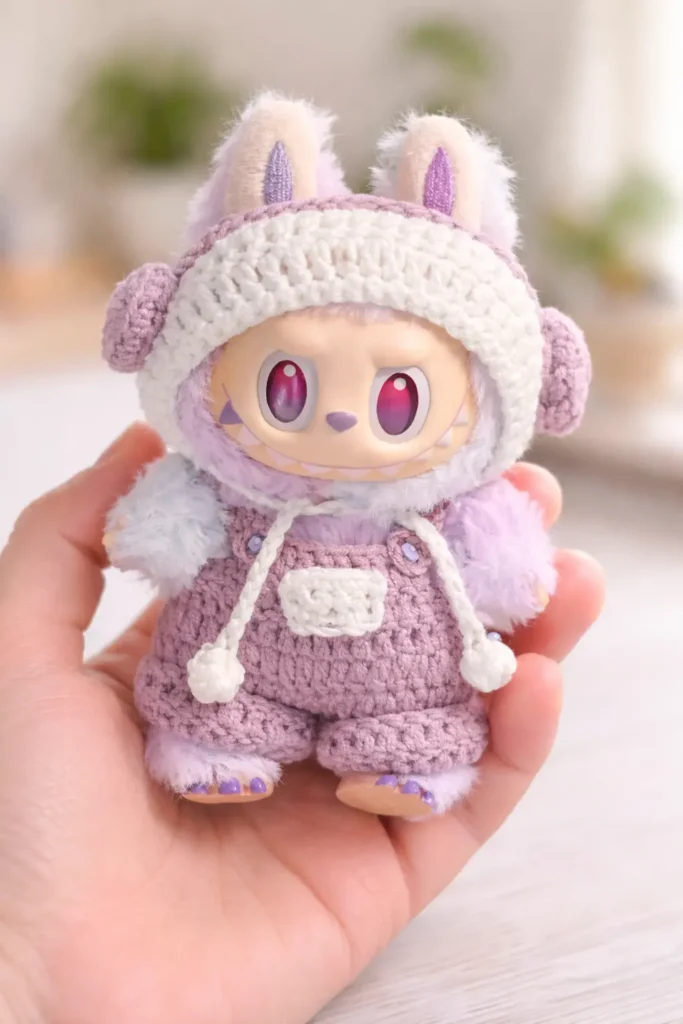
If you’ve been looking for Labubu crochet clothes that are cute and practical, this set is for you. In this labubu clothes crochet pattern, you’ll make a cozy hood hat (with ear holes + ties + pom-poms), matching earmuffs, and sweet little overalls with a front pocket and adjustable straps.
And yes; this is a labubu clothes crochet pattern set that works great for beginners as long as you take it step by step.
Optional: If you prefer a smaller project, you might also like my Labubu keychain tutorial (different size, but super fun).
Jump to section
What Size Is Labubu? Fit & Sizing Guide
Because Labubu dolls can vary a little (and yarn tension changes everything), here’s the easiest way to get a perfect fit:
- Check your Labubu first: the hood and overalls are designed for a standard Labubu doll. If you still need the doll pattern, start here: Free Crochet Labubu Pattern.
- Test-fit as you go:
- After the hood ear-holes round, place it on the head to confirm the ears line up.
- After making the waist chain ring, wrap it gently around the waist area before joining (don’t guess—test!).
- Tension matters:
- If your stitches are tight, use 3.5 mm.
- If your stitches are loose, use 3.0 mm.
- Quick resizing rule (you’ll see it again later):
- Waist too tight/loose → change the starting chain 40 → 38 or 42 (keep it even).
- Straps too short/long → add/remove 2–4 chains.
Materials (Yarn, Hook, Notions)
Yarn (DK / Light Worsted #3)
- Main yarn: smooth cotton or cotton-blend (tight twist = cleaner stitches)
- Colors used in this set:
- White / Cream: hood, ties, pocket
- Pastel Purple / Mauve: overalls, earmuffs, trim
- Color variation option: Red / Coral instead of purple
If you want a quick refresher on yarn weight, gauge, and hook matching, use this guide: Yarn Weight, Gauge & Hook Size Guide.
“Not sure what DK/Light (#3) means? Check the Craft Yarn Council’s Standard Yarn Weight System for the official categories.”
Hook
- 3.0–3.5 mm (US C–E)
- Use 3.0 mm if you crochet loose
- Use 3.5 mm if you crochet tight
Notions
- 2 small buttons (about 6–8 mm)
- Yarn needle, scissors
- Stitch markers (super helpful for the waist split + leg sections)
US Abbreviations + Pattern Notes
Before we start crocheting the outfit, here are the stitches and rules used in this labubu clothes crochet pattern (written in US terms).
US Abbreviations
- MR = magic ring
- ch = chain
- sl st = slip stitch
- sc = single crochet
- hdc = half double crochet
- dc = double crochet
- inc = increase (2 sts in the same st)
- dec = decrease (dc2tog or sc2tog as noted)
- BLO = back loop only
Need help with UK terms? Use my US vs UK crochet terms conversion chart.
Quick Stitch Help (optional)
If you’re newer, these quick tutorials will make the pattern much easier:
- Learn the chain stitch (you’ll use chains a lot for ties, straps, and the waist ring).
- Review double crochet (used in the hood and overalls).
- Review half double crochet (used in the earmuffs).
- If MR feels tricky, see magic ring vs chain circle.
Pattern Notes (Important)
- Hood rounds are joined with a sl st at the end of each round.
- ch2 does NOT count as a stitch unless I clearly say it does.
- Fit depends on yarn + tension. If needed, adjust chain counts (especially the waist ring, straps, and earmuff connector).
- Use stitch markers to keep track of:
- the start of rounds
- the waist split (20 front / 20 back) for the overalls legs
Labubu clothes crochet pattern step-by-step guide
Let’s start the labubu clothes crochet pattern with the hood hat.
A) Hood Hat (White) with Ear Holes + Ties + Pom-Poms
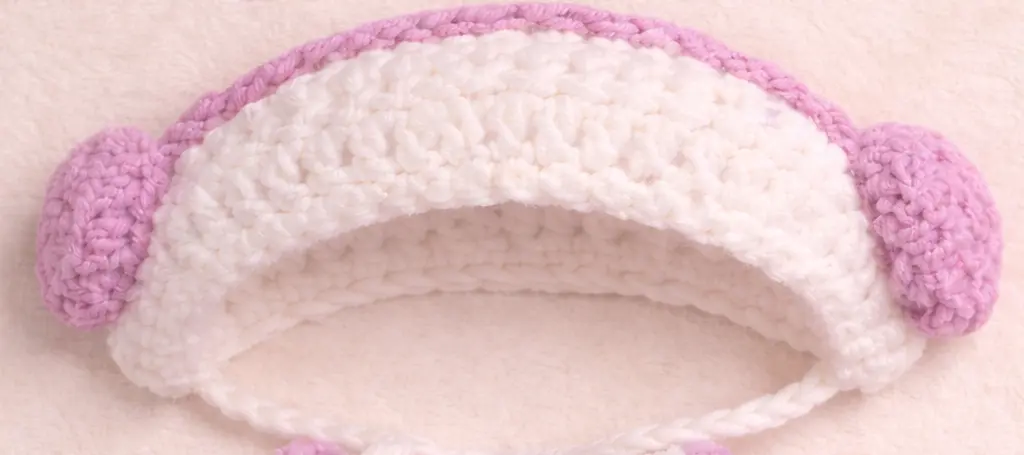
This hood hat is worked in joined rounds in double crochet, then we shape the back with short turning rows. If you want a quick refresher before you start, check my double crochet tutorial.
Hood Crown (Joined Rounds in dc)
R1: MR, 12 dc into ring, join with sl st (12)
R2: ch2, inc dc in each st around, join (24)
R3: ch2, (dc, inc dc) × 12, join (36)
R4: ch2, (2 dc, inc dc) × 12, join (48)
Ear Holes Round
R5: ch2, dc 20, ch 5, skip 5 sts, dc 3, ch 5, skip 5 sts, dc 15, join.
✅ You now have 2 ear holes created by the ch-5 spaces.
Back of Hood Shaping (Turning Rows)
Now we crochet only the back section to create the hood shape.
Row 6: ch2, turn, dc 37 (37)
Row 7: ch2, turn, dec 1 dc at each side → dc2tog at start + dc2tog at end = 35 dc
Row 8: ch2, turn, dec 1 dc at each side = 33 dc
Row 9: ch1, turn, sc 33 (33)
Fasten off.
Ties (Make 2) + Pom-Pom Look
Join white yarn at one bottom corner of the hood:
ch 20
In the 3rd ch from hook, make a bobble/puff:
(yo, insert hook, pull up loop, yo, pull through 2) × 5 (you’ll have 5 partial dc), then yo and pull through all loops, ch 1 to close.
Fasten off. Repeat on the other side.
Optional Purple Trim (Cute Finish)
Join purple yarn and sc evenly around:
- the face opening
- the bottom edge
- Fasten off and weave in ends.
Next in this labubu clothes crochet pattern: the earmuffs.
B) Earmuffs (Purple) ×2 + Connector
These earmuffs are made as two small pads, then connected with a simple chain “headband.” The pads include one round of BLO hdc, so if you want a quick refresher, here’s my half double crochet tutorial.
Earmuff Pads (Make 2)
R1: MR, 6 sc (6)
R2: inc × 6 (12)
R3: (sc, inc) × 6 (18)
R4: BLO hdc around (18)
Fasten off for each pad.
Connector (Headband)
Join yarn to one earmuff pad:
- ch 22 (adjust to fit your hood—some Labubu hoods may need +2 or -2 chains)
- Sew/attach the other end of the chain to the second pad.
Optional Clean Border (Nice Finish)
With purple yarn, sc around the outer edge of each pad to smooth the shape.
Attach the Earmuffs
- Place one pad on each side of the hood (centered over the ear-hole area).
- Sew with small stitches around the inner edge so they sit flat.
Now we’ll crochet the overalls in this labubu clothes crochet pattern.
C) Overalls (Purple) with Pocket + Straps
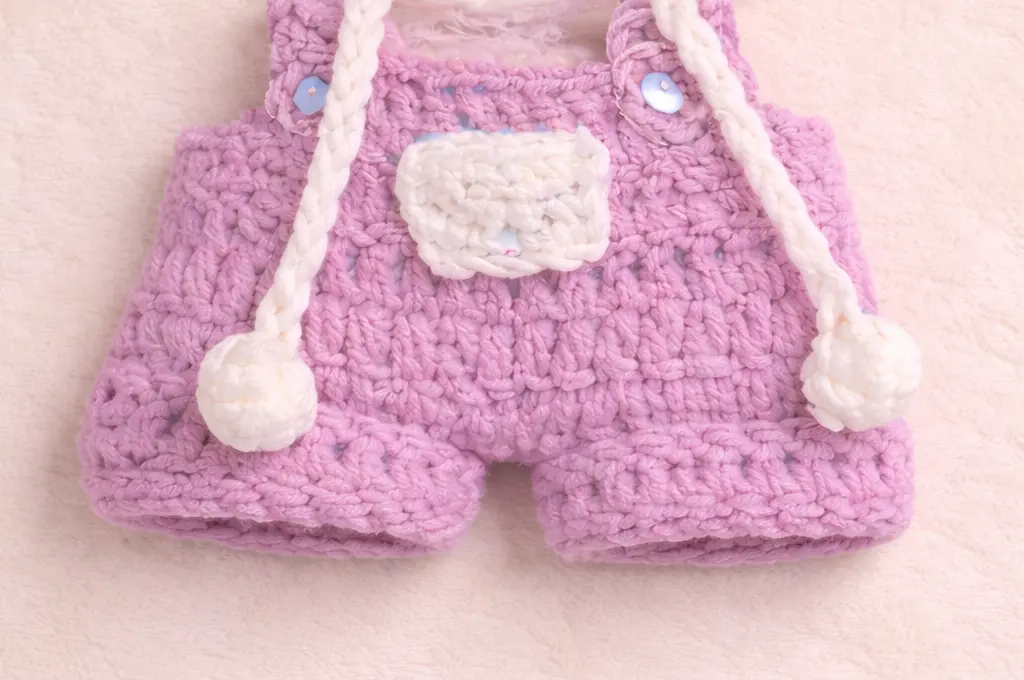
These overalls start with a simple waist ring, then you split into two legs, and finish with a small front bib, a cute white pocket, and adjustable straps.
Waist Ring
R1: ch 40, join into a ring (40)
R2: ch2 (not counted), dc in same st, dc around, sl st (40)
R3: ch2 (not counted), dc in same st, dc around, sl st (40)
✅ Waist fit tip: if your Labubu is a bit smaller/larger, change ch 40 → ch 38 or ch 42 (keep it even).
Legs (Split into Two Sections)
Place markers so you have:
- 20 sts front
- 20 sts back
You’ll work each leg on one 20-st section.
Leg 1
Join yarn to one 20-st section:
Leg R1: ch2 (not counted), dc 20, join (20)
Leg R2: ch2, dc 20, join (20)
Leg R3: ch2, dc 20, join (20)
Fasten off.
Leg 2
Repeat the same 3 rounds on the other 20 sts:
Leg R1–R3: dc 20 each round (20)
Fasten off.
✅ Optional cuff: join yarn and sc around each leg opening once.
Front Bib (Purple)
Join yarn at the front center above the legs.
More Free Amigurumi Patterns You’ll Love

")

")
Bib Row 1: ch2, dc 10, turn
Bib Row 2: ch2, dc 10, turn
Bib Row 3: ch2, dc 10, fasten off
Pocket (White)
ch 6
Row 1: sc in 2nd ch from hook and across = 5 sc, turn
Row 2: ch1, sc 5, turn
Row 3: ch1, sc 5, fasten off
Sew the pocket centered on the bib.
Straps ×2 (Purple)
Attach yarn to a top corner of the bib.
Strap length: ch 18–22 (adjust so it reaches the back waistband comfortably)
Option A (Thin Strap)
- ch 18–22, fasten off
- Sew strap end to the back waistband
Option B (Thicker Strap + Buttonhole)
- ch 18–22
- Work back down the chain to thicken:
- starting in 2nd ch from hook, sc in each ch until you have 2 chains left
- Buttonhole:
- ch 2, skip 2 chains, then sl st in the last chain
(or sc in the last chain for a stronger finish)
- ch 2, skip 2 chains, then sl st in the last chain
- Fasten off, leave a tail to sew.
✅ Reinforce buttonhole (best finish): after sewing, make sl st or sc around the ch-2 space once.
Button sizing quick fix
- Bigger button → ch 3, skip 3
- Smaller button → ch 1, skip 1
Sew 2 small buttons onto the bib corners (or sew straps directly if you prefer).
Fit Adjustments (Quick)
- Waist too tight/loose: change ch 40 → 38 / 42
- Legs too short/long: add/remove 1 dc round per leg
- Straps: adjust length ± 2–4 chains
Want a print-friendly copy? Grab the Printable PDF version of this pattern for easy saving and offline crocheting
No-Sew / Minimal-Sew Options (Easy Finish)
If you love the look but don’t want a lot of sewing, here are easy shortcuts that still look neat on Labubu:
Option 1: Make it “minimal-sew” (best balance)
What you’ll still sew (just a few stitches):
- Attach the two earmuff pads (small, quick stitches)
- Attach strap ends to the back waistband (or button them)
What you can skip:
- Skip the pocket completely (the bib still looks adorable and clean).
- Skip the purple trim if you want the simplest finish.
Option 2: No pocket + tie straps (almost no sewing)
Instead of sewing buttons + buttonholes:
- Make the straps with a longer chain (add +6 to +10 ch),
- Then tie each strap at the back waistband in a small bow.
✅ This removes the need to sew buttons and makes the straps adjustable.
Option 3: “Crochet-on” straps (no sewing the strap ends)
If you don’t want to sew the strap ends at all:
- Attach yarn directly to the back waistband where the strap should land,
- ch 18–22 to reach the bib corner,
- Then fasten off and use only 1–2 tiny stitches (or a tight knot + weave-in) at the bib corner.
It’s not 100% “zero sewing,” but it’s so close—and it holds well once woven in.
Quick “No-Sew” Checklist
- ✅ Overalls: crochet as written
- ✅ Bib: crochet as written
- ✅ Pocket: skip
- ✅ Straps: use tie straps (Option 2) or crochet-on (Option 3)
- ✅ Earmuffs: attach with a few stitches (smallest sewing part)
Color Variations (Purple + Red/Coral) + Cute Outfit Ideas
This set is super easy to customize because the stitch counts stay the same, you’re mainly swapping colors. Here are a few clean, high-impact options for your Labubu crochet clothes:
Variation 1: Classic Pastel (Original Look)
- Overalls + earmuffs: pastel purple / mauve
- Hood + ties + pocket: white / cream
- Optional: add a purple trim around the hood opening for a “finished” look.
Variation 2: Red / Coral “Pop” Version (Trending Look)
- Swap the purple yarn for red or coral on:
- overalls
- earmuffs
- hood trim (optional)
- Keep the hood base and pocket white so the outfit stays bright and cute.
Variation 3: Cozy Neutral (Minimal Aesthetic)
- Make everything cream/white, then add:
- a tiny pocket border in a soft pastel
- or small colored pom-poms (even just the pom-poms can change the vibe).
Variation 4: Two-Tone Overalls (Extra Cute)
- Overalls in purple, but:
- make the bib a lighter shade
- or do the cuffs (optional sc round) in white for a “pants hem” look.
Fast Styling Tips (Little Details = Big Difference)
- Pom-poms: match the earmuffs color (makes it look like a designed set).
- Buttons: white buttons look soft; clear buttons look modern; colored buttons look playful.
- Trim: one round of sc in a contrast color instantly makes the hood look premium.
Troubleshooting Fit (Quick Fixes)
Even with the same stitch counts, yarn + tension can make your Labubu outfit fit a little differently. Here are the fastest fixes (no stress, no ripping back whole pieces).
Hood Hat Issues
Hood feels too tight on the head
- Go up a hook size (3.0 → 3.5 mm) OR crochet a little looser.
- If it’s still tight, add one more increase round after R4:
- Extra Round: ch2, (3 dc, inc dc) × 12, join (60)
Hood feels too loose
- Use a smaller hook (3.5 → 3.0 mm).
- Or stop at R3 (36 sts) if your Labubu head is smaller (test-fit before doing R4).
Ear holes don’t line up
- Adjust the ear-hole chains:
- Ears feel squeezed → ch 6 instead of ch 5
- Ear holes too big → ch 4
- Also make sure you’re skipping the correct number of stitches (skip 5 / skip 5).
Face opening looks too wide
- Add the optional trim in a slightly tighter tension (sc evenly).
- Or do one round of sc (instead of dc) around the opening to snug it.
Earmuffs Issues
Pads don’t sit flat
- Make sure Round 4 is truly BLO hdc (this helps the edge shape).
- Add the optional border (sc around) to stabilize the edge.
Connector too short/long
- Adjust ch 22 by ±2 chains until it sits comfortably over the hood.
Overalls Issues
Waistband too tight / too loose
- Change the starting chain:
- Tight → ch 42
- Loose → ch 38
- Always keep it even so the legs split cleanly.
Legs too short / too long
- Add or remove 1 dc round per leg (R1–R3 becomes R1–R4, or stop at R2).
Bib curls or flips
- This is usually tension. Try:
- A slightly larger hook for the bib rows, OR
- Add a simple border: sc evenly around the bib (optional, very clean).
Straps don’t reach / sit awkwardly
- Adjust strap chain by ±2–4 chains (test before fastening off).
- If straps slip off buttons:
- Reinforce the buttonhole with sl st or sc around the hole once.
Buttonhole doesn’t fit
- Bigger button → ch 3, skip 3
- Smaller button → ch 1, skip 1
FAQ (Labubu Crochet Clothes)
Is this Labubu clothes crochet pattern beginner-friendly?
Yes — it uses basic stitches (sc, hdc, dc) and simple shaping. The key is to test-fit the hood after the ear-hole round and check the waist ring before you commit.
What yarn weight works best for Labubu crochet clothes?
in this labubu clothes crochet pattern a DK / Light Worsted (#3) cotton (or cotton-blend) is ideal because it gives crisp stitches and a neat “mini clothes” look.
How do I resize the overalls if the waist is too tight or loose?
Change the starting chain ch 40:
Smaller: ch 38
Bigger: ch 42
Keep it even so your legs split cleanly into 20/20.
Can I make this as a no-sew Labubu outfit?
You can make it minimal-sew easily: skip the pocket, use tie straps instead of buttons, and attach earmuffs with just a few small stitches.
My straps don’t fit my buttons — what’s the fix?
Adjust the buttonhole:
Bigger button: ch 3, skip 3
Smaller button: ch 1, skip 1
Then reinforce around the hole with a quick round of sl st or sc.
Why does my bib curl or flip?
Usually tension. Try one of these:
Use a slightly larger hook for the bib rows
Add a tiny border: sc evenly around the bib (clean and flat)
Can I use acrylic instead of cotton in my labubu clothes crochet pattern?
You can, but cotton holds shape better. If you use acrylic, go with a smooth yarn and keep your tension consistent (and test-fit more often).
Can I sell finished Labubu outfits made from this pattern?
Typically yes for finished items (small handmade sales), but don’t resell or repost the written pattern as your own.
Conclusion
And that’s your full labubu clothes crochet pattern (free) , a cozy hood hat with ear holes + ties + pom-poms, matching earmuffs, and cute overalls with a pocket + adjustable straps.
My best tip before you weave in the last ends: do one final test-fit (hood placement + waistband + strap length). Tiny tweaks like ±2 chains can make the outfit look perfectly tailored on your Labubu.
If you make this set, leave a comment with:
- the yarn + hook you used
- which color version you chose (purple or red/coral)
- and whether you went minimal-sew or full details 💜