


This Mini Taiyaki Fish Crochet Charm Pattern is a tiny, sweet, and beginner-friendly project inspired by the cute fish shape of taiyaki. It is small, quick to make, and perfect for turning into a keychain, bag charm, phone charm, or handmade gift.
I love this kind of mini crochet project because it does not need too much yarn, and you can finish several fish in different colors in a short time. You can make one simple fish, or you can create three little fish and connect them vertically as a hanging charm.
If you enjoy small sea-themed crochet projects, you may also love this Clownfish Amigurumi Crochet Pattern or this adorable Little Sea Doll Crochet Pattern for a cute ocean-inspired collection.
This pattern is written in US crochet terms. If you are still learning crochet abbreviations, the Craft Yarn Council crochet abbreviations guide is a helpful external reference for checking standard stitch terms.
Jump to section
About This Mini Taiyaki Fish Crochet Charm
This mini fish is worked in continuous rounds, with a narrow body section before the tail and a textured tail edge made using half double crochet stitches. The shape stays small and slightly flat, which makes it perfect for a keychain charm.
You can use classic taiyaki-inspired colors like beige, light brown, cream, or golden yellow. You can also make playful versions in white, yellow, pastel pink, orange, or soft blue.
For more small charm ideas, you can pair this project with the Lucky Rainbow Koi Fish Keychain Pattern or the Mini Sea Turtle Pattern to create a full handmade sea charm collection.
Skill Level
Beginner to easy intermediate.
This pattern uses basic amigurumi shaping, simple increases and decreases, light stuffing, safety eyes or beads, and small embroidery details.
Finished Size
The final size depends on your yarn, hook size, and tension. With 4-ply cotton yarn and a 2.0 mm–2.5 mm crochet hook, each fish will be a small mini charm size.
Materials
- 4-ply cotton yarn or similar yarn
- Crochet hook suitable for your yarn, usually 2.0 mm–2.5 mm
- Small black safety eyes or black beads
- Brown embroidery thread for the fish stripes
- Fiberfill stuffing
- Yarn needle
- Stitch marker
- Scissors
- Keychain ring or jump rings if you want to make the hanging charm
Suggested Yarn Colors
You can make one fish or a set of three.
Good color ideas:
- White fish
- Yellow fish
- Light brown fish
- Cream fish
- Golden beige fish
- Soft orange fish
For a taiyaki-style look, beige, caramel, and light brown work beautifully. For a kawaii charm look, pastel colors are also very cute.
Abbreviations
This pattern uses US crochet terms.
- MR = magic ring
- sc = single crochet
- inc = 2 sc in the same stitch
- dec = single crochet decrease
- hdc = half double crochet
- sl st = slip stitch
- sk = skip stitch
- FO = fasten off
If you are new to reading crochet instructions, you may find my guide on how to read an amigurumi pattern helpful before starting.
Pattern Notes
- Work in continuous rounds unless stated otherwise.
- Use a stitch marker to mark the beginning of each round.
- Stuff the fish lightly. Do not overstuff, because the fish should stay small and slightly flat.
- If using safety eyes, insert them before closing the body completely.
- If using beads, sew them on after finishing the fish.
- Embroider the stripes on both sides of the fish for the cutest result.
- You can make one fish or connect three fish vertically as a charm.
For smoother shaping, use neat decreases. If your decreases look bulky, you can review this helpful tutorial on the invisible decrease crochet technique.
Mini Taiyaki Fish Crochet Charm Pattern
Fish Body
Work in continuous rounds.
Start with your chosen fish color.
- Rnd 1: 6 sc in MR. [6]
- Rnd 2:
(sc, inc) ×3. [9] - Rnd 3:
(sc, inc, sc) ×3. [12] - Rnd 4:
(3 sc, inc) ×3. [15] - Rnd 5–8: sc around. [15]
- Start stuffing the fish lightly. Do not add too much stuffing. The fish should keep a small, slightly flat charm shape.
- Rnd 9:
(3 sc, dec) ×3. [12] - Rnd 10: dec ×6. [6]
- This forms the narrow part before the tail.
- Rnd 11: inc ×6. [12]
- Now make the tail edge.
- Rnd 12:
(3 hdc in the next stitch, sl st in the next stitch, sk 1) ×4. - FO and weave in the end.
This creates a small wavy tail edge. Try not to pull the stitches too tightly in the final round, because the tail should look soft and rounded.
If you need extra help with the hdc stitch used in the tail, you can follow my simple guide on how to half double crochet.
Eyes
- Attach or sew one small black eye on each side near the front of the fish.
- If using safety eyes, insert them before fully closing the body. Make sure they are placed evenly on both sides.
- If using black beads, sew them on after finishing the fish. Secure them very well, especially if the charm will be attached to a bag or keys.
Embroidered Stripes
Using 2 strands of brown embroidery thread, stitch simple wavy or vertical stripes on both sides of the fish.
You can make:
- 2 or 3 short brown stripes near the middle of the body
- one tiny mouth stitch near the front if desired
- small curved lines to make the fish look more like a mini taiyaki
sew the stripes on both sides, and this detail really helps the charm look finished. Keep the embroidery simple because the fish is very small.
Finishing as a Charm
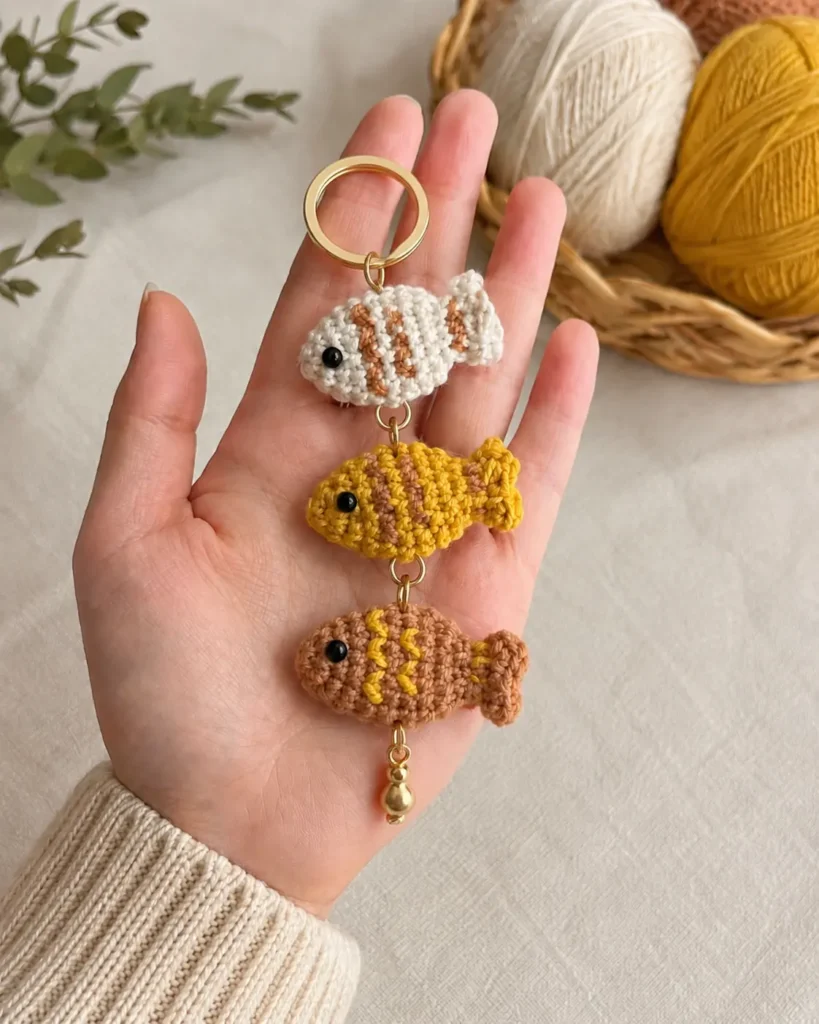
To make the charm version, make 3 fish in different colors.
For example:
- 1 white fish
- 1 yellow fish
- 1 light brown fish
Connect them vertically using small jump rings. Add a keychain ring at the top and a small charm at the bottom if you like.
You can also make only one fish and attach it directly to a keyring. This is a lovely option for a quick handmade gift or market item.
If you like mini bag charm projects, you may also enjoy this Avocado Crochet Keychain Pattern or this cute Mini Bear Crochet Keychain Pattern.
Assembly Tips
- Before adding the keychain hardware, check the shape of the fish from both sides.
- The body should look slightly rounded but not too bulky. The tail should stay visible and gently textured. If the body looks too full, use less stuffing next time.
- When attaching jump rings, avoid pulling directly through loose embroidery. It is better to attach the ring through a firm stitch near the top of the fish body or use a small loop made from yarn.
Customization Ideas
This Mini Taiyaki Fish Crochet Charm Pattern is easy to customize.
You can try:
- Beige fish with dark brown stripes for a classic taiyaki look
- White fish with golden stripes for a soft kawaii style
- Yellow fish with orange stripes for a sunny charm
- Pink fish with brown embroidery for a sweet pastel version
- Three fish in gradient colors for a hanging charm
You can also add a tiny bow, a small bead, or a little bell at the bottom of the charm.
For more cute mini crochet projects, this Mini Bear Pumpkin Toast Crochet Pattern is another fun small design that works beautifully as a gift or decoration.
Helpful Tips for a Neat Result
- Use a smaller hook if your stitches look too loose. Small amigurumi charms need tight stitches so the stuffing does not show through.
- Keep your stuffing light. This is one of the most important parts of this pattern. Overstuffing can make the fish too round and may hide the taiyaki-style shape.
- Use thin embroidery thread for the stripes. Thick yarn can overwhelm the tiny fish body.
- Make the eyes small. Large eyes can be cute, but for this mini charm, small black eyes or beads keep the design balanced.
- Weave in all ends securely, especially if the charm will be used on keys, bags, or backpacks.
How to Use Your Mini Taiyaki Fish Charm
You can use your finished fish as:
- a keychain
- a bag charm
- a zipper pull
- a phone charm
- a small desk decoration
- a handmade gift topper
- a craft fair item
- a cute addition to an ocean-themed crochet set
You can even combine it with other sea-inspired designs like the Crochet Clam Shell Pattern to create a small handmade ocean charm collection.
FAQ About Mini Taiyaki Fish Crochet Charm Pattern
Is this Mini Taiyaki Fish Crochet Charm Pattern beginner-friendly?
Yes, this pattern is beginner-friendly if you already know how to work in continuous rounds, make increases, make decreases, and sew small details.
Can I use plush yarn for this fish?
You can, but the fish will become larger and rounder. For a small keychain charm, 4-ply cotton yarn or similar yarn is better.
Why should I stuff the fish lightly?
The fish should stay small and slightly flat. If you add too much stuffing, the body may become too bulky and lose the mini taiyaki shape.
Can I make this fish without safety eyes?
Yes. You can use black beads, embroidery, or small felt circles instead of safety eyes.
How many fish should I make for the charm?
You can make one fish for a simple keychain, or make three fish in different colors and connect them vertically with jump rings.
Can I sell finished items from this pattern?
Yes, you can sell finished handmade fish charms made from this pattern. Please do not copy or redistribute the written pattern as your own.
")


")
This Mini Taiyaki Fish Crochet Charm Pattern is a quick, cute, and satisfying mini crochet project. It uses simple stitches, light shaping, and easy embroidery to create a tiny fish charm with lots of personality.
You can make one fish for a simple keychain, or crochet three fish in different colors and connect them into a vertical hanging charm. Because the project is small, it is also a great way to use leftover yarn from other amigurumi projects.
Whether you choose soft neutral colors for a taiyaki-inspired look or bright pastel colors for a kawaii charm style, this little fish is a fun pattern to add to your handmade collection.