
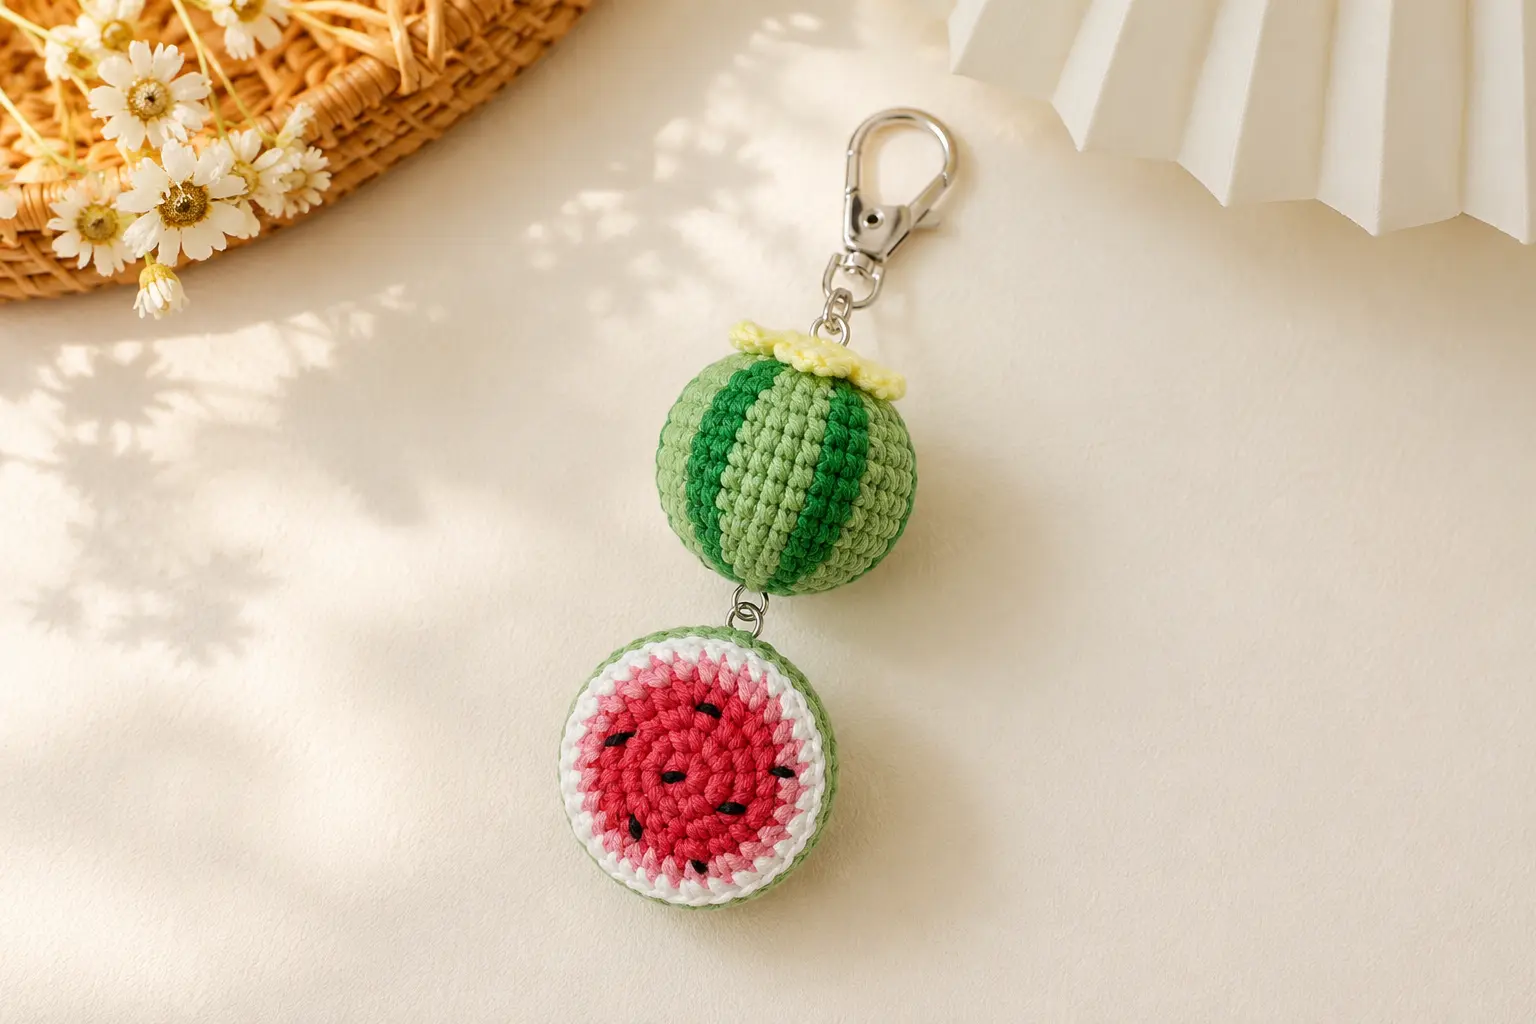
Bright, juicy, and perfect for summer, this Mini Watermelon Keychain Crochet Pattern creates an adorable two-piece fruit charm that you can attach to your keys, handbag, backpack, or crochet project bag.
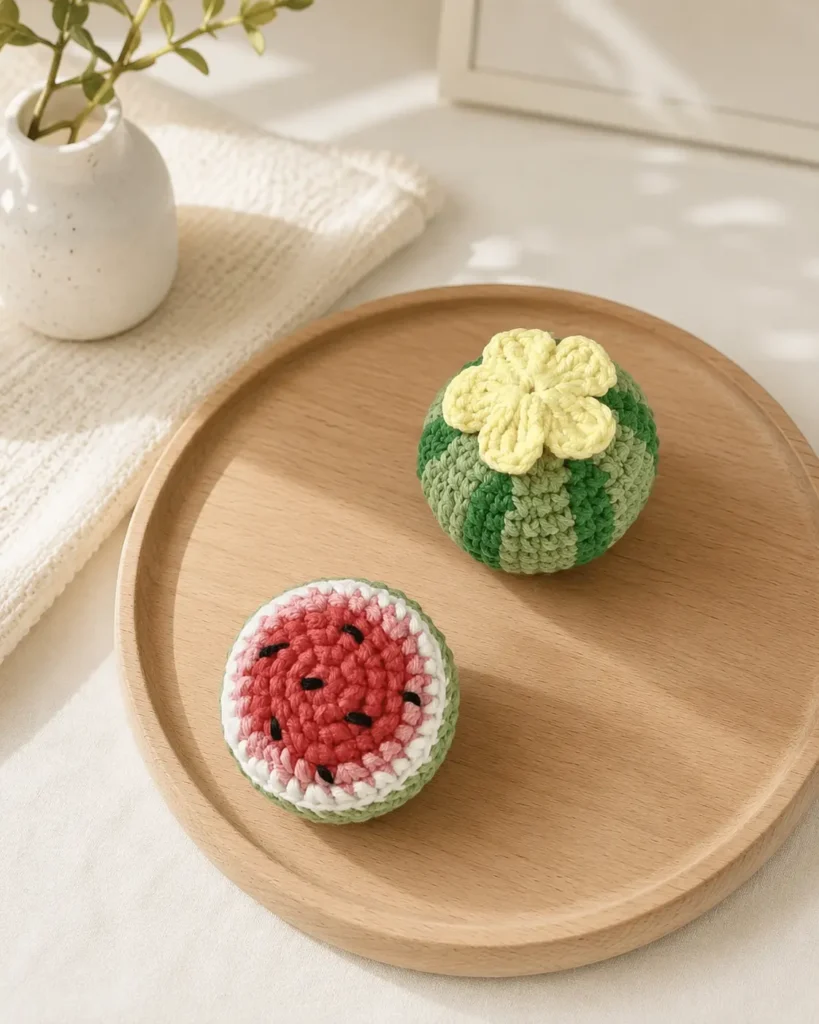
The design combines a small striped whole watermelon with a colorful cut watermelon slice hanging underneath. A tiny five-petal flower decorates the top, while the optional crochet leaf adds an extra handmade detail.
The cut slice uses simple increases and decreases, making it a good starting point for crocheters who are still practicing amigurumi shaping. The whole watermelon introduces tapestry crochet, carried yarn, and frequent color changes to create six repeating dark-green stripes.
If this is your first small stuffed project, begin with our First Amigurumi Step-by-Step Guide before starting. It explains the basic techniques you need for working in continuous rounds, placing a stitch marker, stuffing, and closing an amigurumi piece.
Fruit-themed keychains are also wonderful stash-buster projects because they require only small quantities of each color. After finishing this watermelon charm, you may also enjoy making the Avocado Crochet Keychain Pattern or the colorful Strawberry Crochet Pattern.
Quick Answer: This free Mini Watermelon Keychain Crochet Pattern makes a striped whole watermelon and a round cut slice. The two pieces are joined with keychain hardware, with the whole watermelon above and the red watermelon slice hanging below.
Jump to section
Pattern Overview
Crochet terms: US terminology
Skill level: Intermediate
Construction: Continuous rounds, with a separately crocheted flower and optional leaf
Main techniques: Single crochet, increases, invisible decreases, color changes, tapestry crochet, embroidery, stuffing, and basic assembly
Gauge: Not essential, but your stitches should be tight enough to prevent the stuffing from showing
Finished size: The final size depends on your yarn weight, hook size, tension, and keychain hardware
The cut watermelon slice is the easier of the two main pieces. The whole watermelon is more detailed because two green colors are carried throughout the rounds to create the striped rind.
The optional leaf uses taller stitches and an unusual turning and surface slip-stitch technique. It can be omitted without affecting the construction of the keychain.
Choosing Yarn and Hook Size
Cotton or cotton-blend yarn is an excellent option for this Mini Watermelon Keychain Crochet Pattern because it creates clear stitches and holds the small shapes well. Acrylic yarn can also be used.
Choose a crochet hook slightly smaller than the size normally recommended on your yarn label. This helps create a firm amigurumi fabric without large spaces between the stitches.
For more guidance, see our Yarn Weight, Gauge, and Hook Size Guide. You can also consult the Craft Yarn Council’s Standard Yarn Weight System when comparing yarn categories and general hook-size ranges.
The exact yarn weight is flexible, but all colors used in the project should be approximately the same thickness.
Materials
- Red yarn for the center of the cut watermelon slice
- Pink yarn for the inner rind
- White yarn for the pale rind layer
- Light green yarn for the watermelon skin
- Dark green yarn for the stripes
- Yellow or cream yarn for the flower
- Green yarn for the optional leaf
- Black embroidery thread for the watermelon seeds
- Crochet hook suitable for your yarn
- Fiberfill stuffing
- Yarn needle
- Stitch marker
- Scissors
- Keychain clasp
- Small jump rings
- Metal eye pins or strong yarn loops, optional
- Thin craft wire for the leaf, optional
- Jewelry pliers for opening and closing jump rings, recommended
Abbreviations
This pattern is written using US crochet terminology.
- MR – magic ring
- ch – chain
- sc – single crochet
- hdc – half double crochet
- dc – double crochet
- tr – treble crochet
- inc – increase, work 2 sc in the same stitch
- dec – single crochet decrease
- tr inc – work 2 tr in the same stitch
- sl st – slip stitch
- BLO – back loop only
- FO – fasten off
- st/sts – stitch/stitches
- Rnd/Rnds – round/rounds
Crochet patterns can look complicated when you are still learning their abbreviations. Our guide explaining How to Read an Amigurumi Pattern can help you understand repeats, brackets, round totals, and common crochet terminology.
Important Pattern Notes
- Work in continuous spiral rounds unless the instructions specifically say otherwise.
- Do not join each round with a slip stitch.
- Place a stitch marker in the first stitch of every round.
- Move the marker upward as you complete each round.
- The number in brackets indicates the total number of stitches at the end of the round.
- Use a smaller hook or tighter tension if large spaces appear between your stitches.
- Stuff the pieces gradually rather than adding all the fiberfill at the end.
- Avoid overstuffing the cut slice because its red front should remain relatively flat.
- Keep the whole watermelon slightly oval rather than perfectly round.
- The lower red piece is called a “half watermelon” in some versions of the original design, but the crochet instructions create a round cut watermelon slice, not a semicircle.
- The flower and leaf are sewn on after the whole watermelon is completed.
- Keychain hardware should be anchored through several stitches, not through only one crochet loop.
If you have difficulty beginning with an adjustable loop, compare the two methods in our Magic Ring vs. Chain Circle Guide.
Use an invisible decrease whenever possible. This keeps the decrease rounds smooth and prevents visible gaps. Our Invisible Decrease Crochet Tutorial explains the technique step by step.
Mini Watermelon Keychain Crochet Pattern
Cut Watermelon Slice
Begin with red yarn.
The red side forms the visible cut surface of the watermelon. The pink, white, and green rounds form the rind and stuffed back.
- Rnd 1: Work 6 sc in an MR. [6]
- Rnd 2: Inc ×6. [12]
- Rnd 3: (Sc in next st, inc in next st) ×6. [18]
- Rnd 4: (Sc in next st, inc in next st, sc in next st) ×6. [24]
- Change to pink yarn during the final yarn-over of the last stitch of Round 4.
- Rnd 5: (Sc in next 3 sts, inc in next st) ×6. [30]
- Change to white yarn during the final yarn-over of the last stitch of Round 5.
- Rnd 6: (Sc in next 2 sts, inc in next st, sc in next 2 sts) ×6. [36]
- Do not fasten off yet.
Embroidering the Watermelon Seeds
- Embroider the seeds before continuing with the green rounds. The red section is much easier to access before the piece is closed and stuffed.
- Thread a yarn needle with black embroidery thread.
- Make several short straight stitches over the red section. Each seed can be formed with one slightly angled stitch or two tiny stitches placed close together.
- Arrange the seeds irregularly rather than placing them in perfect rows. Leave a small space between the seeds and the pink edge.
- Secure the thread ends firmly on the wrong side of the crochet fabric.
- Do not pull the embroidery thread too tightly, or the red surface may pucker.
Completing the Cut Watermelon Slice
Change to light green or medium green yarn during the final yarn-over of the last stitch of Round 6.
- Rnd 7: Working in the BLO, sc in each stitch around. [36]
- Working in the back loops creates a visible edge around the cut face and allows the green section to bend backward more neatly.
- Rnds 8–10: Sc in each stitch around. [36]
- Rnd 11: (Sc in next 2 sts, dec over next 2 sts, sc in next 2 sts) ×6. [30]
- Rnd 12: (Sc in next 3 sts, dec over next 2 sts) ×6. [24]
- Rnd 13: (Sc in next st, dec over next 2 sts, sc in next st) ×6. [18]
- Begin adding small amounts of fiberfill.
- Keep the red cut surface relatively flat. Place most of the stuffing behind the red face and inside the green section.
- Rnd 14: (Sc in next st, dec over next 2 sts) ×6. [12]
- Add the remaining stuffing. Shape the slice into a small rounded disk with a flat red front and a gently curved green back.
- Rnd 15: Dec ×6. [6]
- FO, leaving a yarn tail.
Thread the tail through the front loops of the remaining six stitches. Pull firmly to close the opening, secure the yarn, and weave in the end.
Gently press and shape the finished piece with your fingers.
Whole Watermelon
Use light green and dark green yarn.
The watermelon is divided into six repeating color sections. Each section creates one dark-green stripe.
Begin with light green yarn. Add the dark green during Round 2 and carry both strands inside the piece for the remainder of the colorwork.
Not sure how to change colors?, read our tutorial on Changing Colors in Amigurumi.
- Rnd 1: 6 light-green stitches
- Rnd 2: 1 light green, 1 dark green
- Rnd 3: 2 light green, 1 dark green
- Rnd 4: 3 light green, 1 dark green
- Rnd 5: 3 light green, 2 dark green
- Rnds 6–11: 4 light green, 2 dark green
- Rnd 12: 3 light green, 2 dark green
- Rnd 13: 3 light green, 1 dark green
- Rnd 14: 2 light green, 1 dark green
- Rnd 15: 1 light green, 1 dark green
Repeat the listed color section six times around each round.
Pay close attention to your stitch marker and color changes. Our guide on How to Count Rounds in Crochet can help if the striped rounds make it difficult to identify the beginning of the round.
- Begin with light green yarn.
- Rnd 1: Work 6 sc in an MR. [6]
- All six stitches are light green.
- Rnd 2: Inc ×6. [12]
- For each increase, make the first sc light green and the second sc dark green.
- Finished color sequence:
- (1 light green, 1 dark green) ×6
- Rnd 3: (Sc in next st, inc in next st) ×6. [18]
- Finished color sequence:
- (2 light green, 1 dark green) ×6
- Rnd 4: (Inc in next st, sc in next 2 sts) ×6. [24]
- Finished color sequence:
- (3 light green, 1 dark green) ×6
- Rnd 5: (Sc in next 3 sts, inc in next st) ×6. [30]
- Finished color sequence:
- (3 light green, 2 dark green) ×6
- Rnd 6: (Sc in next 2 sts, inc in next st, sc in next 2 sts) ×6. [36]
- Finished color sequence:
- (4 light green, 2 dark green) ×6
- Rnds 7–11: Sc in each stitch around. [36]
- Maintain the following sequence in every round:
- (4 light green, 2 dark green) ×6
Check the stripe placement at the end of every round. Correcting a misplaced color immediately is easier than unraveling several completed rounds.
Keep the carried strands relaxed while crocheting. Periodically stretch the fabric gently between your fingers to confirm that the inside yarn is not restricting the piece.
Keep each decrease inside its color section whenever possible.
When a decrease forms a completed stitch of a particular color, use that color for the final yarn-over of the decrease.
Rnd 12: (Sc in next 2 sts, dec over next 2 sts, sc in next 2 sts) ×6. [30]
Finished color sequence:
(3 light green, 2 dark green) ×6
In each section, work:
- 2 light-green sc
- 1 light-green decrease over the next 2 light-green stitches
- 2 dark-green sc
Rnd 13: (Sc in next 3 sts, dec over next 2 sts) ×6. [24]
Finished color sequence:
(3 light green, 1 dark green) ×6
In each section, work:
More Free Amigurumi Patterns You’ll Love


- 3 light-green sc
- 1 dark-green decrease over the 2 dark-green stitches
Complete the final yarn-over of the decrease with dark green.
Rnd 14: (Sc in next st, dec over next 2 sts, sc in next st) ×6. [18]
Finished color sequence:
(2 light green, 1 dark green) ×6
In each section, work:
- 1 light-green sc
- 1 light-green decrease over the next 2 light-green stitches
- 1 dark-green sc
Begin stuffing the watermelon.
Add the fiberfill in small pieces, distributing it evenly around the inside. Shape the piece into a short oval watermelon rather than a firm ball.
Rnd 15: (Sc in next st, dec over next 2 sts) ×6. [12]
Finished color sequence:
(1 light green, 1 dark green) ×6
In each section:
- Work 1 light-green sc.
- Decrease over the next light-green and dark-green stitches.
- Complete the final yarn-over of the decrease with dark green.
Add the remaining fiberfill.
The piece should feel firm enough to maintain its shape but should not be stretched so tightly that the stuffing becomes visible.
Rnd 16: Dec ×6. [6]
You may use either green color for the final decreases because the closed opening will be covered by the flower.
FO, leaving a yarn tail.
Thread the tail through the front loops of the six remaining stitches. Pull tightly to close the opening, secure the yarn, and weave in the end.
Roll the watermelon gently between your palms and shape it into a neat oval.
Five-Petal Flower
Use yellow or cream yarn.
Make an MR.
Petal
Ch 4.
Work 2 tr into the MR.
Ch 4.
Sl st into the MR.
Repeat the petal instructions five times in total.
After completing the fifth petal, pull the magic ring closed.
FO, leaving a long tail for sewing.
Arrange the petals evenly around the center. Sew the flower over the closed top of the whole watermelon.
The petals use treble crochet stitches to create their height. Review our How to Treble Crochet Tutorial if you need help forming this taller stitch.
Optional Crochet Leaf
Use green yarn.
The leaf is optional and slightly more advanced than the other parts of the pattern. It uses tall stitches, a special backward slip-stitch movement, and optional craft wire.
The leaf can be omitted if you prefer a simpler keychain.
- Leaf Row 1:
Ch 16.
Beginning in the second ch from the hook, work:
- Sc in next ch
- Hdc in next ch
- Dc in next 10 ch
- Hdc in next ch
- Sc in next ch
- Work 3 sc in the final ch
Do not turn the work over.
Rotate the foundation chain and continue along the unused loops on the opposite side:
- Sc in next ch
- Hdc in next ch
- Dc in next 10 ch
- Hdc in next ch
- Sc in final ch
You should have 31 stitches around the foundation chain.
Do not turn.
- Leaf Row 2
A thin piece of craft wire may be crocheted over during this row. Leave enough wire extending from both ends to trim or bend safely after the leaf is complete.
Work:
- Hdc in next 3 sts
- Dc in next 3 sts
- Tr inc in each of the next 2 sts
- Ch 1
Working backward toward the tall stitches you just made, insert the hook into the second stitch behind the hook and make a sl st.
Work 3 additional surface sl sts down the side of the raised section until you return to the outer edge of Row 1.
Continue around the leaf:
- Sc in next 7 sts
- Make 1 picot
- Sc in next 6 sts
In the next stitch, work:
- Sc
- Tr
- Ch 1
- Sl st backward into the second stitch behind the hook
- Tr
Continue with:
- Tr inc in each of the next 2 sts
- Dc in next 3 sts
- Hdc in next 3 sts
- Sl st into the final stitch
Join near the beginning of the round.
FO and weave in the yarn ends.
- Picot
Ch 3.
Sl st into the first chain made.
This forms one small pointed bump along the edge of the leaf.
When using wire, trim any excess carefully and bend the cut ends inward so they cannot poke through the crochet fabric.
Shape the wired leaf gently with your fingers.
Do not use craft wire when making the charm for a young child.
Keychain Assembly
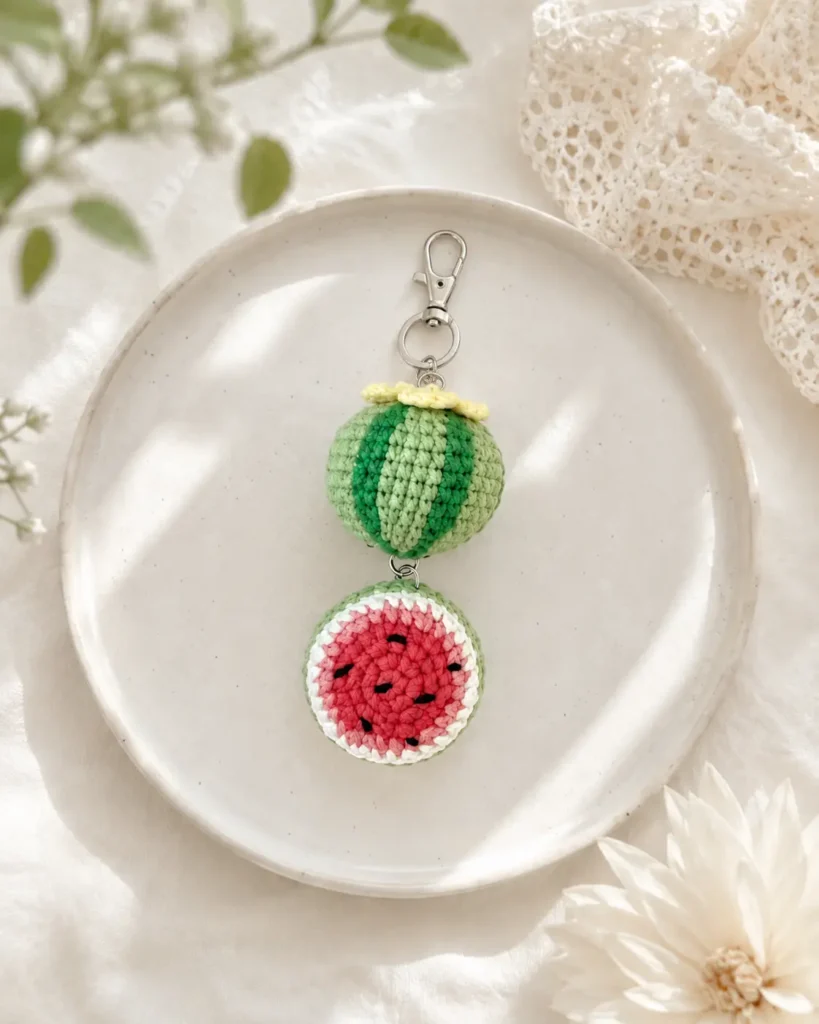
Before attaching the hardware, place the pieces on a flat surface in this order:
- Keychain clasp
- Whole striped watermelon
- Cut watermelon slice
The flower should sit at the top of the whole watermelon, and the red side of the cut slice should face forward.
Attach the Flower
Position the flower over the closed opening at the top of the whole watermelon.
Use the flower’s long yarn tail to sew around the center several times. Catch stitches from both the flower and the watermelon with every pass.
Make sure the flower cannot rotate or pull away from the watermelon.
Secure the yarn inside the piece and weave in the end.
Attach the Optional Leaf
Place the leaf beside or slightly underneath the flower.
Sew the base of the leaf to the watermelon with several small stitches. Do not sew across the entire leaf because the remaining section should stay free and dimensional.
If the leaf contains wire, confirm that both wire ends are completely enclosed.
Add the Top Connection
Create a secure connection at the top of the whole watermelon using one of these methods:
- A reinforced yarn loop
- A metal eye pin
- A small closed jump ring
- A keychain screw eye designed for soft crafts
When using a yarn loop, pass the yarn through several crochet stitches and knot it securely inside the piece. Do not attach the keychain clasp to only one surface loop.
Connect the keychain clasp to the reinforced top loop with a jump ring.
Attach the Lower Slice
Create another reinforced attachment point at the bottom of the whole watermelon.
Add a small loop or jump ring to the upper green edge of the cut watermelon slice.
Connect the two pieces with a jump ring so the cut slice hangs freely below the whole watermelon.
The red embroidered side should face forward when the keychain is lying flat.
For another example of a small crochet project assembled as a hanging charm, see the Mini Taiyaki Fish Crochet Charm Pattern.
Final Security Check
Gently pull each connection before using the keychain.
Check that:
- The flower is firmly sewn down.
- The optional leaf is secure.
- All jump rings are completely closed.
- Yarn loops pass through several stitches.
- The embroidery ends are secured.
- No wire ends are exposed.
- The two watermelon pieces hang in the correct direction.
Use jewelry pliers to close jump rings properly. Twisting a jump ring sideways preserves its round shape better than pulling the two ends directly apart.
Frequently Asked Questions
Is this Mini Watermelon Keychain Crochet Pattern suitable for beginners?
An adventurous beginner can make the cut watermelon slice because it uses basic single crochet increases and decreases. The whole watermelon is better suited to an intermediate beginner because it requires frequent color changes and carrying two yarn colors. The optional leaf is the most advanced part and can be omitted.
Is the lower piece a half-circle watermelon?
No. Although some versions call it a half watermelon, the written rounds create a circular cut watermelon slice with a red front and rounded green back.
A true half-moon watermelon would require a different construction worked in rows or by folding a crochet circle
Can I make the watermelon without carrying yarn?
Yes. You could crochet the whole watermelon entirely in light green and embroider the dark-green stripes afterward.
This alternative is easier, but the embroidered stripes will have a different appearance from the tapestry-crochet version.
Can I cut the green yarn after every stripe?
It is not recommended. Cutting after every section creates many yarn ends and can weaken the small piece.
Carrying the unused green strand inside is cleaner and faster once you become comfortable with the color changes.
This Mini Watermelon Keychain Crochet Pattern combines bright summer colors, simple amigurumi shaping, decorative embroidery, and striped tapestry crochet in one cheerful project.
The round cut slice provides a quick and approachable introduction to the design, while the whole striped watermelon offers a satisfying colorwork challenge. Finish the charm with its tiny flower, add the optional leaf, and securely connect the two fruit pieces with keychain hardware.
The completed design should have the flower-topped whole watermelon above and the red cut watermelon slice hanging underneath. Attach it to a handbag, backpack, project pouch, or set of keys for a playful handmade accessory.
