

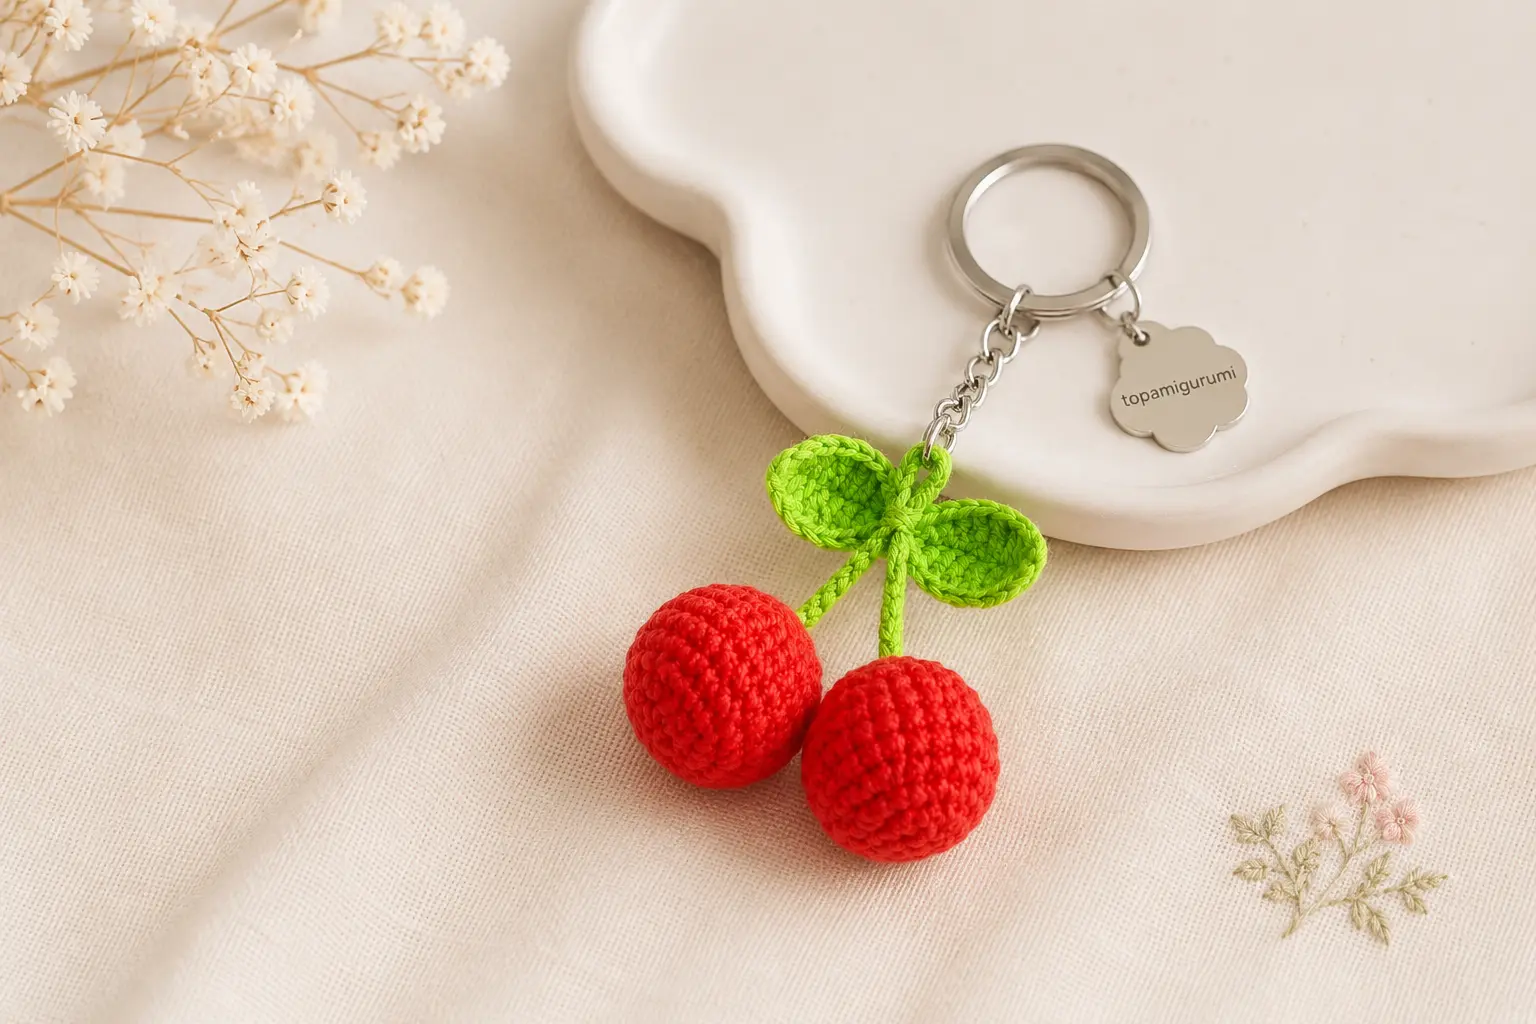
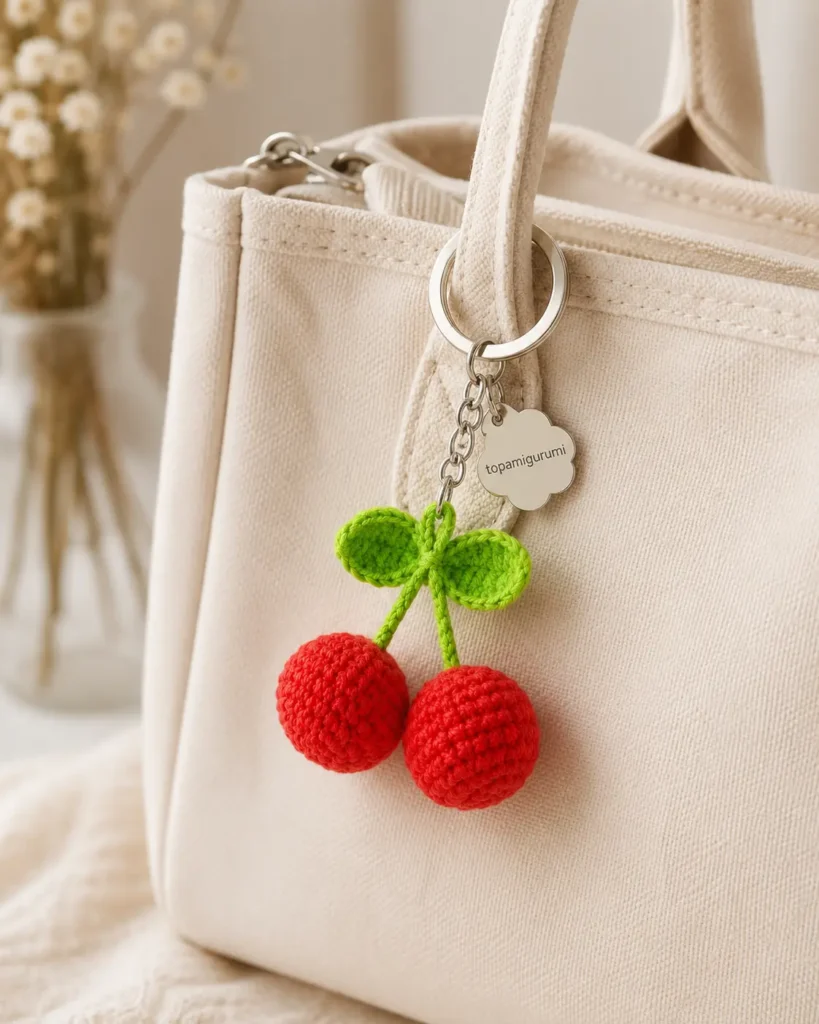
This Cherry Keychain Crochet Pattern is a sweet and beginner-friendly project that turns a small amount of yarn into an adorable handmade accessory. The finished design features two plump red cherries, a flexible green stem, and a decorative double leaf.
Attach your crochet cherries to your keys, handbag, backpack, purse, or project bag. They also make lovely handmade gifts, market items, and colorful decorations.
If you enjoy small fruit-themed projects, try our Mini Watermelon Keychain Crochet Pattern after finishing your cherries. You may also like the cherry decoration used in our Little Bear with Cherry Bib Crochet Pattern.
Quick Answer
To make this crochet cherry keychain, crochet two stuffed red spheres in continuous rounds. Make a double leaf around both sides of a foundation chain, then crochet a long green chain for the stem. Attach one cherry to each end of the stem, sew the leaf over the folded center, and secure everything to your keychain hardware.
Jump to Section
Cherry Keychain Project Details
- Skill level: Easy
- Crochet terms: US terminology
- Construction: Continuous rounds and rows
- Main stitches: Chain, single crochet, half double crochet, double crochet, increase, and decrease
- Pieces: Two cherries, one double leaf, and one stem
- Gauge: Not essential, but your stitches should be tight enough to prevent the stuffing from showing
- Finished size: Depends on the yarn weight and crochet hook used
This is a manageable project for adventurous beginners. Anyone making their first stuffed crochet project can begin with our First Amigurumi Step-by-Step Guide for help with stuffing, counting rounds, and closing amigurumi pieces.
Materials
You will need:
- Red yarn for the cherries
- Green yarn for the leaf and stem
- Crochet hook suitable for your yarn
- Fiberfill stuffing
- Yarn needle
- Stitch marker
- Scissors
- Keychain ring, clasp, or jump rings
Choose a crochet hook slightly smaller than the size normally recommended for your yarn. This helps create the firm, closely worked fabric needed for amigurumi. You can consult the Craft Yarn Council crochet hook size chart when comparing metric and US hook sizes.
Cotton or cotton-blend yarn is a particularly good choice for a keychain because it produces clear stitches and keeps its shape well. Acrylic yarn can also be used.
Abbreviations
- MR = magic ring
- ch = chain
- sc = single crochet
- hdc = half double crochet
- dc = double crochet
- inc = increase, work 2 sc in the same stitch
- dec = decrease
- sl st = slip stitch
- FO = fasten off
All instructions in this Cherry Keychain Crochet Pattern use standard US crochet terms.
Pattern Notes
- Work the cherries in continuous spiral rounds.
- Do not join at the end of each cherry round unless instructed.
- Place a stitch marker in the first stitch of each round.
- Move the stitch marker up as you complete each round.
- The number in brackets shows the total number of stitches at the end of the round.
- Stuff each cherry before completing the final decrease round.
- The double leaf is worked around both sides of a foundation chain.
- Keep the stitches firm and even, especially when making the keychain attachment.
- Use an invisible decrease whenever possible for a smoother finish.
Are you unfamiliar with the adjustable starting circle? Our Magic Ring vs. Chain Circle Guide explains both starting methods. You can also follow our Invisible Decrease Crochet Tutorial to make the cherry decreases less noticeable.
Cherry Keychain Crochet Pattern
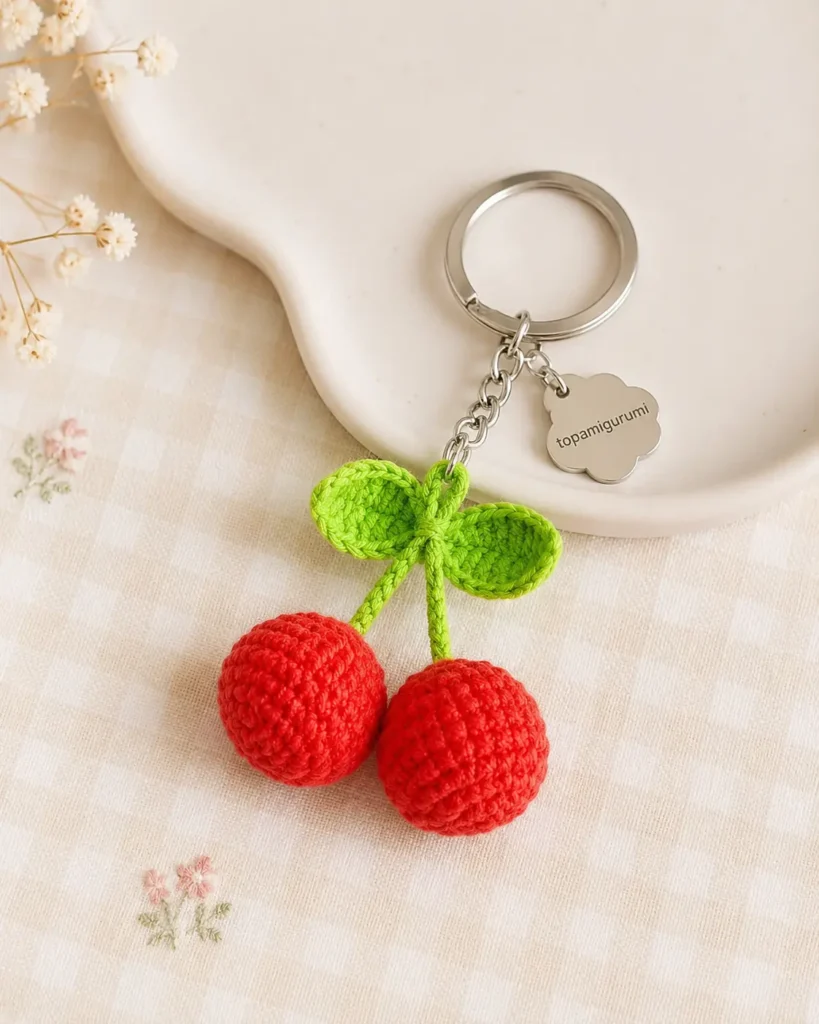
Cherry
Make two using red yarn.
Rnd 1: Work 6 sc in a MR. [6]
Rnd 2: Inc ×6. [12]
Rnd 3: (Sc, inc) ×6. [18]
Rnd 4: (Sc, inc, sc) ×6. [24]
Rnd 5–8: Sc around. [24]
Rnd 9: (Sc, dec, sc) ×6. [18]
Rnd 10: (Sc, dec) ×6. [12]
Begin stuffing the cherry firmly. Add the fiberfill in small amounts, distributing it evenly to maintain a smooth, round shape.
Do not overstuff the cherry. Too much stuffing can stretch the stitches and make the fiberfill visible.
Rnd 11: Dec ×6. [6]
FO, leaving a yarn tail.
Thread the tail onto your yarn needle and pass it through the front loops of the six remaining stitches. Pull tightly to close the opening. Secure the yarn and weave in the end.
Repeat the instructions to make the second cherry.
Shaping the Cherries
Roll each stuffed cherry gently between your palms to smooth the surface and distribute the stuffing.
Both cherries should be approximately the same size, but a small difference will not be noticeable once one cherry is positioned slightly lower than the other.
Double Leaf
Make one using green yarn.
Ch 18.
Starting in the second chain from the hook, work along the first side of the foundation chain:
- Sc in the next chain
- Hdc in the next chain
- Dc in each of the next 4 chains
- Hdc in the next chain
- Sc in the next chain
- Sl st in the next chain
- Sc in the next chain
- Hdc in the next chain
- Dc in each of the next 4 chains
- Hdc in the next chain
In the final chain, work:
(Sc, ch 1, sc) in the same chain.
The chain-1 space forms the pointed end of the second leaf.
Continue working along the opposite side of the foundation chain:
- Hdc in the next chain
- Dc in each of the next 4 chains
- Hdc in the next chain
- Sc in the next chain
- Sl st in the next chain
- Sc in the next chain
- Hdc in the next chain
- Dc in each of the next 4 chains
- Hdc in the next chain
- Sc in the final chain
Join with a sl st if needed.
FO, leaving a long yarn tail for attaching the leaf.
The slip stitches positioned near the middle of the foundation chain create the narrow joining point between the two leaves.
Need help with the taller stitches used in this section? Review our tutorials for the half double crochet stitch and the double crochet stitch.
Stem
Using green yarn:
Ch 26.
FO, leaving a long yarn tail at both ends for attaching the cherries.
More Free Amigurumi Patterns You’ll Love
For a thicker and stronger stem, start in the second chain from the hook and work one sl st into each chain before fastening off.
The simple chain-only version is softer and more flexible. The slip-stitch version is firmer and may be better for a keychain that will be used regularly.
Anyone who needs help creating an even foundation chain can follow our How to Crochet a Chain Stitch Tutorial.
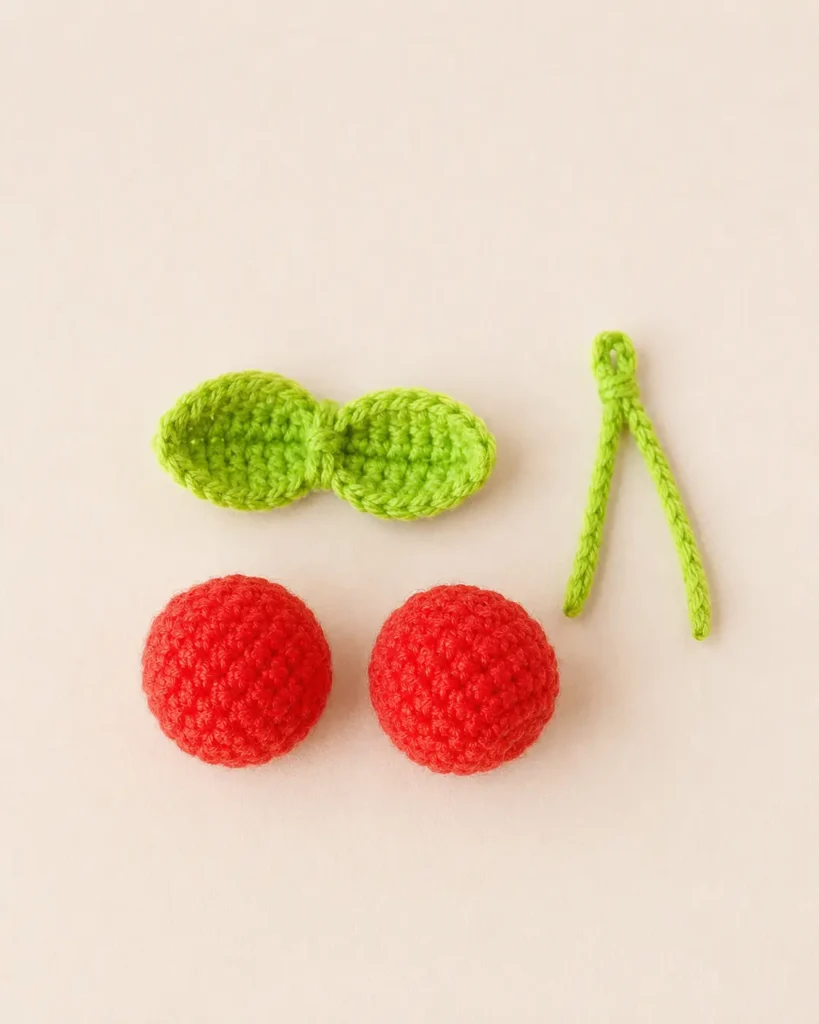
Assembly
- Step 1: Sew one cherry securely to each end of the green stem.
- Step 2: Fold the stem slightly off-center so one cherry hangs lower than the other.
- Step 3: Place the double leaf over the folded stem and sew it firmly in place.
- Step 4: Attach the folded section to the keychain ring, clasp, or jump ring.
Reinforce all connections with several stitches, then knot and weave in the remaining yarn ends.
Tips for a Neat Cherry Keychain
- Keep the Starting Ring Tight: Pull the magic ring firmly before weaving in the starting tail. A loose center may leave a visible hole at the bottom of the cherry.
- Add Stuffing Gradually: Use several small pieces of fiberfill instead of pushing one large piece inside. Small amounts are easier to distribute and produce a smoother shape.
- Avoid Overstuffing: Overstuffing can create gaps between the stitches. Stop adding fiberfill when the cherry feels firm but the crochet fabric is not stretched.
- Use Strong Assembly Stitches: The connection between the stem and keychain hardware receives the most pressure. Sew through several crochet stitches and reinforce the connection more than once.
- Match the Hook to the Yarn: The correct hook should create a dense fabric without making the stitches painfully difficult to work. If large gaps appear, change to a smaller hook.
- Secure Every Yarn Tail: Keychains experience more movement than decorative amigurumi. Knot and weave each tail through several directions before trimming it.
Cherry Keychain Customization Ideas
- Change the Cherry Color: Use burgundy yarn for dark cherries, bright pink for a playful version, or pastel red for a softer design.
- Add a Highlight: Embroider a small curved line on each cherry using white or pale pink yarn. This creates the appearance of a shiny highlight.
- Add a Face: Create a kawaii cherry keychain by embroidering small black eyes and a smiling mouth. Pink cheek stitches can be added beside the eyes.
- Make a Larger Version: Use thicker yarn and a larger crochet hook to make a bag charm or plush cherry decoration. Remember that larger cherries require more stuffing and stronger attachment stitches.
- Make a Single-Cherry Charm: Crochet only one cherry, shorten the stem, and attach the leaf directly above it for a simpler keychain.
- Add More Leaves: Make a second double leaf in a lighter shade of green and layer it behind the first one.
For another compact accessory that can be customized with different colors, see our Avocado Crochet Keychain Pattern.
Frequently Asked Questions
Is this Cherry Keychain Crochet Pattern suitable for beginners?
Yes. The cherries use basic amigurumi increases and decreases, while the leaf introduces half double crochet and double crochet stitches. Beginners should be comfortable working in continuous rounds and counting stitches.
Why is my cherry becoming oval instead of round?
The cherry may become oval if your tension changes between rounds or if the stuffing is concentrated in one area. Redistribute the stuffing and gently roll the finished cherry between your palms.
Can I use plush yarn?
Yes, but plush yarn will produce much larger cherries and may hide the leaf’s stitch definition. Use a larger hook suitable for the yarn and reinforce all attachment points carefully.
Can I replace the chain stem with an i-cord?
Yes. A short crochet i-cord creates an especially thick and durable stem. Keep it flexible enough to fold through the keychain ring.
Do I have to make two cherries?
No. You can make one cherry and shorten the stem for a single-cherry charm. However, the pair of cherries creates the classic finished design.
Is the finished keychain safe for babies?
No. Keychain rings, clasps, jump rings, and small decorative pieces can present safety hazards. This design should be treated as an accessory rather than a baby toy.
More Small Crochet Projects
Once you complete this Cherry Keychain Crochet Pattern, you can use the same amigurumi techniques to make other small accessories.
Try the Strawberry Crochet Pattern for another bright red fruit project, or make the Mini Bear Crochet Keychain Pattern for a cute animal charm.
Each project is a useful way to practice working in continuous rounds, creating smooth decreases, stuffing small pieces, and securing keychain hardware.
This free Cherry Keychain Crochet Pattern is quick, colorful, and easy to personalize. The two stuffed cherries create the main shape, while the double leaf and folded stem give the design its recognizable cherry appearance.
Use tight stitches, add the stuffing gradually, and reinforce the stem carefully during assembly. With those details in place, your finished crochet cherry charm will be ready to brighten your keys, handbag, backpack, or handmade gift collection.
