


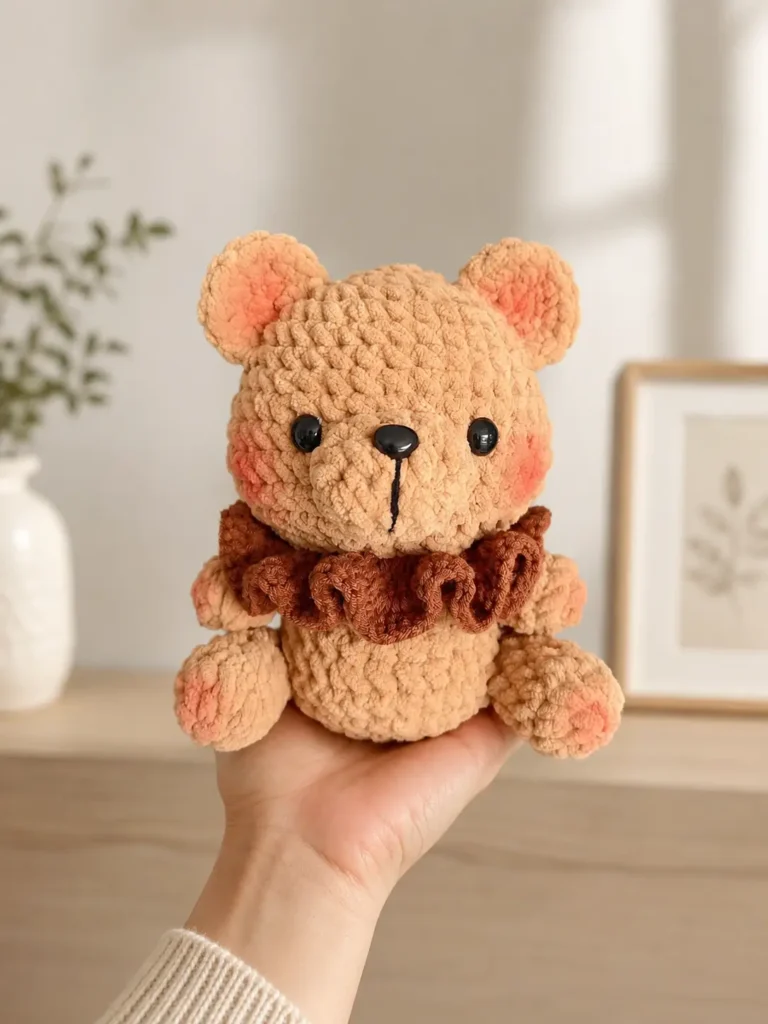
This bear crochet pattern free tutorial is a sweet little teddy bear design with a simple rounded body, tiny arms and feet, a soft muzzle, and a beautiful ruffled collar around the neck. The collar is made by working into the front loops left from one body round, which gives the bear that cute vintage-style detail without making the pattern too complicated.
If you enjoy small teddy projects, you may also love this Little Bear with Cherry Bib Crochet Pattern for another adorable bear idea. And if you want something seasonal, the Mini Bear Pumpkin Toast Crochet Pattern is a lovely fall-style project to try next.
This pattern is written in US crochet terms and is suitable for confident beginners who already know how to work in continuous rounds, increase, decrease, and sew small amigurumi pieces together.
Jump to section
Why You’ll Love This Bear Crochet Pattern Free Tutorial
This little teddy bear is simple, soft, and full of charm. The body and head are made as one piece, so there is less sewing than in many traditional teddy bear patterns. The ruffled collar adds a special handmade detail and makes the bear look finished without needing extra clothes.
You can make this bear as a small desk decoration, a cute handmade gift, a nursery ornament, or even a keychain if you use thinner yarn. For another tiny bear-style project, you can also check the Mini Bear Crochet Keychain Pattern Free.
Materials
You can adjust the materials depending on the size you want.
- Cotton yarn, milk cotton yarn, or soft acrylic yarn
- Main bear color: beige, cream, caramel, brown, or any teddy bear color
- Collar color: white, cream, pink, blue, or any contrast color
- Small amount of dark brown or black embroidery thread for the nose and mouth
- Safety eyes or black embroidery thread for embroidered eyes
- Fiberfill stuffing
- Crochet hook suitable for your yarn
- Yarn needle
- Stitch marker
- Scissors
- Optional: blush for cheeks
If this bear is made for a baby or very young child, embroider the eyes instead of using safety eyes.
Helpful Notes Before You Start
Work in continuous rounds unless the pattern says otherwise. Use a stitch marker to mark the first stitch of each round.
Stuff the head and body as you go, especially before the opening becomes too small. Do not overstuff the neck area, because the collar will sit around that part.
Round 16 is worked in BLO, which means back loop only. The front loops are left free so you can later crochet the ruffled collar into them.
If you are still practicing the basic stitches, the guides for how to single crochet and how to double crochet are helpful before starting this project. For standard crochet abbreviations, you can also visit the Craft Yarn Council crochet abbreviations guide.
Abbreviations
MR = magic ring
ch = chain
sc = single crochet
inc = increase, 2 sc in the same stitch
dec = decrease
hdc = half double crochet
dc = double crochet
sl st = slip stitch
BLO = back loop only
FLO = front loop only
FO = fasten off
Bear Crochet Pattern Free Instructions
Head and Body
Use your main bear color.
Work in continuous rounds. Stuff as you go.
- Rnd 1: 6 sc in MR. [6]
- Rnd 2: inc ×6. [12]
- Rnd 3: (sc, inc) ×6. [18]
- Rnd 4: (sc, inc, sc) ×6. [24]
- Rnd 5: (3 sc, inc) ×6. [30]
- Rnd 6–7: sc around. [30]
- Rnd 8: (2 sc, inc) ×3, 12 sc, (inc, 2 sc) ×3. [36]
- Rnd 9: sc around. [36]
- Rnd 10: (2 sc, inc) ×4, 12 sc, (inc, 2 sc) ×4. [44]
- Rnd 11: sc around. [44]
- Rnd 12: (2 sc, dec) ×4, 12 sc, (dec, 2 sc) ×4. [36]
- Rnd 13: (2 sc, dec, 2 sc) ×6. [30]
- Rnd 14: (3 sc, dec) ×6. [24]
- Rnd 15: (2 sc, dec) ×6. [18]
- Rnd 16: BLO sc around. [18]
Leave the front loops free for the collar.
- Rnd 17: sc around. [18]
- Rnd 18: (sc, inc, sc) ×6. [24]
- Rnd 19–20: sc around. [24]
- Rnd 21: (3 sc, inc) ×6. [30]
- Rnd 22: sc around. [30]
- Rnd 23: (3 sc, dec) ×6. [24]
- Rnd 24: (2 sc, dec) ×6. [18]
- Rnd 25: (sc, dec) ×6. [12]
- Rnd 26: dec ×6. [6]
FO, close the opening, and weave in the end.
Collar
- Use the front loops left from Rnd 16 of the body.
- Join collar yarn to one front loop.
- Work 4 dc in each front loop around.
- Finish with a sl st.
- FO and weave in the end.
This creates a full ruffled collar around the bear’s neck. If you want a softer collar, you can use 3 dc in each front loop instead of 4 dc.
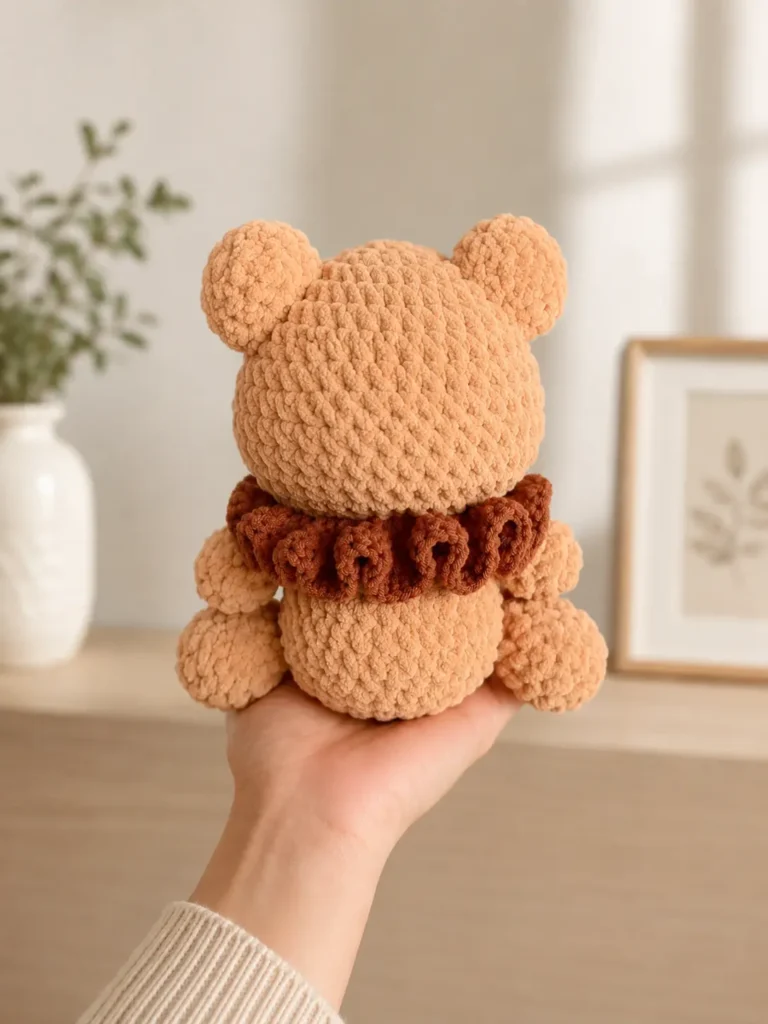
Ears — Make 2
Use your main bear color.
- Rnd 1: 6 sc in MR. [6]
- Rnd 2: inc ×6. [12]
- Rnd 3–4: sc around. [12]
FO, leave a long tail for sewing.
Flatten the ears slightly before sewing them to the head.
Arms — Make 2
Use your main bear color.
- Rnd 1: 6 sc in MR. [6]
- Rnd 2: (sc, inc) ×3. [9]
- Rnd 3: (sc, dec) ×3. [6]
- Rnd 4: sc around. [6]
- Rnd 5: Fold the arm flat and crochet 3 sc through both sides to close.
FO, leave a long tail for sewing.
Feet / Legs — Make 2
Use your main bear color.
- Rnd 1: 6 sc in MR. [6]
- Rnd 2: inc ×6. [12]
- Rnd 3: 4 sc, dec ×2, 4 sc. [10]
- Rnd 4: sc around. [10]
- Rnd 5: 4 sc, dec, 4 sc. [9]
- Rnd 6: sc around. [9]
- Rnd 7: (sc, dec) ×3. [6]
FO, leave a long tail for sewing.
Muzzle
Use a lighter bear color, cream yarn, or the same main color if you want a simple look.
- Chain 6.
- Rnd 1: Starting in the 2nd ch from the hook:
1 sc, 2 hdc, 1 sc, 3 sc in the last ch, continue on the other side of the chain: 3 sc, inc. [12] - Rnd 2: sc around. [12]
FO, leave a long tail for sewing.
Assembly
- Sew the ears to the top sides of the head.
- Sew the muzzle to the lower front of the face.
- Add safety eyes or embroider the eyes above the muzzle. A simple placement is just above the muzzle, with enough space between the eyes to keep the face soft and cute.
- Embroider the nose and mouth with dark brown or black thread.
- Sew the arms to both sides of the body, just under the collar.
- Sew the feet to the bottom front of the body.
- Add blush to the cheeks if desired.
For a cleaner finish when sewing small parts, you may find the guide on how to attach amigurumi limbs evenly very useful.
Tips for a Neat Ruffled Collar Teddy Bear
To make your bear crochet pattern free project look cleaner, keep your stitches even and do not overstuff the small pieces. The ears should stay slightly flat, the arms should sit just under the collar, and the feet should be sewn toward the front bottom of the body so the teddy looks like it is sitting.
If your decreases leave small gaps, try using the invisible decrease crochet method. It is especially helpful for amigurumi projects where you want the surface to look smooth.
You can also change the bear’s personality by changing the collar color. A white collar gives a classic teddy look, pink makes it sweeter, blue feels soft and dreamy, and red can make it look like a tiny holiday bear. If you enjoy bear variations, the Mini Butter Bear Crochet Pattern is another cute teddy-style idea.
Color Variation Ideas
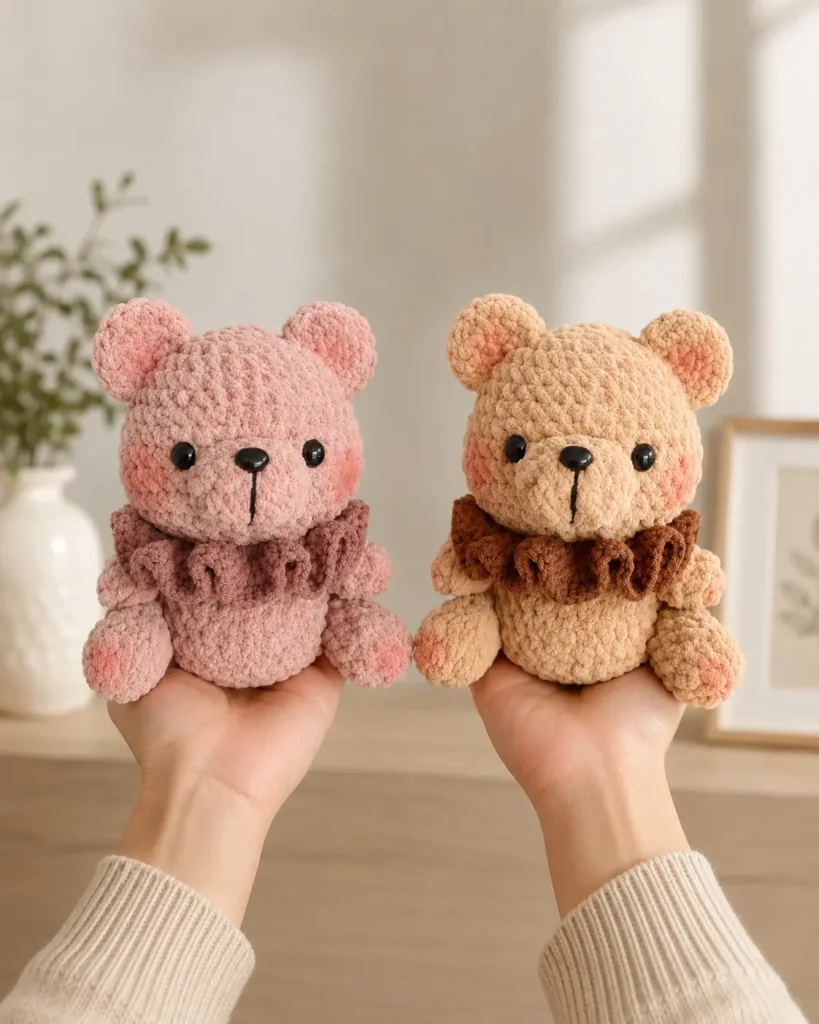
This teddy bear looks beautiful in many color combinations:
- Beige bear with a white ruffled collar
- Brown bear with a cream collar
- Caramel bear with a soft pink collar
- White bear with a pastel blue collar
- Gray bear with a lavender collar
You can also make a small collection of bears in different colors, similar to a teddy family. For more bear inspiration, visit the Three Bare Bears Crochet Pattern.
FAQ
Is this bear crochet pattern free suitable for beginners?
Yes, this bear crochet pattern free tutorial is suitable for confident beginners. You need to know basic amigurumi skills such as working in rounds, increasing, decreasing, stuffing, and sewing small parts together.
Can I use plush yarn for this teddy bear?
Yes, you can use plush yarn, but the bear will become larger and softer. If you use plush yarn, choose a larger hook that matches your yarn and be gentle when sewing the smaller pieces.
How do I make the collar less ruffled?
The pattern uses 4 dc in each front loop for a full ruffle. For a softer collar, work 3 dc in each front loop instead.
Can I turn this bear into a keychain?
Yes. Use thinner cotton yarn and a small hook to make a smaller bear. Add a keychain ring securely at the top of the head after finishing the assembly.
Where should I place the eyes?
Place the eyes above the muzzle and adjust them before attaching permanently. If you are using safety eyes, test the placement first. If the bear is for a young child, embroider the eyes instead.
This bear crochet pattern free tutorial is a lovely project for anyone who enjoys small teddy bear amigurumi. The simple one-piece head and body make the pattern easier to assemble, while the ruffled collar adds a beautiful handmade detail.
You can keep the bear classic with soft brown yarn, make it dreamy with pastel colors, or create a whole collection of tiny collar teddy bears. Whether you use it as a gift, decoration, or keychain, this little teddy is a sweet project to add to your crochet list.
")


")