


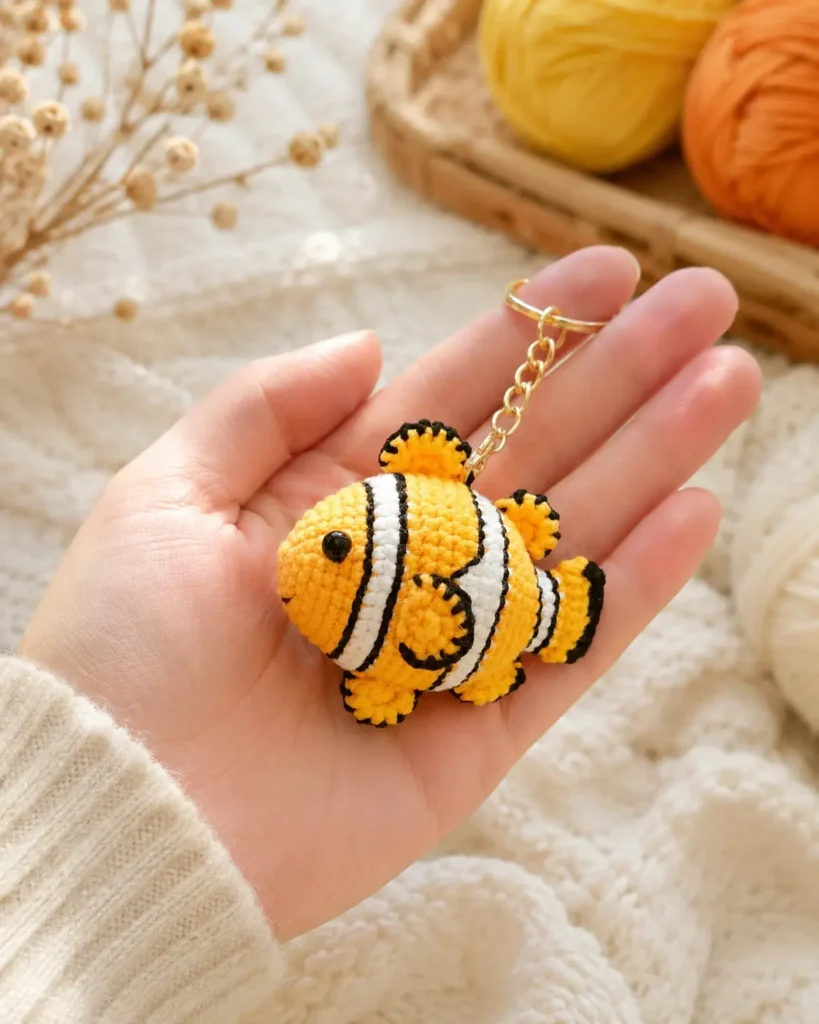
This Clownfish Amigurumi Crochet Pattern is a cheerful little sea animal project with a rounded orange body, white stripes, black outlines, tiny side fins, a top fin, and a cute flattened tail. It is a fun crochet idea for ocean lovers, nursery decorations, handmade gifts, keychains, or a sea-themed amigurumi collection.
If you enjoyed making ocean-inspired projects like the Little Sea Doll Crochet Pattern or the Mini Sea Turtle Pattern, this little clownfish will fit beautifully beside them. It also makes a lovely handmade companion for other small sea creatures such as the Free Whale Crochet Pattern or the Crochet Clam Shell Pattern Free.
The most important details in this pattern are the color changes and the black outlines around the white stripes. If you are still practicing clean color transitions, you may also find my guide on changing colors in amigurumi helpful before starting this project.
For real-life color inspiration, you can also look at Britannica’s overview of the common clown fish, which explains its orange body, white bands, and black stripe details.
Jump to section
About This Clownfish Amigurumi Pattern
This clownfish is worked mostly in continuous rounds using simple single crochet increases and decreases. The body starts at the face, grows into a rounded fish shape, then narrows toward the tail. The white stripe sections are worked directly into the body, and the black outlines are embroidered or added with surface slip stitches afterward.
The fins are made separately and sewn on at the end. This gives the fish a soft 3D shape and makes it easier to adjust the final look.
Skill Level
Beginner to intermediate.
This pattern is suitable for crocheters who already know how to work in the round, change colors, sew small pieces, and embroider simple details. If you are new to decreases, my guide on the invisible decrease crochet technique can help you make the shaping smoother.
Finished Size
The finished size depends on your yarn, hook size, and tension. With sport-weight cotton yarn and a 2.0 mm crochet hook, the clownfish will be a small amigurumi size, perfect for a desk decoration, bag charm, or ocean-themed display.
Materials
- Orange yarn
- White yarn
- Black yarn or black embroidery thread
- Safety eyes
- Fiberfill stuffing
- Crochet hook suitable for your yarn
- Yarn needle
- Stitch marker
- Scissors
Abbreviations
This pattern uses US crochet terms.
- MR = magic ring
- ch = chain
- sc = single crochet
- inc = increase, 2 sc in the same stitch
- dec = decrease
- hdc = half double crochet
- dc = double crochet
- sl st = slip stitch
- FLO = front loop only
- BLO = back loop only
- sk = skip stitch
Pattern Notes
- Work in continuous rounds unless another instruction is given. Use a stitch marker to mark the beginning of each round.
- Place the safety eyes before the body is fully stuffed and closed. If the toy is made for a baby or very young child, embroidered eyes are safer than plastic safety eyes.
- Stuff the body firmly enough to keep a rounded fish shape, but do not overstuff. Too much stuffing can stretch the stitches and distort the stripe sections.
- The black outlines can be made with backstitch embroidery or surface slip stitches. Surface slip stitches give a more raised crochet look, while embroidery gives a softer handmade finish.
If you need help keeping sewn pieces balanced, the guide on attaching amigurumi limbs evenly is useful for positioning the side fins and bottom fins neatly.
Clownfish Amigurumi Crochet Pattern Instructions
Body
Start with orange yarn.
- Rnd 1: 6 sc in MR. [6]
- Rnd 2: inc ×6. [12]
- Rnd 3: (sc, inc) ×6. [18]
- Rnd 4: (sc, inc, sc) ×6. [24]
- Rnd 5: (7 sc, inc) ×3. [27]
- Rnd 6: (4 sc, inc, 4 sc) ×3. [30]
- Rnd 7: (2 sc, inc, 7 sc) ×3. [33]
- Rnd 8: (8 sc, inc, 2 sc) ×3. [36]
Place the safety eyes between Rnd 5 and Rnd 6, about 20 stitches apart.
Change to white yarn.
- Rnd 9: FLO, (5 sc, inc, 6 sc) ×3. [39]
- Rnd 10: 39 sc. [39]
Change to orange yarn.
- Rnd 11: FLO, (12 sc, inc) ×3. [42]
Using black yarn, embroider or surface slip stitch around the white section to create the black stripe outline.
- Rnd 12–13: 42 sc. [42]
Colorwork Section
- Rnd 14:
10 sc in orange,
2 sc in white,
19 sc in orange,
2 sc in white,
9 sc in orange. [42] - Rnd 15:
9 sc in orange,
4 sc in white,
17 sc in orange,
4 sc in white,
8 sc in orange. [42]
Use black yarn to make the black outline around the white stripe.
Change to white yarn.
- Rnd 16: (6 sc, dec, 6 sc) ×3. [39]
- Rnd 17: (dec, 11 sc) ×3. [36]
Change to orange yarn.
- Rnd 18: (2 sc, dec, 8 sc) ×3. [33]
Embroider the stripe detail again with black yarn.
- Rnd 19: (7 sc, dec, 2 sc) ×3. [30]
- Rnd 20: (dec, 11 sc, dec) ×2. [26]
- Rnd 21: (dec, 9 sc, dec) ×2. [22]
- Rnd 22: (dec, 7 sc, dec) ×2. [18]
Start stuffing the body. Shape it gently with your fingers as you stuff so the fish stays rounded and smooth.
Change to white yarn.
- Rnd 23: (dec, 5 sc, dec) ×2. [14]
- Rnd 24: 14 sc. [14]
Change to orange yarn.
- Rnd 25: (6 sc, inc) ×2. [16]
- Rnd 26: (inc, hdc, 4 dc, hdc, inc) ×2. [20]
Change to black yarn.
Flatten the tail opening. Crochet through both layers.
- Rnd 27: 10 sc through both layers to close the tail. [10]
- Fasten off and weave in the end.
Side Fins
Make 2 in orange.
- Rnd 1: 6 sc in MR. [6]
- Rnd 2: inc in 5 stitches, then 1 sc. [11]
Fasten off, leaving a long tail for sewing.
Sew one fin on each side of the body. Try to place them evenly behind the front white stripe so they look balanced from both sides.
Top Fin
Use orange yarn.
Leave a long yarn tail at the beginning for sewing.
- Row 1: ch 6. [6]
- Row 2: Starting in the 2nd ch from hook, 4 sc, ch 1, turn. [5]
- Row 3: ch 1, turn, (hdc, hdc inc) ×2, sl st. [6]
Fasten off and leave a tail for sewing.
Sew the fin along the top of the fish. Position it in the center of the body so it follows the natural curve of the clownfish.
Other Fins
Make 3 in orange.
These are for the bottom fins and extra small fins.
Leave a long yarn tail at the beginning for sewing.
- Row 1: ch 5. [5]
- Row 2: Starting in the 2nd ch from hook, 4 sc, ch 1, turn. [4]
- Row 3: ch 1, 2 hdc, sl st. [5]
Fasten off and sew the fins in place.
You can sew two fins under the body and use the third as an extra small back or tail detail, depending on the look you prefer.
Finishing
- Use black yarn or embroidery thread to outline the white body stripes, just like a real clownfish.
- You can use backstitch embroidery for a soft handmade look or surface slip stitches for a raised crochet outline.
- Check that the fins are sewn securely and evenly. Weave in all yarn ends.
- Gently shape the body, tail, and fins with your hands. The finished clownfish should have a rounded face, bright white stripes, clean black outlines, and a cute soft tail.
Helpful Tips for a Neater Clownfish
- For a clean amigurumi finish, keep your tension even throughout the body. The colorwork rounds may feel a little tighter than the plain orange rounds, so try not to pull the white or orange yarn too hard when switching colors.
- When outlining the stripes, use small stitches and follow the edge of the white sections slowly. This makes the black lines look more natural and helps the clownfish design stand out.
- If you want to turn this project into a keychain, use a smaller hook and tight stitches so the stuffing does not show. You can also make a tiny ocean-themed set with this clownfish, the Lucky Rainbow Koi Fish Keychain Pattern, and the Amigurumi Molly the Octopus Free Pattern.
Customization Ideas
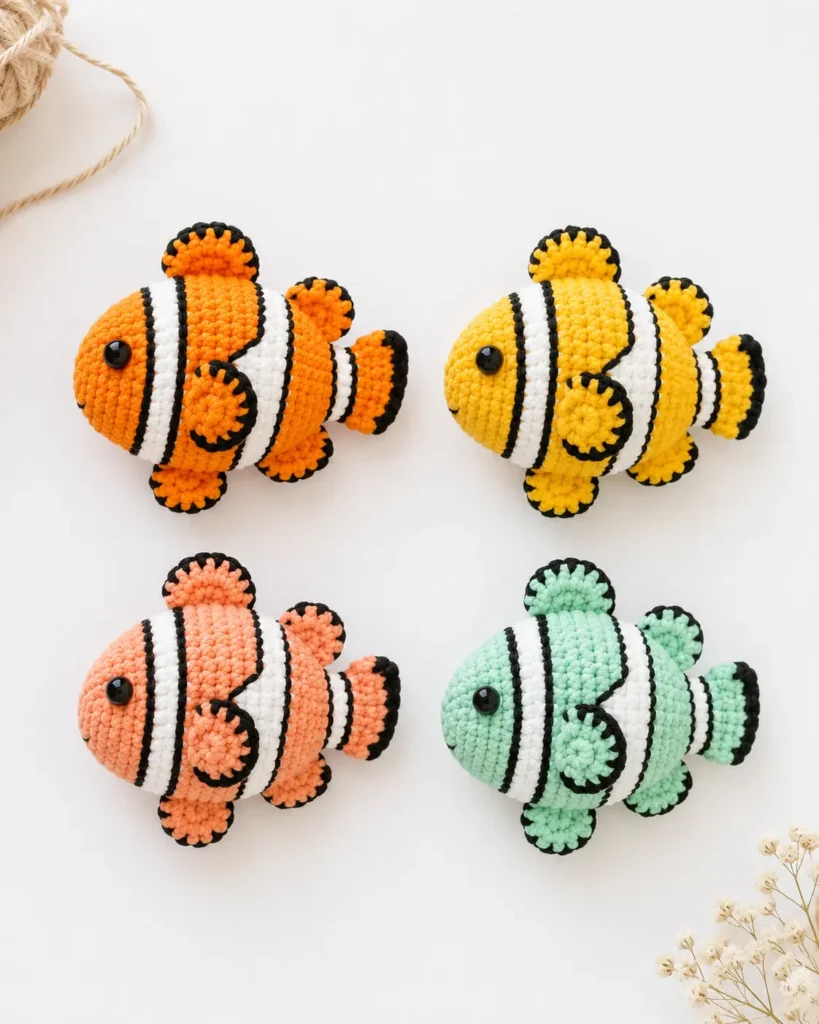
- You can make this clownfish in classic orange, white, and black, or try a softer pastel version for a nursery decoration. A peach body with cream stripes can look very sweet, while a bright orange body with strong black outlines gives the most recognizable clownfish style.
- You can also adjust the eyes. Safety eyes give a polished toy look, while embroidered eyes make the project softer and safer for younger children.
- For a hanging ornament, sew a small yarn loop or keychain ring at the top of the body. For a flat display, leave the loop out and place the clownfish beside other sea animals in a crochet ocean scene.
FAQ About Clownfish Amigurumi Crochet Pattern
Is this clownfish amigurumi crochet pattern beginner-friendly?
Yes, it can be made by confident beginners. The main body uses basic single crochet increases and decreases. The slightly more advanced parts are the color changes, stripe outlines, and sewing the fins evenly.
Can I make this clownfish without safety eyes?
Yes. You can embroider the eyes with black yarn or embroidery thread. This is a better option if the finished toy is for a baby or very young child.
What yarn works best for this clownfish?
Cotton or milk cotton yarn works well because it shows the stitches and stripe details clearly. Plush yarn can also be used, but the color changes and black outlines may be harder to define.
")

")
")
Can I make this clownfish into a keychain?
Yes. Use a smaller hook, keep the stitches tight, and avoid overstuffing. Add a keychain ring or small loop at the top after finishing the fish.
How do I make the black stripe outlines neat?
Use black embroidery thread or thin black yarn. Work slowly around each white stripe using small backstitches or surface slip stitches. Try to keep the outline close to the edge of the white section.
This Clownfish Amigurumi Crochet Pattern is a bright and playful project for anyone who loves sea animals, ocean decorations, and cute handmade toys. The rounded body, tiny fins, white stripes, and black outlines make it instantly recognizable while still keeping the pattern simple and enjoyable.
It is a lovely small project to add to your amigurumi collection, especially if you enjoy making ocean friends, keychains, or colorful crochet gifts.