


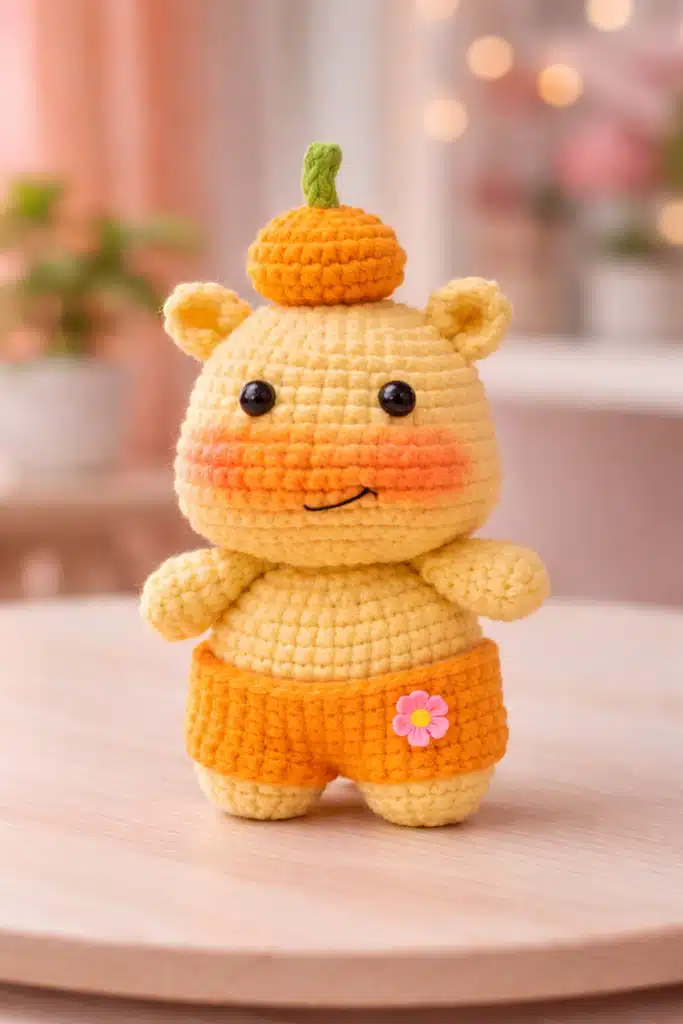
If you’ve been hunting for a capybara crochet pattern free with a cute hippo twist, meet Lulu the Capy-Hippo 🧡🐾. This beginner-friendly amigurumi is worked in simple rounds with clean shaping, a sweet blush muzzle, and an adorable outfit (shorts + a tiny top accessory).
New to crochet toys? Start here first: What is amigurumi? and How to read an amigurumi pattern, it’ll make the pattern feel super easy.
Jump to section
Quick Overview
- Style: capybara crochet pattern free + hippo-inspired amigurumi body
- Skill level: Beginner → Easy intermediate
- Yarn + hook used here: Cotton yarn + 2.5 mm hook
- Includes: Shorts + blush muzzle + top accessory (pumpkin)
- Variation later: Christmas swap (Mini Santa Hat instead of pumpkin)
Materials
- Cotton yarn: Yellow, Orange, small Green
- Hook: 2.5 mm
- Safety eyes: 8 mm (recommended)
- Fiberfill stuffing
- Tapestry needle, stitch marker
- Optional: orange yarn strand or pastel/makeup for blush muzzle
Abbreviations (US)
- MR: magic ring
- sc: single crochet
- inc: increase
- dec: decrease
- sl st: slip stitch
- ch: chain
- hdc: half double crochet
- dc: double crochet
If you ever want the official standard list, the Crochet Abbreviations Master List (Craft Yarn Council) is the best quick reference.
If you need quick refreshers:
Notes (Read before you start)
- Work in continuous rounds unless stated.
- Numbers in ( ) are stitch counts.
- Use a stitch marker to track rounds.
- For a neat start with no center hole, this guide helps a lot: Magic Ring vs Chain Circle for Amigurumi.
Free Lulu Pattern (Capybara Crochet Pattern Free + Hippo Amigurumi Style)
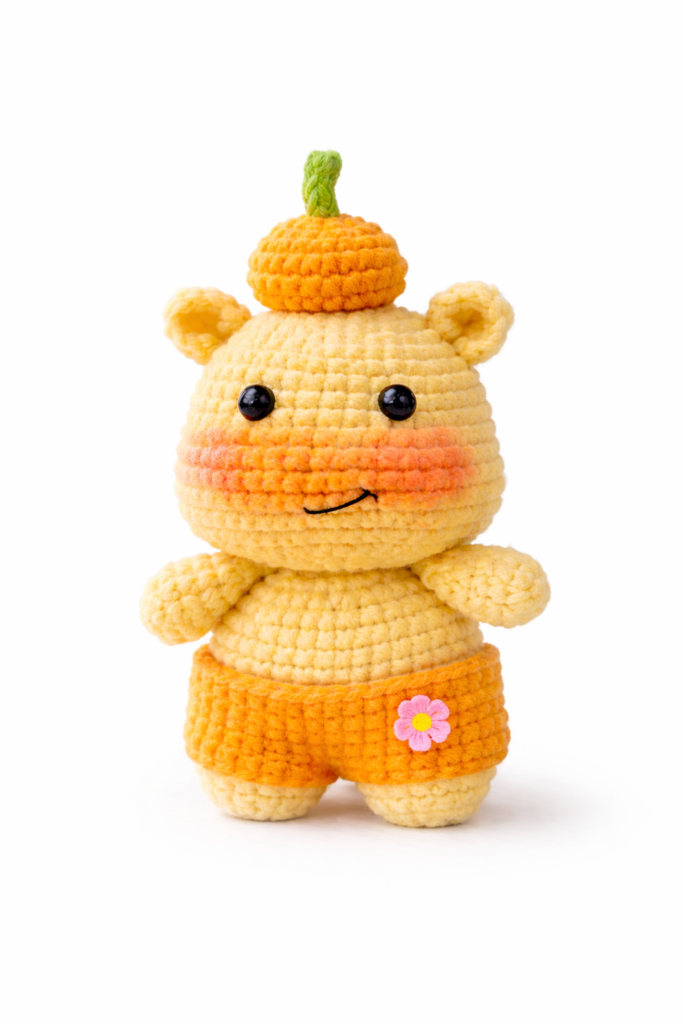
Below is the capybara crochet pattern free for Lulu the Capy-Hippo, written exactly in the same stitch counts and order you provided (cotton yarn + 2.5 mm hook). This also works perfectly as a hippo amigurumi pattern free because the shaping gives that cute, round hippo body look.
1) Head (Yellow)
- R1: MR 6 sc (6)
- R2: inc ×6 (12)
- R3: (sc, inc) ×6 (18)
- R4: (sc, inc, sc) ×6 (24)
- R5: (3 sc, inc) ×6 (30)
- R6: (2 sc, inc, 2 sc) ×6 (36)
- R7: (5 sc, inc) ×6 (42)
- R8–R11: sc around (42)
- R12: 13 sc, inc×5, 6 sc, inc×5, 13 sc (52)
- R13–R17: sc around (52)
👉 Insert 8 mm eyes between R10–R11, 7–8 sts apart.
- R18: 13 sc, dec×5, 6 sc, dec×5, 13 sc (42)
- R19: (5 sc, dec) ×6 (36)
- R20: (2 sc, dec, 2 sc) ×6 (30)
- R21: (3 sc, dec) ×6 (24)
- Stuff firmly.
- R22: dec ×12 (12)
- R23: dec ×6 (6)
- Fasten off, close hole.
Tip for super-smooth shaping on this capybara amigurumi pattern: use Invisible Decrease (sc2tog) Tutorial once you reach the decrease rounds.
2) Ears ×2 (Yellow)
- Into MR: ch 3, 2 dc, 2 hdc, 3 dc
- Pull tight. Fasten off, leave tail to sew.
3) Arms ×2 (Yellow)
- R1: MR 6 sc (6)
- R2: inc ×6 (12)
- R3–R6: sc around (12)
- Lightly stuff. Flatten and sc through both layers 6 sc to close (or sew).
- Fasten off, leave tail.
4) Mini Orange / Pumpkin (Orange)
- R1: MR 6 sc (6)
- R2: inc ×6 (12)
- R3: (sc, inc) ×6 (18)
- R4: (sc, inc, sc) ×6 (24)
- R5–R6: sc around (24)
- R7: (sc, dec, sc) ×6 (18)
- Stuff lightly.
- R8: (sc, dec) ×6 (12)
- R9: dec ×6 (6)
- Fasten off, close hole.
Stem (Green)
- Ch 5, starting in 2nd ch: sl st 4
- Fasten off, sew on top of the pumpkin.
5) Legs + Body (Yellow)
Leg 1
- R1: MR 6 sc (6)
- R2: inc ×6 (12)
- R3: (sc, inc) ×6 (18)
- R4: sc around BLO (18)
- R5–R6: sc around (18)
- Fasten off.
Leg 2
- Repeat R1–R6, but do not fasten off.
Join legs
Hold legs together (feet forward). Join and crochet around both legs, skipping 2 inner sts on each leg (skip 4 total).
- R7: sc around (32)
- R8: 8 sc, inc, 14 sc, inc, 8 sc (34)
- R9: 10 sc, inc, 12 sc, inc, 10 sc (36)
- R10–R13: sc around (36)
- R14: 10 sc, dec, 12 sc, dec, 10 sc (34)
- R15: 5 sc, dec, 9 sc, dec, 9 sc, dec, 5 sc (31)
- Stuff body.
- R16: 8 sc, dec, 9 sc, dec, 8 sc, dec (28)
- Fasten off, close opening (or sew shut neatly).
If you want perfectly even limb placement later, this guide helps a lot: How to Attach Amigurumi Limbs Evenly.
6) Shorts (Orange)
Make 2 leg rings, then join.
Ring 1
- R1: ch 20, sl st to form ring
- R2: sc around (20)
- Fasten off.
Ring 2
- R1: ch 20, sl st to form ring
- R2: sc around (20)
- Do NOT fasten off.
Join rings
Join both rings and crochet around, skipping 3 inner sts on each ring (skip 6 total).
- R3: sc around (34)
- R4: 8 sc, inc, 16 sc, inc, 8 sc (36)
- R5: 10 sc, inc, 14 sc, inc, 10 sc (38)
- R6: sc around (38)
- R7: sc 1, (5 sc, inc) ×6, sc 1 (44)
- Fasten off.
Put shorts on the body and tack with a few stitches so they stay in place.
Face Details (Blush Muzzle + Mouth)
- Blush muzzle (orange, no color change)
- Add blush under the eyes as a soft oval around R12–R15.
- Use orange yarn surface stitches OR pastel/makeup.
Mouth
Embroider a small tilted smile around R14–R15.
Assembly
- Sew ears to head (slightly high on the sides).
- Sew pumpkin on top of head, then add stem.
- Sew head to body (centered).
- Sew arms to sides.
- Add blush muzzle and mouth.
Variation — Christmas Lulu (Swap Pumpkin → Mini Santa Hat)
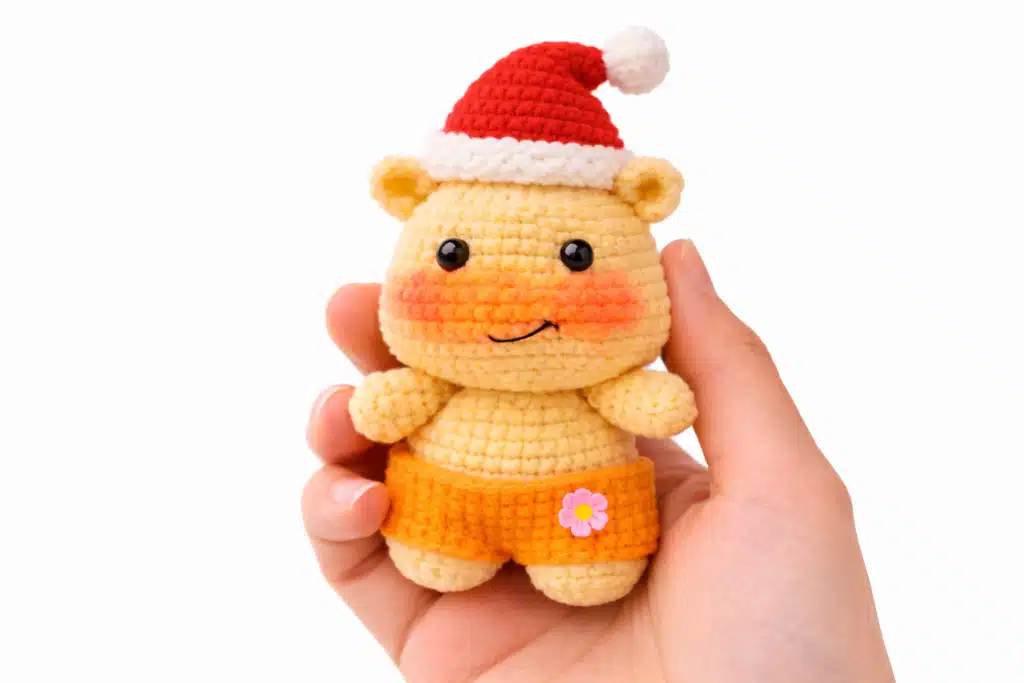
To make a Christmas version of this capybara crochet pattern free, crochet everything exactly the same, but skip the Mini Orange/Pumpkin and do this instead:
- Make the hat using my tutorial: Mini Santa Hat Crochet Pattern
- Sew the mini Santa hat on top of Lulu’s head where the pumpkin would go.
- Keep the blush muzzle + smile for that cute holiday look (it’s perfect for this hippo amigurumi pattern free style too).
Troubleshooting (Quick Fixes)
This capybara crochet pattern free is beginner-friendly, but here are the fixes that make Lulu look perfect (and keep this hippo amigurumi pattern free version super clean and round).
1) “I have holes when I join the legs”
That’s normal with joined rounds. Here’s the easiest fix:
- After joining, use your yarn tail to sew the small gap closed from the inside before stuffing fully.
- Make sure you really skip the inner stitches exactly as written (skip 2 inner sts on each leg).
2) “My head looks wobbly”
For a stable Lulu head:
- Stuff the head firmly, especially under the eyes.
- When sewing head to body, stitch through more anchor points (go around twice if needed).
- Add a little extra stuffing right before you fully close the seam.
3) “My shorts are too tight / too loose”
Shorts fit changes depending on tension.
- Too tight: go up one hook size just for the shorts.
- Too loose: tack the waistband with a few extra stitches around the body so they hug nicely.
4) “My muzzle blush looks messy”
For a clean blush oval:
- Use light surface stitches (small and spaced), or pastel gently.
- Keep it centered under the eyes around R12–R15 so it reads as a cute oval.
5) “My stitch counts keep going off”
Most mistakes happen at increases/decreases.
- Count at the end of every round (especially Head R12 and Body R15–R16).
- If you lose track often, read this once: How to Count Rounds in Crochet.
FAQ (Lulu Capybara + Hippo Amigurumi)
Can this be a “hippo amigurumi pattern free” instead of capybara?
Yes — the body shaping makes Lulu read like a tiny hippo too. That’s why this tutorial works as both a capybara amigurumi pattern and a hippo amigurumi pattern free option.
Can I make Lulu with plush yarn instead of cotton?
Yes. The stitch counts stay the same, but Lulu becomes bigger and extra cuddly. If you want your size and hook choices to feel easier, check: Yarn Weight, Gauge, and Hook Size Guide.
Are safety eyes safe for babies?
For baby toys, it’s better to use embroidered eyes instead of safety eyes.
Can I replace the pumpkin with the Christmas hat?
Yes — that’s the Christmas variation in this capybara crochet pattern free tutorial. Use your Santa hat pattern once, then sew it where the pumpkin sits.
Can I add accessories like a turtle backpack or flamingo float?
Absolutely. This design is a great base for “dress-up” accessories. Keep accessories lightweight so they don’t pull the head forward.
You May Also Like (More Free Patterns)
If you enjoyed this capybara crochet pattern free, here are more cute projects to keep your hook busy:
- Crochet Mini Christmas Stocking Pattern
- Crochet Gingerbread Snowflake Applique Pattern
- Free Crochet Snowman Pattern
- Free Crochet Reindeer Pattern
- Crochet Christmas Tree Applique Pattern
Conclusion
You’ve just finished Lulu, a cute capybara crochet pattern free that also works beautifully as a hippo amigurumi pattern free thanks to the round head, soft body shaping, and sweet face details. Whether you make the classic version with the tiny pumpkin or the Christmas version with the mini Santa hat, Lulu is the kind of capybara amigurumi pattern that looks adorable in photos and is genuinely fun to crochet.
If you make Lulu, add your own twist (different shorts color, stronger blush, or extra accessories) and keep notes, small tweaks make a big difference in amigurumi personality.

")

")