


Hello there, friend! Martha here from my cozy craft corner at TopAmigurumi.com.
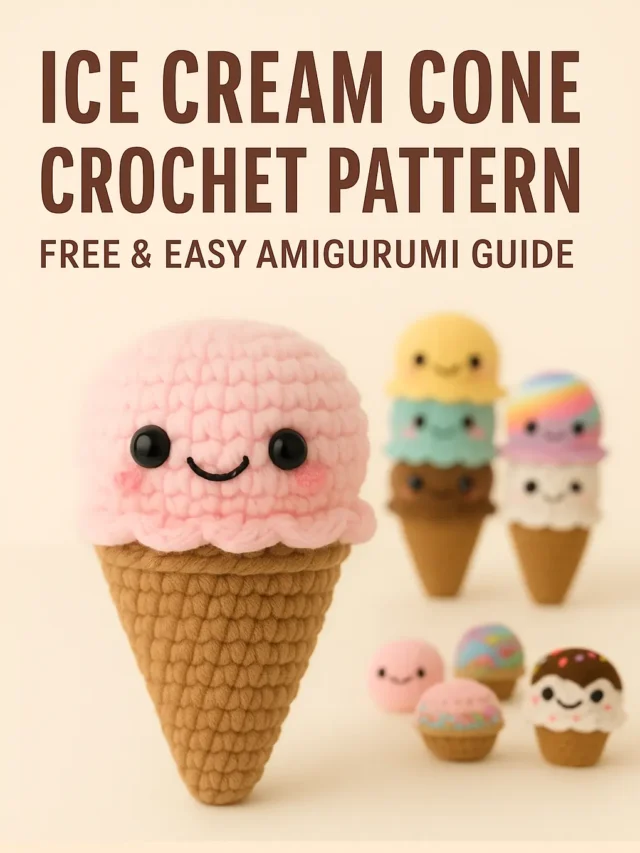
You know, after nearly 40 years of crocheting, I can tell you, some projects just spark joy from the very first stitch. This ice cream cone crochet pattern is one of those projects that never fails to bring a smile.
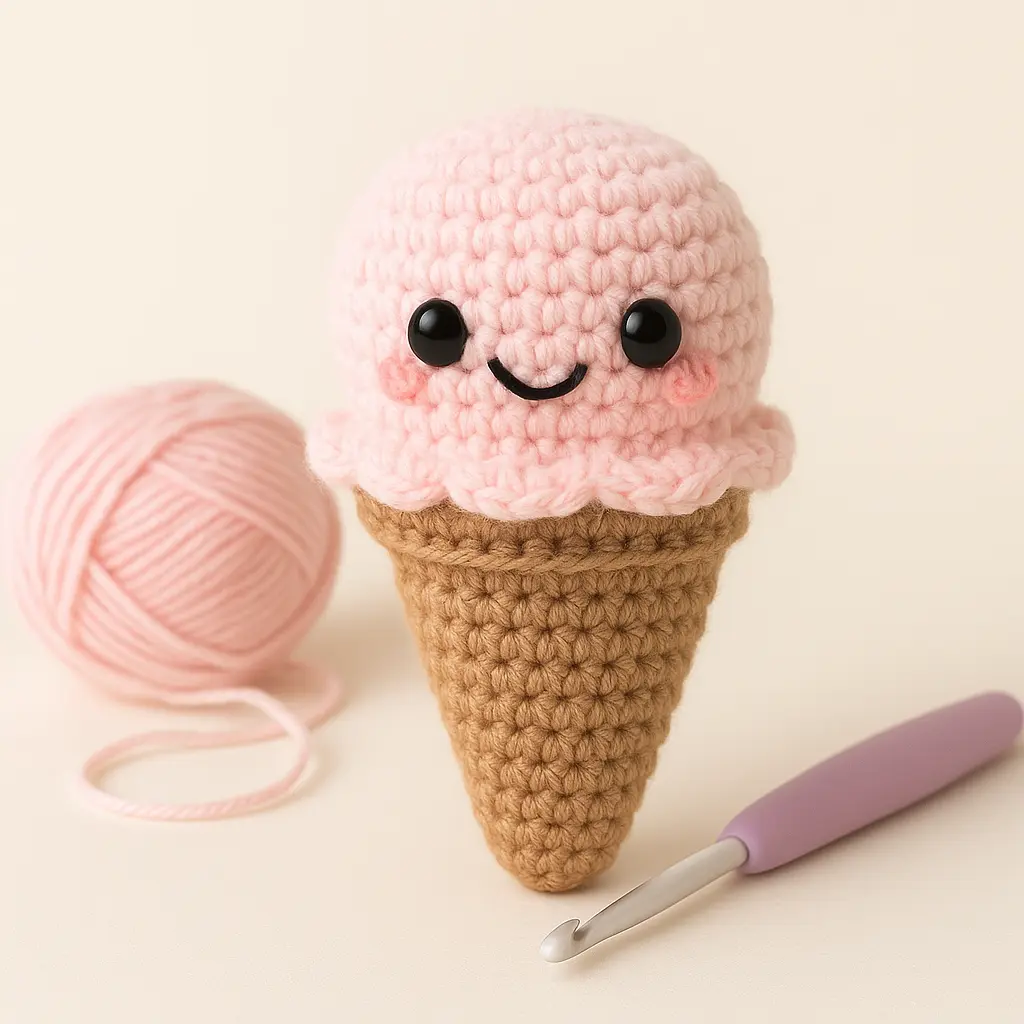
This free ice cream cone crochet pattern makes a soft pastel pink scoop with a scalloped edge, perfectly paired with a textured waffle cone. It’s an adorable amigurumi that’s beginner-friendly yet satisfying for experienced crocheters. You can make it as a classic cone, turn it into a crochet ice cream cozy, adapt it into a cute ice cream cone keychain, or even crochet a flat ice cream applique for hats and tote bags.
If you’re just starting with amigurumi, you might want to check out my First Amigurumi Step-by-Step Guide before diving in. And if you love crochet food, my Strawberry Crochet Pattern and Crochet Pattern for Candy Corn make perfect companions for this ice cream cone crochet pattern.
Jump To section
Estimated Time & Skill Level
| Project Type | Estimated Time | Skill Level |
|---|---|---|
| Amigurumi Ice Cream Cone | 1–2 hours | Beginner-Friendly |
Tip: If you’re new to amigurumi, this pattern is a perfect quick project to practice shaping and basic stitches.
Quick Answer: How to Crochet an Ice Cream Cone Amigurumi
To crochet an ice cream cone amigurumi:
- Make the scoop in pastel pink with a scalloped edge.
- Make the cone in light brown, adding a ridge with BLO stitches 2–3 rounds before the top.
- Sew the scoop to the cone, add eyes, mouth, and blush.
Full, step-by-step pattern is below. 👇
🧵 Why You’ll Love This Pattern
- Beginner-friendly yet detailed enough for seasoned crocheters.
- Adaptable into a cozy, keychain, or applique.
- Uses simple stitches and continuous rounds.
- Makes a perfect handmade gift.
Free Crochet Ice Cream Cone Pattern (Main Tutorial)
If you’re ready to stitch along with me, here’s the full free ice cream cone crochet pattern. This is the exact method I use to make the sweet little cone you’ve seen in the photos, complete with a pastel scoop, scalloped edge, and textured cone.
This amigurumi ice cream cone works up in continuous rounds, using simple stitches that even beginners can master. I’ve included all the details you need, plus a few tips so your cone turns out just as cute as mine.
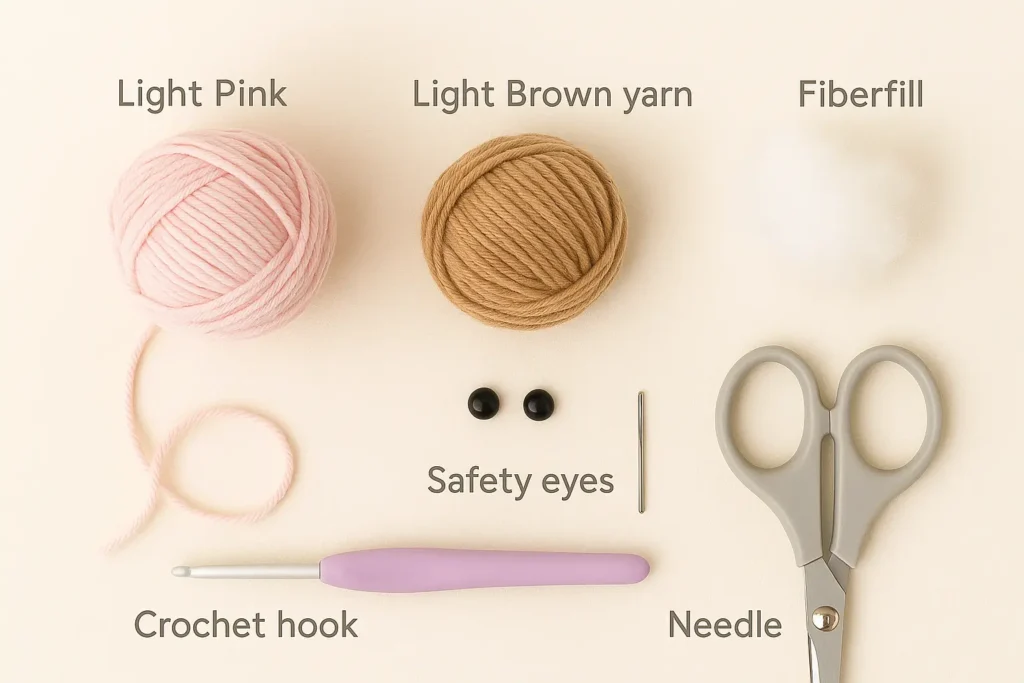
🧶 Materials
- Worsted weight yarn in:
- Light pink (scoop)
- Light brown (cone)
- 3.0 mm crochet hook
- Black safety eyes (8 mm)
- Black embroidery thread (mouth)
- Pink embroidery thread or blush (cheeks)
- Polyester fiberfill stuffing
- Stitch marker & yarn needle
Finished size:
With worsted weight yarn and a 3.0 mm hook, my ice cream cone measures about 14–15 cm (5.5–6 in) tall from the tip of the cone to the top of the scoop.Yarn & size note:
This pattern is written for worsted weight yarn. If you use chunkier/bulkier yarn and/or a larger hook, your ice cream cone will turn out much bigger than the one in the photos. That’s totally fine (jumbo ice cream is cute!) — just keep in mind the finished size will be different.
🪄 Tip: If you’re unsure about yarn sizing, visit the Craft Yarn Council’s yarn weight guide for quick, clear charts.
📖 Abbreviations
- MR = Magic Ring
- sc = single crochet
- inc = increase (2 sc in same stitch)
- dec = decrease (sc two stitches together)
- sl st = slip stitch
- ch = chain
- st(s) = stitch(es)
🍨 Ice Cream Scoop (Light Pink)
R1: MR, 6 sc (6)

R2: inc × 6 (12)

R3: (sc, inc) × 6 (18)

R4: (2 sc, inc) × 6 (24)

R5: (3 sc, inc) × 6 (30)

R6–10: sc around (30)

R11: (3 sc, dec) × 6 (24)

R12: (2 sc, dec) × 6 (18)
➡ Insert safety eyes between R7–8, about 6–7 sts apart.
➡ Embroider mouth between the eyes, add pink cheeks.
➡ Begin stuffing.

R13: (sc, dec) × 6 (12) — Do not fasten off.
🌸 Scalloped Edge (Still with Pink Yarn)
Ch 1, (sl st in next st, 5 dc in next st, sl st in next st) repeat around.

Fasten off, weave in ends.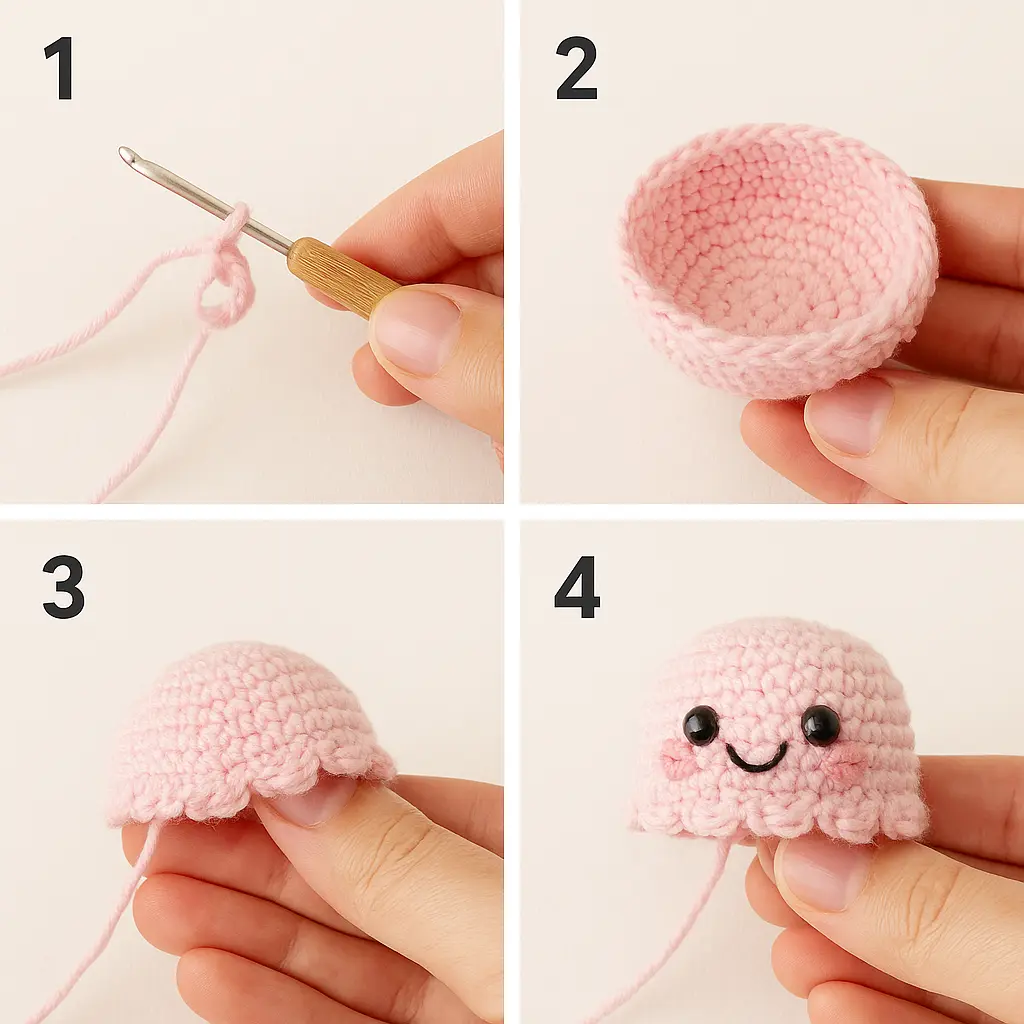
💡Pro Tip: Use a stitch counter app or a simple row counter ring to keep track of your rounds — it saves time and helps avoid mistakes
🍯 Cone (Light Brown)
R1: MR, 6 sc (6)

R2: sc around (6)

R3: (sc, inc) × 3 (9)

R4: sc around (9)

R5: (2 sc, inc) × 3 (12)

R6: sc around (12)

R7: (3 sc, inc) × 3 (15)

R8: sc around (15)

R9: (4 sc, inc) × 3 (18)

R10: sc around (18)

R11: (5 sc, inc) × 3 (21)

R12: sc around (21)

R13: (6 sc, inc) × 3 (24)

R14: sc around (24)

R15: (7 sc, inc) × 3 (27)

R16: sc around (27)

R17: (8 sc, inc) × 3 (30)

R18: sc around (30)

R19: BLO sc around (30) ← creates the separation ridge

R20–21: sc around (30) ← flared rim above the ridge
Stuff firmly and fasten off, leaving a tail for sewing to scoop.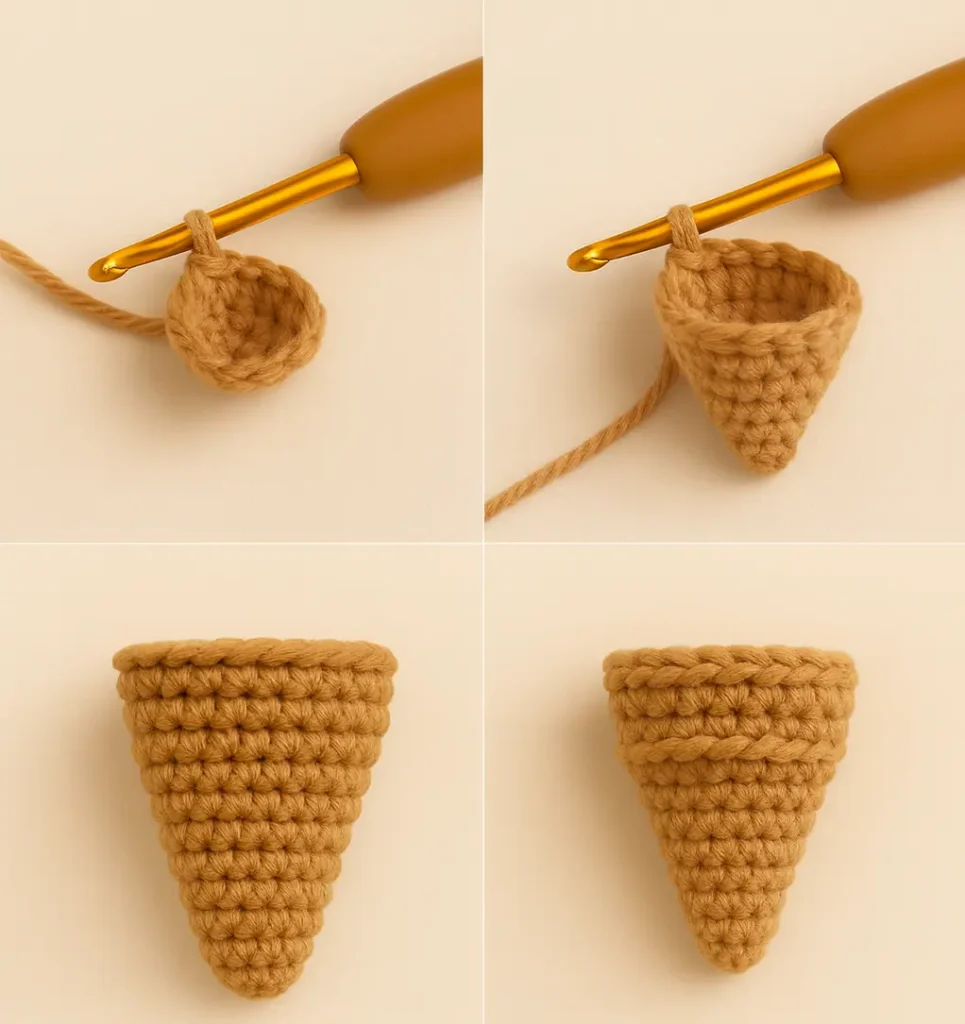
🪡 Assembly
- Place the scoop on top of the cone, matching scallops to cone rim.
- Sew together around the edge.
- Add more stuffing before fully closing.
- Adjust facial embroidery if needed.
📌 If you enjoy this project, you might also like my Amigurumi labubu Pattern Free or the Free Whale Crochet Pattern — both beginner-friendly and just as cute.
Crochet Ice Cream Cozy Pattern – Keep Your Ice Cream Cute
If you’ve already mastered the ice cream cone crochet pattern, here’s a clever upgrade, turn it into a functional pint cozy! This variation not only keeps your ice cream cold but also protects your hands from the chill. It’s a creative way to make your ice cream cone crochet pattern more versatile, practical, and gift-worthy.
Why I Love This Crochet Ice Cream Cozy Pattern:
- It uses the same ice cream cone crochet pattern base you learned earlier, no need to start from scratch.
- You can finish this crochet ice cream cozy pattern in just an hour or two.
- It’s a perfect handmade gift, pair it with someone’s favorite pint for a sweet surprise.
How to Make the Cozy
- Start the Base
Using light brown yarn, chain enough stitches to wrap around your ice cream cup or cone sleeve. Join to form a loop, making sure not to twist. - Work in Rounds
Crochet in the round using single crochet stitches until your piece measures about 1.5 inches tall. - Add Texture (Optional)
For a waffle-like effect, work a few rounds in back loop only (BLO). This gives your crochet ice cream cone cozy that classic cone texture. - Decorate the Top
Switch to your scoop color (pink, mint, chocolate) and work a scalloped edge to mimic melting ice cream. You can also add a small crochet cherry for extra charm. - Finish & Fit
Slip it onto your cone or cup and admire your new, reusable cozy, an eco-friendly and stylish touch!
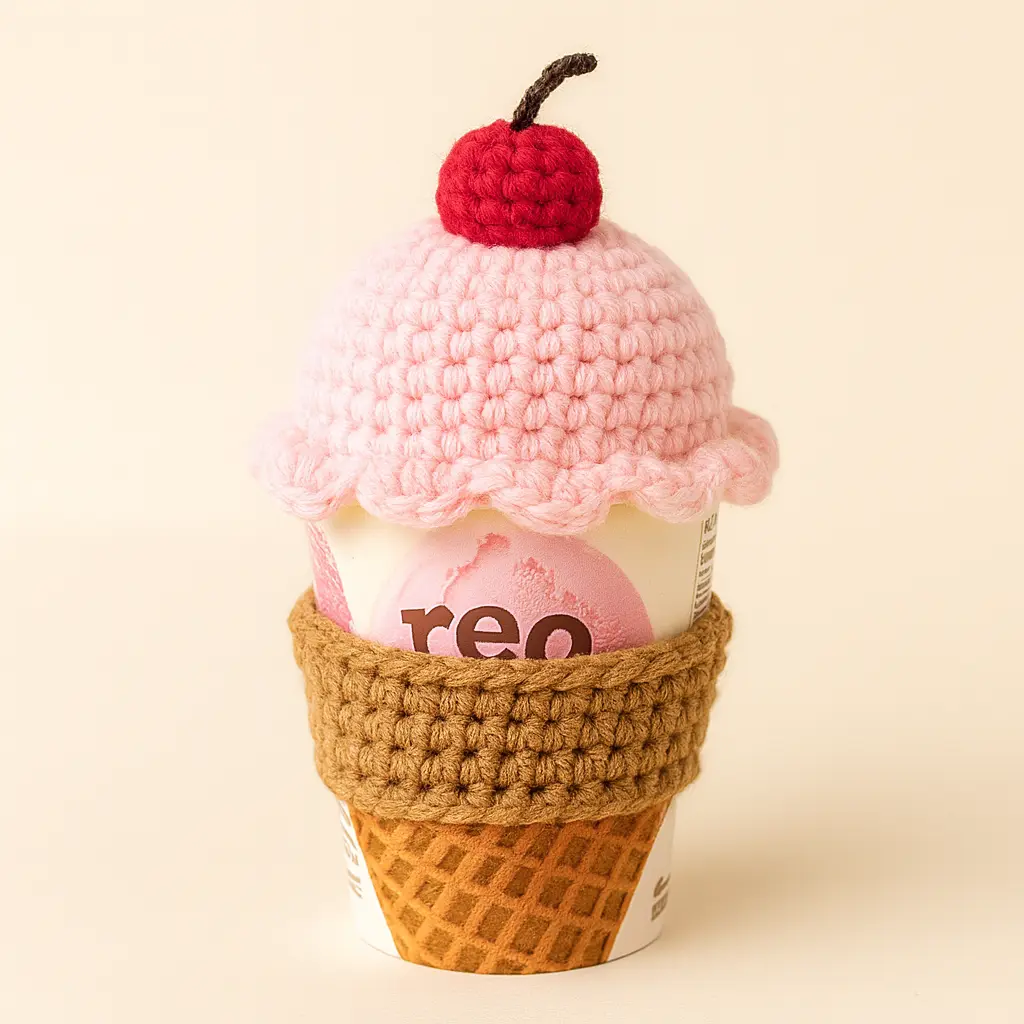
🪄 Pro Tip: This cozy can also be adapted to hold cups of coffee, mugs, or even plant pots. If you’re making it as a gift, pair it with the main ice cream cone crochet pattern for a themed set.
📌 If you’re looking to perfect shaping techniques before starting this ice cream cone crochet pattern, check out my Invisible Decrease Crochet Guide.
Creative Variations of the Ice Cream Cone Crochet Pattern
One of the best parts about working with an ice cream cone crochet pattern is how easily you can customize it. Once you’ve mastered the basic design, you can let your imagination run wild with fun, colorful variations.
1. Triple-Scoop Delight
Why stop at one scoop? Stack two or even three scoops in different pastel shades for a towering treat. Secure each layer firmly to keep your crochet ice cream cone stable.
2. Rainbow Swirl Scoop
Use variegated yarn to create a swirl effect that looks like a real rainbow sherbet. This twist makes your ice cream amigurumi pop in photos and craft fair displays.
3. Chocolate-Dipped Cone
Switch the top rows of your cone to dark brown yarn for a chocolate-dipped look. Add small white or pastel stitches for “sprinkles” that make the ice cream cone crochet pattern extra sweet.
4. Themed Holiday Flavors
Create seasonal styles like red and green scoops for Christmas, orange and black for Halloween, or pastel yellow and blue for Easter. These make great crochet gift ideas.
5. Mini Keychain Version
Shrink the stitch count and use lightweight yarn to make a mini ice cream cone crochet keychain. They’re adorable for bags, zipper pulls, or party favors.
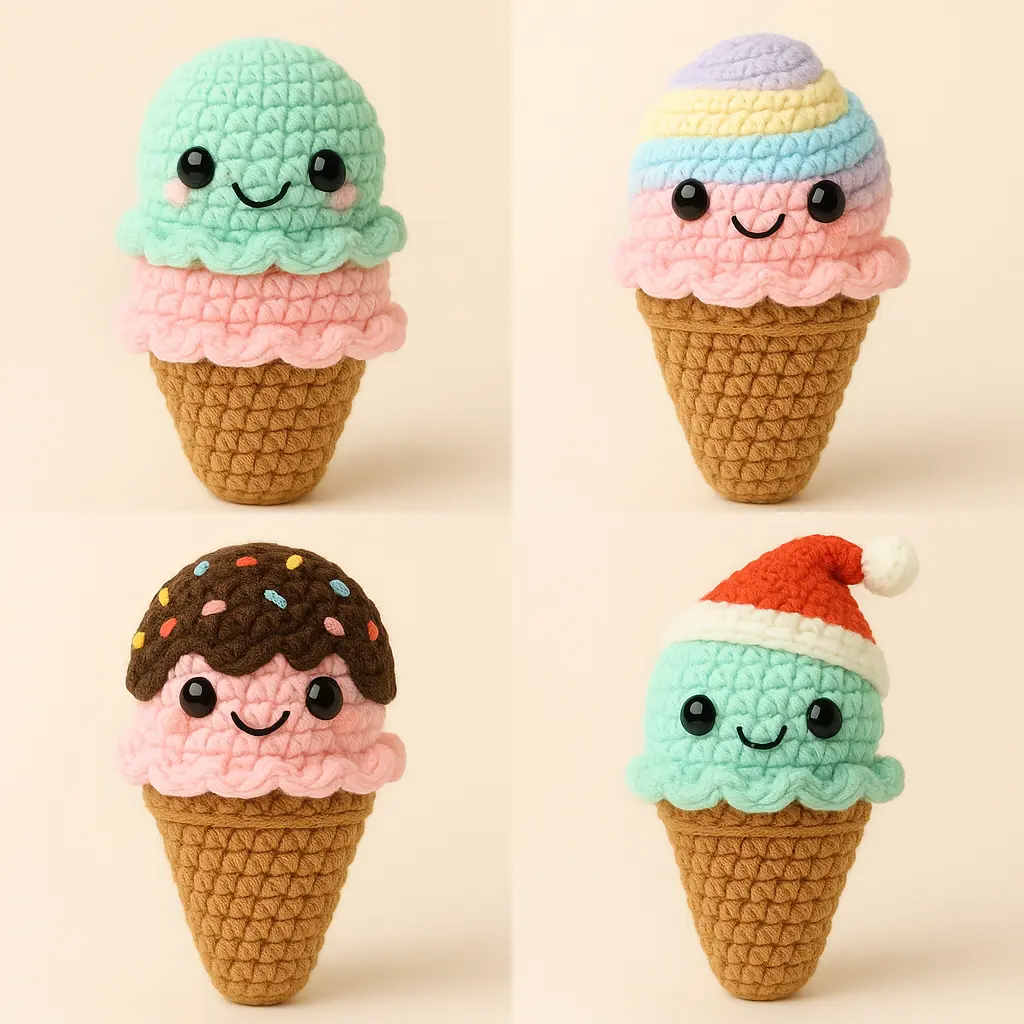
💡 Tip: Don’t be afraid to experiment with textures! Try fuzzy yarn for a “whipped cream” topping or add a tiny cherry bead on top for an extra touch of charm.
Common Mistakes to Avoid When Crocheting an Ice Cream Cone
When working on an ice cream cone crochet pattern, even experienced crocheters can make small errors that affect the final look. Here are the most common pitfalls and how to avoid them so your ice cream cone crochet pattern turns out picture-perfect every time.
1. Wrong Yarn or Hook Size
- The mistake: Using yarn that’s too thick or a hook that’s too large can distort the proportions of your ice cream cone crochet pattern.
- How to fix: Always follow the yarn weight and hook size recommended in the ice cream cone crochet pattern for the best shape and stitch definition.
2. Uneven Stitch Tension
- The mistake: Loose or tight stitches create an uneven shape in your ice cream cone crochet pattern
- How to fix: Keep your tension consistent from start to finish, practicing on a small swatch before beginning the ice cream cone crochet pattern.
3. Stuffing Problems
- The mistake: Overstuffing can make your cone bulge, while under-stuffing makes it floppy.
- How to fix: Add stuffing gradually while crocheting an ice cream cone, shaping it as you go. Aim for a firm but squeezable texture.
4. Skipping Stitch Markers
- The mistake: Losing track of your rounds can lead to a lopsided scoop or uneven cone.
- How to fix: Use stitch markers to track each round in your ice cream cone crochet pattern, especially when increasing or decreasing.
5. Poor Assembly
- The mistake: Misaligned sewing between the scoop and cone can ruin the final look of your ice cream cone crochet pattern.
- How to fix: Match the scalloped edge of the scoop to the cone rim and sew slowly, checking alignment as you go.
6. Skipping Blocking
- The mistake: Not blocking your finished ice cream cone crochet pattern can leave it looking uneven or curled.
- How to fix: Lightly steam or shape your project after assembly for a neat, professional finish.
💡 Pro Tip: If you’re making multiples, crochet all cones first, then all ice cream scoops, then the toppings. This keeps your crocheting an ice cream cone tension consistent and speeds up production.
FAQ: Ice Cream Cone Crochet Pattern
How long does it take to crochet an ice cream cone crochet pattern?
Most crafters complete the basic ice cream cone crochet pattern in about 1–2 hours, depending on stitch speed and complexity. The cozy variation or extra embellishments can add more time, but the core pattern is quick and rewarding for all skill levels.
Is this ice cream cone crochet pattern beginner-friendly?
Yes! The ice cream cone crochet pattern uses simple stitches and clear, round-by-round instructions, making it a great project for beginners. Each shape (cone and scoop) is worked in continuous rounds, so you can focus on your tension and stitch consistency.
What yarn and hook sizes are recommended for this ice cream cone crochet pattern?
This pattern works best with worsted weight yarn and a 3.0 mm crochet hook. Using bulkier yarn or a larger hook can make the scoop too floppy, while finer yarn and smaller hook will result in a petite cone, not bad, just a creative variation!
Can I wash the ice cream cone crochet pattern amigurumi?
Absolutely, your ice cream cone crochet pattern can be hand-washed gently in cool water with a mild soap. Lay it flat to dry to maintain its shape. If you used cotton yarn, the cozy variation is especially easy to wash and dry.
What if the scalloped edge of the scoop doesn’t look even?
Scallops that shift in or out can happen if stitch counts vary between rounds. Double-check your stitch counts before starting the scallop row in the ice cream cone crochet pattern, and mark every few stitches so the scallops line up perfectly.
🍦 Final Thoughts on the Ice Cream Cone Crochet Pattern
Whether you’re making a cute amigurumi for a friend, a functional cozy, or exploring creative variations, the ice cream cone crochet pattern is one of the most versatile and fun projects for beginners and seasoned crocheters alike. Its simple stitches, endless color possibilities, and adorable results make it a must-try for your crochet collection.
If you enjoyed this ice cream cone crochet pattern, you might also love trying out other sweet and playful designs. Each one helps you refine your crochet skills while creating pieces that bring joy.
💡 Keep crocheting:
- Amigurumi Bunny Free Pattern – Soft, huggable, and perfect for gifting.
- Amigurumi Duck Pattern Free – Small and charming, great for keychains or décor.
📌 Pin & Share: Save this ice cream cone crochet pattern to your crochet board so you can revisit it anytime!
💌 Let’s Stay in Touch!
Want more free patterns, pro tips, and exclusive crochet freebies?
📌 Follow me on Pinterest for endless crochet inspiration.
💬 Tag me on Instagram when you make your ice cream cone, I can’t wait to see your creation!


")
2 comments
OH MY GOODNESS! This pattern is soooo cute. You may want to note in it that with chunkier yarn, it comes out a lot bigger than what it looks in the pattern.
Ahhh thank you so much! 🥰 I’m really happy you like the pattern!
And you’re absolutely right — with chunkier yarn the ice cream turns out much bigger than it looks in the photos. That’s such a helpful note, I really appreciate you mentioning it!
I’ll add a little reminder in the pattern about yarn weight and how it affects the final size, so other crocheters know this too. Thank you again for taking the time to comment 💕🧶🍦