

")
If you’ve been searching for a long neck Sid crochet pattern with clear written steps, this one is for you. This free tutorial is designed for makers who want a fun character project with personality: a lanky neck, playful face, and that instantly recognizable sloth vibe inspired by Ice Age fans’ favorite goofball.
Unlike short listing pages, this Long-Neck Sid crochet pattern gives you the full structure in US terms, practical assembly notes, and beginner-friendly guidance you can actually follow line by line. If you’re new to plush-making, start with What Is Amigurumi? and keep How to Read an Amigurumi Pattern open in another tab while crocheting.
If this is your first character doll, you can also warm up with the First Amigurumi Step-by-Step Guide.
This tutorial is written to help you make a stable, cute, long-neck Sid with clean shaping, simple parts, and optional reinforcement for the neck.
Jump to section
Materials & Tools
For this long neck Sid crochet pattern, use the following:
| Item | Details |
|---|---|
| Yarn colors | Brown, white, dark brown (nose), optional black (smile) |
| Hook size | 2.0–2.5 mm |
| Stuffing | Fiberfill |
| Tools | Yarn needle, stitch marker, scissors |
| Optional support | Thin wire or pipe cleaner for neck stability |
Yarn tip: If you want a firmer doll shape, choose a cotton or cotton-blend yarn and keep stitches tight. If you need help choosing yarn and hook combinations, see the Yarn Weight, Gauge, and Hook Size Guide.
Size note: Final size depends on your tension, yarn thickness, and hook size.
Abbreviations (US Terms)
- MR = magic ring
- sc = single crochet
- inc = increase (2 sc in same stitch)
- dec = invisible decrease (sc2tog)
- sl st = slip stitch
- BLO = back loop only
- ch = chain
- dc = double crochet
- FO = fasten off
If you use UK terms, keep this conversion reference nearby: US vs UK Crochet Terms Conversion Chart.
And if you’re unsure which start method to use, compare options here: Magic Ring vs Chain Circle in Amigurumi.
Pattern Notes Before You Start
- Work in continuous rounds unless stated otherwise.
- Use a stitch marker in the first stitch of each round.
- Stitch counts are shown in ( ) at the end of each round.
- For the neck section, keep stuffing minimal or none (as specified in the pattern) to preserve the long, flexible look.
- Skill level: Beginner to Intermediate (mainly because of shaping + assembly precision).
long neck Sid crochet pattern
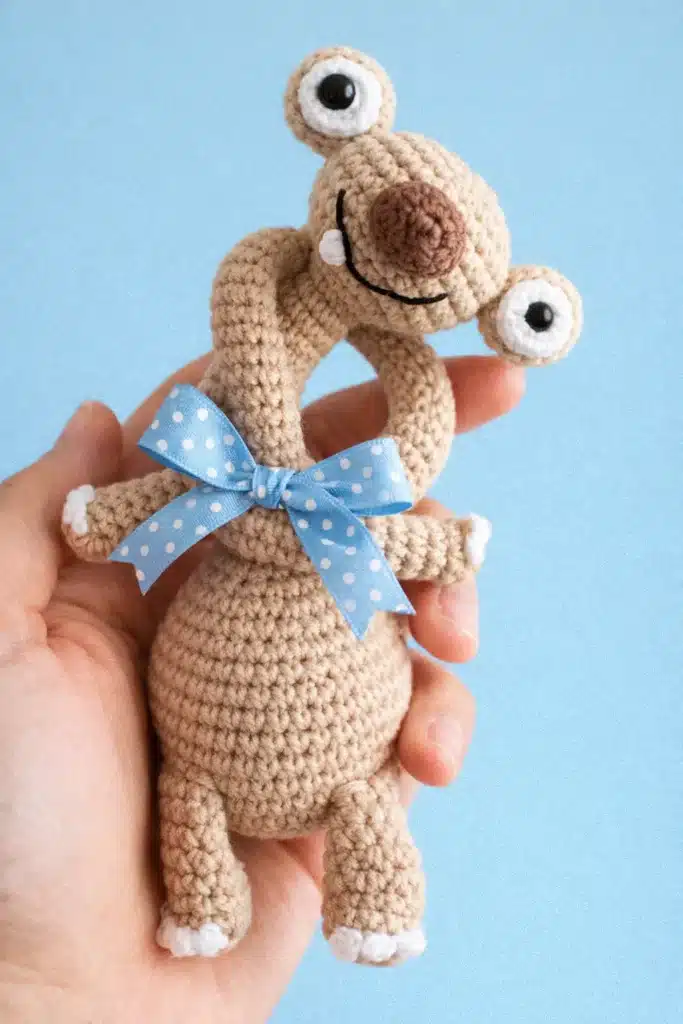
In this long neck Sid crochet pattern, we build the body, long neck, and head as one continuous piece. This gives Sid that iconic silhouette and makes assembly easier later.
Before you begin:
If you need a quick refresher, check this how to single crochet guide and this clean invisible decrease tutorial.
Use a stitch marker and track every round carefully with this count rounds in crochet method.
Body + Neck + Head (One Piece)
Work in continuous rounds.
Stitch count is shown in ( ) at the end of each round.
Start at body base
- R1: MR, 6 sc (6)
- R2: inc ×6 (12)
- R3: (1 sc, inc) ×6 (18)
- R4: (2 sc, inc) ×6 (24)
- R5: (3 sc, inc) ×6 (30)
- R6: (4 sc, inc) ×6 (36)
- R7: (5 sc, inc) ×6 (42)
Create base shaping line
- R8: BLO, 42 sc (42)
- R9–R12: 42 sc (42)
Shape upper body
- R13: (5 sc, dec) ×6 (36)
- R14: (4 sc, dec) ×6 (30)
- R15: (3 sc, dec) ×6 (24)
- R16: 24 sc (24)
- R17: (2 sc, dec) ×6 (18)
- R18: 18 sc (18)
(Stuff body firmly up to here.) - R19: dec ×9 (9)
Long neck section
- R20–R89: 9 sc (9)
(Do NOT stuff the neck.)
Head shaping
- R90: inc ×9 (18)
- R91: (2 sc, inc) ×6 (24)
- R92: (3 sc, inc) ×6 (30)
- R93: (4 sc, inc) ×6 (36)
- R94–R99: 36 sc (36)
- R100: (4 sc, dec) ×6 (30)
- R101: (3 sc, dec) ×6 (24)
- R102: (2 sc, dec) ×6 (18)
- R103: (1 sc, dec) ×6 (12) (Start stuffing head)
- R104: dec ×6 (6)
FO, leave a long tail, and close the opening with a yarn needle.
Pro Tips for a Cleaner Sid Shape
- Keep neck stitches tight to avoid gaps.
- Stuff only the body and head well; keeping the neck unstuffed helps preserve the “long-neck” look.
- If you want a standing/display version, add a thin wire or pipe cleaner inside the neck before final closing.
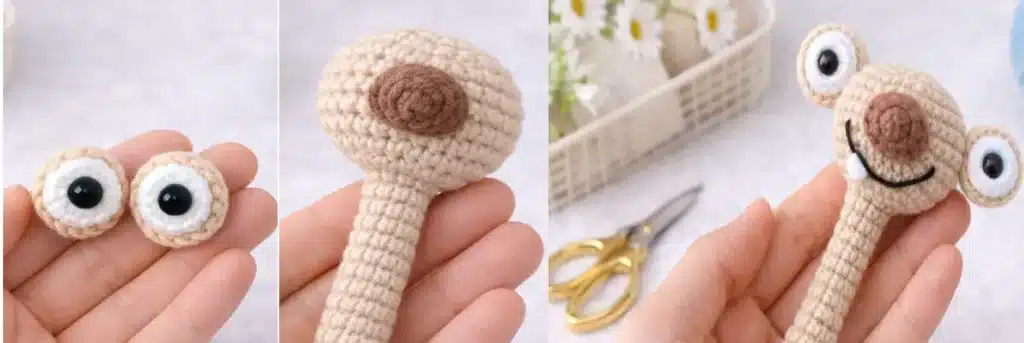
Arms, Legs, Eyes, Nose & Teeth
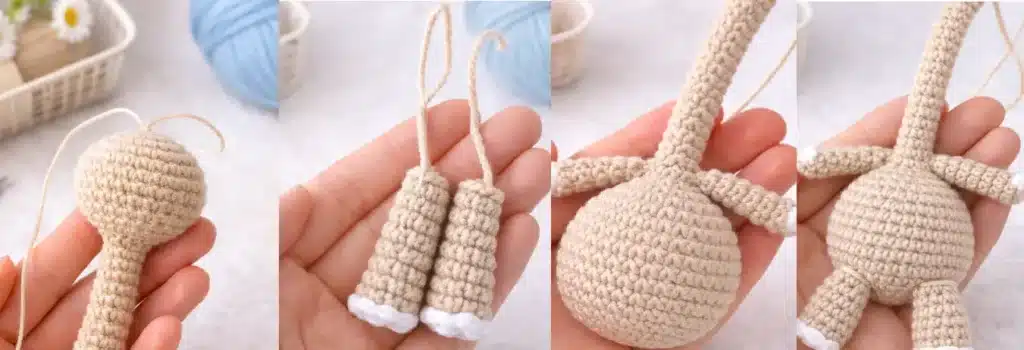
Now we’ll make all small parts for this long neck Sid crochet pattern.
Take your time here—clean shaping in these pieces makes the final face/body look much better.
If tiny parts usually give you trouble, keep this checklist nearby from Top 10 Amigurumi Mistakes to Avoid while you work.
Arms (Make 2)
- R1: MR, 5 sc (5)
- R2: inc ×5 (10)
- R3: BLO, 10 sc (10)
- R4–R8: 10 sc (10)
- R9: (3 sc, dec) ×2 (8)
- R10: 8 sc (8)
Flatten the top and close with 4 sc through both layers.
FO, leave a long tail for sewing.
Optional detail: Embroider 3 tiny fingers on the BLO ridge.
Legs (Make 2)
- R1: MR, 6 sc (6)
- R2: inc ×6 (12)
- R3: BLO, 12 sc (12)
- R4–R6: 12 sc (12)
- R7: (2 sc, dec) ×3 (9)
- R8: 9 sc (9)
Lightly stuff only the lower part.
Flatten and close opening with sc through both layers.
FO, leave a long tail for sewing.
Optional detail: Embroider 3 small toes on the BLO ridge.
Eyes (Make 2 Complete Eyes)
For this Sid the sloth amigurumi pattern, each eye has a white inner piece and brown outer piece.
White Inner Part
- R1: MR, 8 sc (8)
- R2: inc ×8 (16)
- R3: (2 sc, dec) ×4 (12)
- FO.
Brown Outer Part
- R1: MR, 9 sc (9)
- R2: inc ×9 (18)
- R3: (4 sc, dec) ×3 (15)
- sl st, FO.
Place the white part inside the brown part, then sew or glue securely.
Nose (Make 1)
- R1: MR, 5 sc (5)
- R2: inc ×5 (10)
- R3: (4 sc, inc) ×2 (12)
FO, leave a long tail for sewing.
Teeth (White Yarn, Make 2)
For each tooth:
- ch 3
- dc in 3rd ch from hook
- FO, leave tail for sewing
Sew both teeth under the smile line with a tiny gap between them.
Quick Prep Before Assembly
At this stage, you should have:
- 1 body/neck/head piece
- 2 arms
- 2 legs
- 2 completed eyes
- 1 nose
- 2 teeth
Assembly, Finishing & Customization (Long-Neck Sid Crochet Pattern)
This is where your long neck Sid crochet pattern really comes to life.
Take your time with placement—small shifts in eyes/arms can completely change Sid’s expression.
1) Assemble the Body First
Use pins or stitch markers to preview placement before sewing.
- Legs: sew both legs to the BLO ridge from R8 (front-center of body).
- Arms: sew around R16–R18 on each side.
- Keep left/right symmetry by counting stitches from center front.
If you want perfectly even positioning, follow this limb placement method: attach amigurumi limbs evenly.
2) Build Sid’s Face
For a clean “Sid” look in this long neck Sid crochet pattern, place features in this order:
- Nose in face center around R95–R97
- Eyes above nose around R94–R95, with about 6–7 stitches between inner edges
- Smile embroidered as a curved line under the nose
- Teeth sewn under smile with a tiny gap between both teeth
Expression tip:
- Eyes slightly closer = cuter/cartoon style
- Eyes slightly wider = goofier Sid look
3) Neck Stability (Optional but Recommended)
Your pattern already works without support, but if you want a display piece, add support inside the neck:
- Use a thin wire or folded pipe cleaner
- Insert through neck center before final tightening
- Keep both wire ends bent inward (no sharp edges)
- Add a tiny bit of fiberfill around support if needed
This helps the long neck stand cleaner while keeping a natural bend.
4) Finishing Details
- Weave in all ends securely inside the body/head
- Double-check seam strength at arms/legs
- Shape the head gently with fingers for smoother contours
- Optional: add tiny black embroidered nostrils or subtle cheek dots
“Love this Long-Neck Sid crochet pattern? Save this Pin now so you can find it fast when you’re ready to crochet! 😍”
Customization Ideas
Make this long neck Sid crochet pattern your own with easy variations:
Neck Length Variations
- Shorter Sid: reduce neck section (R20–R89) by 10–20 rounds
- Extra goofy Sid: add 10–20 rounds for an even longer neck
Color Variations
- Keep classic brown/cream
- Try warm beige + darker muzzle
- Add lighter belly contrast
If you want clean transitions, this tutorial helps: changing colors in amigurumi.
More Free Amigurumi Patterns You’ll Love


")
")
Character Style Variations
- Small blush embroidery for a softer look
- Tiny eyebrow lines for expressive mood
- Add mini accessory (scarf, leaf, bow tie)
Gift/Display Version
- Turn it into a desk mascot for movie fans
- Pair it with another character-style plush like this Leggy Frog crochet pattern for a fun “odd friends” set
FAQ — Long-Neck Sid Crochet Pattern
Is the Long Neck Sid crochet pattern beginner-friendly?
Yes. It’s suitable for advanced beginners to intermediate crocheters. The stitches are simple, but shaping, long-neck structure, and facial placement require careful counting and assembly.
What stitches are used in the Sid the Sloth pattern?
This pattern uses: MR (magic ring), sc, inc, dec (invisible decrease), sl st, BLO, ch, dc, and FO.
What yarn and hook size should I use for a long neck Sid amigurumi?
Use brown, white, and dark brown yarn (optional black for smile detail) with a 2.0–2.5 mm hook. Cotton or cotton-blend yarn gives cleaner stitch definition and better shape control.
How tall is the finished Long Neck Sid?
Size depends on yarn, hook, and tension. With the recommended setup, Sid is usually around 25–32 cm (10–12.5 inches) tall.
Are the instructions written in US or UK crochet terms?
The entire pattern is written in US crochet terms.
Can I sell items made from this Sid crochet pattern?
You can usually sell finished handmade items in small quantities with credit to the pattern source.
Do not resell, copy, or redistribute the pattern text/PDF itself.
Is there a printable PDF for the Long Neck Sid pattern?
Yes. You can offer a printable PDF version through your email signup/lead magnet section.
How long does it take to crochet Sid the Sloth?
It typically takes about 5–8 hours for intermediate crocheters and 8–12 hours for beginners, depending on speed and finishing details.
Can I use different yarn weights or colors for this Sid pattern?
Absolutely. You can change yarn weight and colors, but the final size and firmness will change. Adjust hook size to keep stitches tight and prevent gaps.
How do I assemble and sew the long neck securely?
The neck is crocheted as one piece with the body/head, so there’s no neck seam. For extra stability:
keep neck stitches tight,
avoid overstuffing the neck,
and insert a thin wire or pipe cleaner inside before final closing (bend ends inward for safety).
Free PDF Download (Printable Version)
Want a clean, printer-friendly copy of this long neck Sid crochet pattern?
You can download the free Sid amigurumi PDF and keep it on your phone/tablet for easy row tracking while crocheting.
To access it, join our email list (quick signup), and we’ll send the printable version directly to your inbox.
Personal-use note: This pattern is for personal use. If you share your finished doll on social media, please credit TopAmigurumi and tag your post with #LongNeckSidFreePattern so we can feature your work.
Conclusion
This free Long Neck Sid crochet pattern was designed to fill the gap between short paid listings and real step-by-step written tutorials. You now have everything in one place: materials, abbreviations, complete rounds, assembly guidance, and customization options.
If you make one, share your finished Sid and tag #LongNeckSidFreePattern I’d love to see your version, from classic movie-inspired colors to totally custom sloth styles.
If you want your next project ready, you can also explore our other free character patterns like the Amigurumi Duck Pattern Free Keychain, Amigurumi Bunny Free Pattern, and Free Whale Crochet Pattern.
1 comment
Sid the sloth😃