


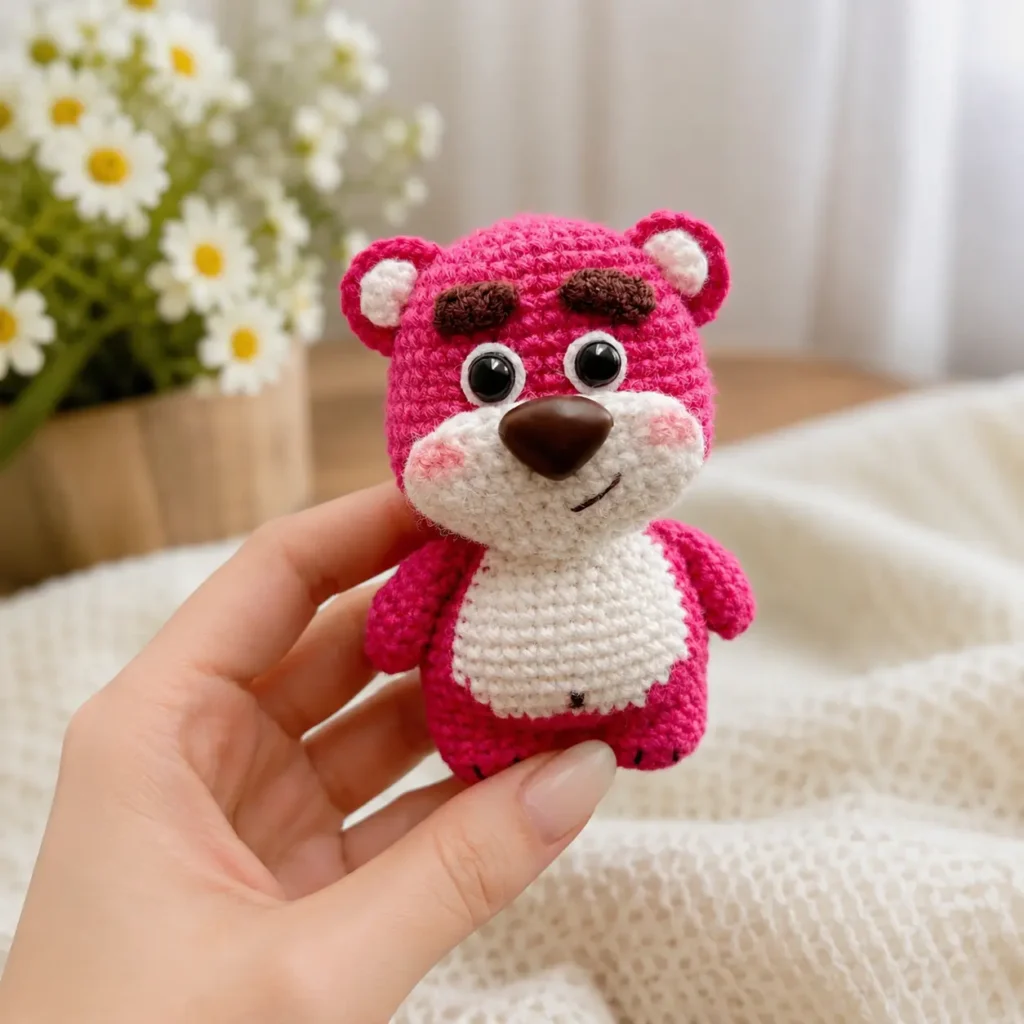
If you love tiny fruit-themed amigurumi, this Strawberry Bear Baby Crochet Pattern is such a sweet project to make. This little pink bear has a rounded baby face, a soft white belly, a cute white muzzle, tiny ears, embroidered eyebrows, and a little tail at the back.
I designed this pattern in US crochet terms, using simple shaping and beginner-friendly amigurumi techniques. The strawberry-pink color gives the bear a soft fruity look, while the white belly and muzzle make it feel extra baby-like and cuddly.
This Strawberry Bear Baby Crochet Pattern is perfect as a handmade gift, shelf decoration, nursery-style decor, or a cute amigurumi collectible. If you enjoy bear patterns, you may also like my ruffled collar teddy bear crochet pattern or this sweet little bear with cherry bib crochet pattern.
Important safety note: If you are making this bear for a baby or a child under 3, do not use safety eyes or glued felt pieces. Embroider the eyes instead and sew all parts very securely. You can read more about small parts and choking hazards from the U.S. Consumer Product Safety Commission.
Jump to section
About This Strawberry Bear Baby Crochet Pattern
This pattern is worked mostly in continuous rounds, which is common for amigurumi. The head is made separately from the body, then sewn together. The body begins with two little legs joined together, and the white belly is crocheted directly into the body using color changes.
The face details make this bear very expressive. The white muzzle gives the face a soft baby look, while the eyebrows add a gentle handmade character. If you enjoy cute animal amigurumi, this bear also pairs nicely with patterns like the mini bear pumpkin toast crochet pattern or the mini butter bear crochet pattern.
Skill Level
Beginner to intermediate.
You should know how to:
- Crochet in a magic ring
- Work single crochet increases and decreases
- Join two legs together
- Change colors for the belly
- Sew amigurumi parts neatly
- Embroider simple facial details
If you are still learning basic stitches, my guides on how to single crochet and how to crochet a chain stitch can help before you start.
Finished Size
The finished size depends on your yarn, hook size, and tension.
With sport-weight or 4-ply cotton yarn and a 2.0 mm to 2.5 mm crochet hook, your Strawberry Bear Baby will be a small amigurumi size, perfect for a mini plush, desk friend, or display toy.
Materials
You will need:
- Pink or strawberry-red yarn
- White yarn
- Dark brown yarn or embroidery thread
- Black safety eyes
- Small piece of white felt for eye whites, optional
- Fiberfill stuffing
- Crochet hook suitable for your yarn
- Yarn needle
- Stitch marker
- Scissors
Baby-safe option
For a baby-safe version, replace safety eyes with embroidered eyes. Avoid felt pieces, glue, buttons, beads, or any removable small parts.
Abbreviations — US Crochet Terms
MR = magic ring
ch = chain
sc = single crochet
inc = increase, 2 sc in the same stitch
dec = decrease
hdc = half double crochet
sl st = slip stitch
FO = fasten off
Pattern Notes
- Work in continuous rounds unless the pattern says otherwise.
- Use a stitch marker to mark the first stitch of each round.
- Stuff the head and body firmly, but do not overstuff.
- The head ends with 24 stitches, and the body also ends with 24 stitches, so they can be sewn together neatly.
- The white belly is worked directly into the body using color changes.
- For a cleaner belly edge, carry the unused yarn inside the stitches or cut and rejoin if you prefer a neater back.
- If you need help with clean shaping, my invisible decrease crochet tutorial is useful for this project.
Strawberry Bear Baby Crochet Pattern
Head
Use pink yarn.
- Rnd 1: 6 sc in MR. [6]
- Rnd 2: inc ×6. [12]
- Rnd 3: (sc, inc) ×6. [18]
- Rnd 4: (sc, inc, sc) ×6. [24]
- Rnd 5: (3 sc, inc) ×6. [30]
- Rnd 6: (2 sc, inc, 2 sc) ×6. [36]
- Rnd 7: sc around. [36]
- Rnd 8: (5 sc, inc) ×6. [42]
- Rnd 9–12: sc around. [42]
- Rnd 13: 12 sc, (sc, inc) ×3, 6 sc, (inc, sc) ×3, 12 sc. [48]
- Rnd 14–17: sc around. [48]
- Rnd 18: 12 sc, (sc, dec) ×3, 6 sc, (dec, sc) ×3, 12 sc. [42]
- Rnd 19: sc around. [42]
- Rnd 20: (5 sc, dec) ×6. [36]
- Rnd 21: (2 sc, dec, 2 sc) ×6. [30]
- Rnd 22: (3 sc, dec) ×6. [24]
Stuff the head firmly.
FO, leaving a long tail for sewing.
Arms — Make 2
Use pink yarn.
- Rnd 1: 6 sc in MR. [6]
- Rnd 2: (sc, inc) ×3. [9]
- Rnd 3: (sc, inc, sc) ×3. [12]
- Rnd 4–6: sc around. [12]
- Rnd 7: (sc, dec, sc) ×3. [9]
- Rnd 8: sc around. [9]
Lightly stuff the bottom of the arms if needed.
FO, leaving a long tail for sewing.
You can sew the arms to the sides of the body later, or crochet them directly into the body around Rnd 17, placing one arm on each side.
Legs — Make 2
Use pink yarn.
First Leg
- Rnd 1: 6 sc in MR. [6]
- Rnd 2: inc ×6. [12]
- Rnd 3: (3 sc, inc) ×3. [15]
- Rnd 4: sc around. [15]
FO the first leg.
Second Leg
- Repeat Rnd 1–4, but do not fasten off.
- Ch 2 and join to the first leg.
Body
Continue with pink yarn.
The stitches inside brackets are worked in white yarn for the belly.
- Rnd 5: 15 sc around the first leg, 2 sc across the chain, 15 sc around the second leg, 2 sc across the other side of the chain. [34]
- Rnd 6: 15 sc, inc ×2, 17 sc. [36]
- Rnd 7: (5 sc, inc) ×6. [42]
Start the white belly section.
- Rnd 8: 15 sc, [10 sc in white], 17 sc. [42]
- Rnd 9: 14 sc, [12 sc in white], 16 sc. [42]
- Rnd 10: 13 sc, [14 sc in white], 15 sc. [42]
- Rnd 11–13: 13 sc, [14 sc in white], 15 sc. [42]
- Rnd 14: 3 sc, dec, 5 sc, dec, 1 sc, [4 sc, dec, 5 sc, dec, 1 sc in white], 4 sc, dec, 5 sc, dec, 2 sc. [36]
- Rnd 15: 11 sc, [12 sc in white], 13 sc. [36]
- Rnd 16: 2 sc, dec, 4 sc, dec, 1 sc, [3 sc, dec, 4 sc, dec, 1 sc in white], 3 sc, dec, 4 sc, dec, 2 sc. [30]
- Rnd 17: 9 sc, [10 sc in white], 11 sc. [30]
- Rnd 18: 1 sc, dec, 3 sc, dec, 1 sc, [2 sc, dec, 3 sc, dec, 1 sc in white], 2 sc, dec, 3 sc, dec, 2 sc. [24]
Stuff the body firmly.
FO, leaving a long tail for sewing the body to the head.
Ears — Make 2
Each ear has one white inner ear and one pink outer ear.
White Inner Ear — Make 2
Use white yarn.
- Rnd 1: 6 sc in MR. [6]
FO. Do not join with sl st.
Pink Outer Ear — Make 2
Use pink yarn.
- Rnd 1: 6 sc in MR. [6]
Do not join. Ch 1 and turn. - Row 2: (sc, inc) ×3. [9]
FO, leaving a long tail for sewing.
Place the white inner ear on top of the pink outer ear. Sew or glue them together.
For a baby-safe version, sew the pieces together instead of using glue.
Sew the ears to both sides of the head, around Rnd 3–5.
Eyebrows — Make 2
Use dark brown yarn.
- Ch 4.
- Starting in the 2nd ch from hook, make 3 sc.
FO, leaving a tail for sewing.
Sew one eyebrow above each eye.
White Muzzle / Face Patch
Use white yarn.
More Free Amigurumi Patterns You’ll Love
")


")
Work around the chain.
- Rnd 1: Ch 12. Starting in the 2nd ch from hook: 10 sc, 3 sc in the last ch, 9 sc on the other side of the chain, inc in the last stitch. [24]
- Rnd 2: inc, 9 sc, inc ×3, 9 sc, inc ×2. [30]
- Rnd 3: 2 sc, 9 hdc, 6 sc, 9 hdc, 4 sc. [30]
FO, leaving a long tail for sewing.
Sew or glue the muzzle to the front of the head, below the eyes, around Rnd 12.
For the neatest result, pin the muzzle first, check the face shape, then sew it slowly around the edge.
Eyes
Insert the safety eyes between Rnd 11 and Rnd 12 of the head.
Leave about 2 sc spaces between the eyes.
Optional: before attaching the safety eyes, insert each eye through a small piece of white felt, then trim the felt into a small circle to create the white eye detail.
For a baby-safe Strawberry Bear Baby, embroider the eyes instead of using safety eyes or felt.
Nose and Mouth
- Use dark brown yarn or embroidery thread.
- Embroider a small oval or triangle nose in the center of the white muzzle.
- Add a short vertical line under the nose, then a small curved mouth.
- Take your time with the face embroidery. Small changes in the nose, mouth, and eyebrows can completely change the expression of your bear.
Tail
Use pink yarn.
- Rnd 1: 6 sc in MR. [6]
- Rnd 2: (sc, inc) ×3. [9]
- Rnd 3: sc around. [9]
FO, leaving a tail for sewing.
Sew or glue the tail to the back of the body.
For a stronger finish, sewing is better than glue, especially if the bear will be handled often.

Assembly
- Sew the head to the body.
- Sew the arms to both sides of the body.
- Sew the ears to both sides of the head.
- Attach the white muzzle under the eyes.
- Add the safety eyes with optional white felt eye details, or embroider the eyes for a baby-safe version.
- Sew the eyebrows above the eyes.
- Embroider the nose and mouth.
- Sew the tail to the back of the body.
- Shape the bear gently with your fingers so the belly and muzzle sit nicely.
Your Strawberry Bear Baby Crochet Pattern is finished.
Helpful Tips for a Cleaner Strawberry Bear Baby
Keep the belly centered
When changing to white yarn for the belly, make sure the white section stays centered on the front of the body. If your stitch marker shifts slightly, do not worry. You can adjust the position when sewing the head to the body.
Use pins before sewing
Pin the muzzle, ears, arms, and head before sewing. This helps you check the face position and body balance before making anything permanent.
Choose the right hook size
For amigurumi, use a hook that creates tight stitches so the stuffing does not show. If your stitches look loose, go down half a hook size.
Make it more strawberry-themed
You can add tiny embroidered white seed stitches on the pink body or head to make the bear look even more like a strawberry baby. Keep the stitches small and evenly spaced.
If you love fruity amigurumi designs, you may also enjoy the strawberry crochet pattern as a matching mini project.
Color Variation Ideas
You can make this Strawberry Bear Baby in many cute colors:
- Strawberry red with white belly
- Soft pastel pink with cream muzzle
- Raspberry pink with light blush belly
- Peach-pink with white face details
- Brown bear version with strawberry-red belly
For a cute animal collection, display it beside other small handmade characters like the little zodiac sheep crochet pattern or the zodiac cow crochet pattern.
Can I Turn This Into a Keychain?
Yes, you can turn this Strawberry Bear Baby into a keychain if you use thinner yarn and a small hook.
To make it a keychain:
- Use cotton yarn instead of plush yarn.
- Keep stuffing firm but not bulky.
- Sew all pieces very securely.
- Add a keychain ring to the top of the head.
- Reinforce the ring attachment with several stitches.
For more charm-style inspiration, you can look at the mini taiyaki fish crochet charm pattern.
Frequently Asked Questions
Is this Strawberry Bear Baby Crochet Pattern beginner-friendly?
Yes, this pattern is beginner-friendly if you already know the basic amigurumi stitches. The body has a color-change belly, so it is a little more detailed than a very basic bear, but the shaping is simple and clear.
Can I make this bear without safety eyes?
Yes. For a baby-safe version, embroider the eyes with black or dark brown yarn. This is the best option if the bear is intended for a baby or toddler.
What yarn is best for this Strawberry Bear Baby?
Cotton or milk cotton yarn works well if you want clear stitch definition. Plush yarn can also be used for a softer bear, but the finished toy will be bigger.
Can I use glue for the muzzle, ears, and tail?
You can use glue if the bear is only for decoration, but sewing is stronger and safer. For baby items, avoid glue and sew all parts securely.
Why does the body start at Rnd 5?
The legs are Rnds 1–4. After joining the two legs with a chain, the body continues from Rnd 5.
Can I add strawberry seeds to the bear?
Yes. You can embroider small white seed stitches on the pink parts of the head or body. Keep them tiny so they do not overpower the baby bear face.
This Strawberry Bear Baby Crochet Pattern is a sweet little project for anyone who loves soft, fruity, baby-style amigurumi. The rounded head, white belly, tiny ears, and gentle embroidered face make it a charming handmade bear with lots of personality.
You can keep it simple in pink and white, or add strawberry seed details for an even cuter fruit-inspired look. Whether you make it as a small gift, a display toy, or part of a handmade bear collection, this Strawberry Bear Baby is a lovely project to crochet and personalize.