


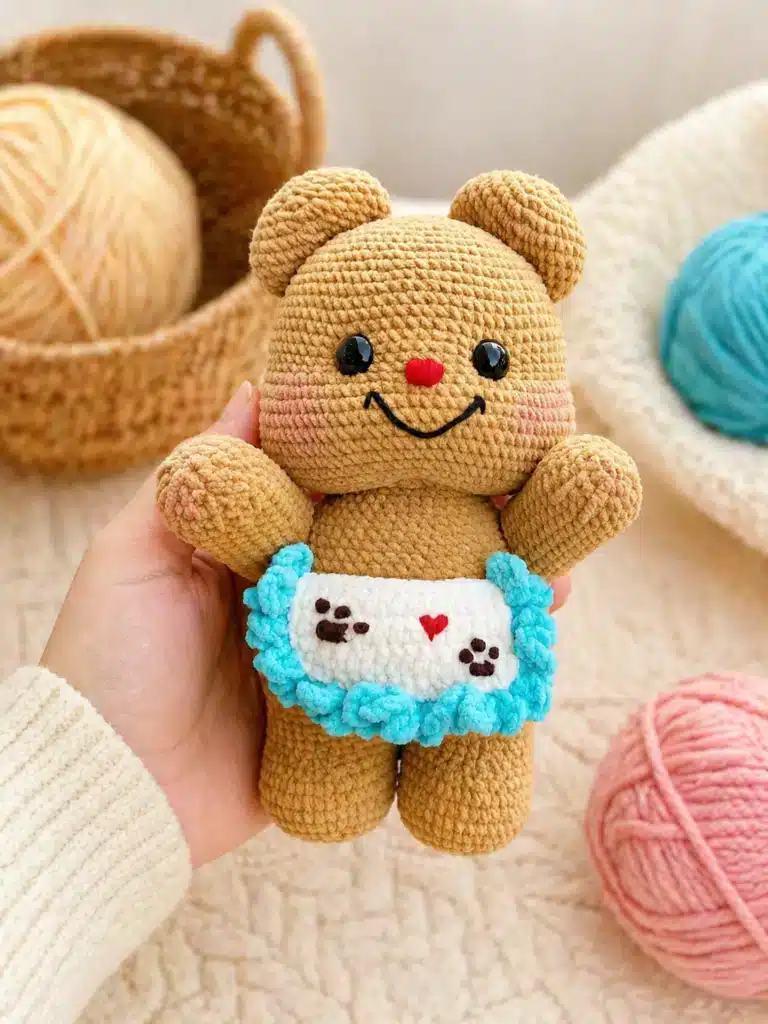
This Mini Butter Bear Crochet Pattern is a soft, cuddly amigurumi bear with a warm caramel-butter body, big safety eyes, rounded ears, tiny paws, and the sweetest little apron. The apron detail makes this bear feel like a tiny kitchen helper, a handmade gift, or a cute nursery decoration.
I love this project because it has the charm of a classic teddy bear but with extra personality. The aqua blue ruffle, white apron, red nose, and little heart detail make the finished bear look playful and cozy.
If you enjoy small animal amigurumi projects, you may also love my Mini Cow Amigurumi Pattern or the sweet Brown Calf Crochet Pattern for another soft farmhouse-style crochet friend.
This pattern is written in US crochet terms and worked mostly in continuous rounds.
Jump to section
About This Mini Butter Bear Crochet Pattern
This mini butter bear crochet pattern uses plush or chenille yarn, so the finished bear becomes soft, rounded, and huggable. The main pieces are the legs and body, head, arms, ears, tail, and apron.
The body is made by crocheting two separate legs first, then joining them together to continue upward. The head is made separately and sewn to the body. The apron is worked flat in rows, then decorated with a blue shell-style ruffle edging.
If you are still building your amigurumi confidence, this bear is a lovely next project after simpler small toys like my Mini Bear Crochet Keychain Pattern. For official yarn and hook sizing references, you can also check the Craft Yarn Council yarn standards.
Skill Level
Intermediate beginner
You should already know how to make a magic ring, single crochet, increase, decrease, and sew amigurumi parts together. The apron ruffle uses double crochet, but the edging is simple and repetitive.
Finished Size
The final size depends on your yarn, hook, and tension. With plush or chenille yarn and a 2.0 mm hook, your bear will have a soft mini amigurumi size. If you use thicker plush yarn, the bear will become larger.
Materials
- 2.0 mm crochet hook
- 20 mm safety eyes
- Plush or chenille yarn
- Main bear color: caramel or butter brown
- White yarn for apron
- Aqua blue yarn for apron ruffle and straps
- Small red yarn for nose and heart
- Small black yarn for mouth and paw details
- Fiberfill stuffing
- Yarn needle
- Stitch marker
- Scissors
For another cute character with soft shaping and a playful outfit feeling, you can also visit my Sitting Tiger in Bunny Hood Crochet Pattern.
Abbreviations — US Terms
- MR = magic ring
- sc = single crochet
- inc = increase, 2 sc in the same stitch
- dec = decrease
- ch = chain
- sl st = slip stitch
- dc = double crochet
- FO = fasten off
Pattern Notes
- Work in continuous rounds unless the pattern says otherwise. Use a stitch marker to mark the first stitch of each round.
- Stuff the body and head firmly, especially when working with plush yarn. Plush yarn can hide stitches easily, so count each round carefully.
- The 20 mm safety eyes should be added before the head opening becomes too small. You can test the position first, then secure them when you are happy with the expression.
- If you enjoy cute dolls with character-style details, the Kuromi-Inspired Amigurumi Crochet Pattern is another fun project with decorative facial features.
Mini Butter Bear Crochet Pattern
Legs and Body
Leg 1
Use caramel or butter brown yarn.
- Rnd 1: 8 sc in MR. [8]
- Rnd 2: inc ×8. [16]
- Rnd 3: (sc, inc) ×8. [24]
- Rnd 4: (sc, inc, sc) ×8. [32]
- Rnd 5: (3 sc, inc) ×8. [40]
- Rnd 6–9: 40 sc. [40]
- Rnd 10: sc, dec, 11 sc, (sc, dec) ×4, 12 sc, dec. [34]
- Rnd 11: 13 sc, dec ×4, 13 sc. [30]
- Rnd 12–15: 30 sc. [30]
FO.
Leg 2
- Repeat Rnd 1–15, but do not fasten off if you want to continue directly into the body join.
Join Legs and Body
- Rnd 16: Join the two legs together. Start from the 8th stitch of one leg, then connect to the 24th stitch of the second leg. Crochet around both legs: 30 sc around one leg + 30 sc around the other leg. [60]
- Rnd 17: (9 sc, inc) ×6. [66]
- Rnd 18: (5 sc, inc, 5 sc) ×6. [72]
- Rnd 19: 2 inc, 15 sc, 2 inc, 16 sc, 4 inc, 15 sc, 2 inc, 14 sc, 2 inc. [84]
- Rnd 20–25: 84 sc. [84]
- Rnd 26: (6 sc, dec, 6 sc) ×6. [78]
- Rnd 27: 78 sc. [78]
- Rnd 28: (11 sc, dec) ×6. [72]
- Rnd 29: 72 sc. [72]
- Rnd 30: (5 sc, dec, 5 sc) ×6. [66]
- Rnd 31: (9 sc, dec) ×6. [60]
- Rnd 32: (4 sc, dec, 4 sc) ×6. [54]
- Rnd 33: (7 sc, dec) ×6. [48]
- Rnd 34: (3 sc, dec, 3 sc) ×6. [42]
- Rnd 35: (5 sc, dec) ×6. [36]
Stuff the body firmly. Leave the opening for sewing the head.
If the leg join feels a little confusing, take your time to align both feet before continuing. This helps the bear sit evenly. You may also find my guide on attaching amigurumi limbs evenly useful when assembling the arms later.
Head
Use caramel or butter brown yarn.
- Rnd 1: 8 sc in MR. [8]
- Rnd 2: inc ×8. [16]
- Rnd 3: (sc, inc) ×8. [24]
- Rnd 4: (sc, inc, sc) ×8. [32]
- Rnd 5: (3 sc, inc) ×8. [40]
- Rnd 6: (2 sc, inc, 2 sc) ×8. [48]
- Rnd 7: (5 sc, inc) ×8. [56]
- Rnd 8: (3 sc, inc, 3 sc) ×8. [64]
- Rnd 9: 64 sc. [64]
- Rnd 10: (7 sc, inc) ×8. [72]
- Rnd 11: 72 sc. [72]
- Rnd 12: (4 sc, inc, 4 sc) ×8. [80]
- Rnd 13–19: 80 sc. [80]
- Rnd 20: (4 sc, dec, 4 sc) ×8. [72]
- Rnd 21: 72 sc. [72]
- Rnd 22: 20 sc, inc ×12, 8 sc, inc ×12, 20 sc. [96]
- Rnd 23–30: 96 sc. [96]
- Rnd 31: 20 sc, dec ×12, 8 sc, dec ×12, 20 sc. [72]
- Rnd 32: (7 sc, dec) ×8. [64]
- Rnd 33: (3 sc, dec, 3 sc) ×8. [56]
- Rnd 34: (5 sc, dec) ×8. [48]
- Rnd 35: (3 sc, dec, 3 sc) ×6. [42]
- Rnd 36: (5 sc, dec) ×6. [36]
Stuff the head firmly. Leave a long tail for sewing.
Add the 20 mm safety eyes before the opening becomes too small. Place them evenly on the front of the face, then secure the washers when you are satisfied with the look.
Embroider the red nose and black smile after stuffing. A tiny red nose gives this mini butter bear crochet pattern its sweet handmade expression.
For beginners who want to practice reading rounds and shaping before starting bigger plush toys, my guide on how to read an amigurumi pattern can help make the instructions easier to follow.
Arms ×2
Use caramel or butter brown yarn.
- Rnd 1: 8 sc in MR. [8]
- Rnd 2: inc ×8. [16]
- Rnd 3: (sc, inc) ×8. [24]
- Rnd 4–17: 24 sc. [24]
- Rnd 18: (sc, dec, sc) ×6. [18]
Stuff lightly. FO and leave a long tail for sewing.
Do not overstuff the arms. A soft, slightly flat arm usually sits better against the body.
Ears ×2
Use caramel or butter brown yarn.
- Rnd 1: 8 sc in MR. [8]
- Rnd 2: inc ×8. [16]
- Rnd 3: (sc, inc) ×8. [24]
- Rnd 4: (sc, inc, sc) ×8. [32]
- Rnd 5: (3 sc, inc) ×8. [40]
- Rnd 6–9: 40 sc. [40]
- Rnd 10: (3 sc, dec) ×8. [32]
Stuff lightly if needed. FO and leave a long tail for sewing.
Flatten the lower edge slightly before sewing. This gives the ears a cute rounded teddy-bear shape.
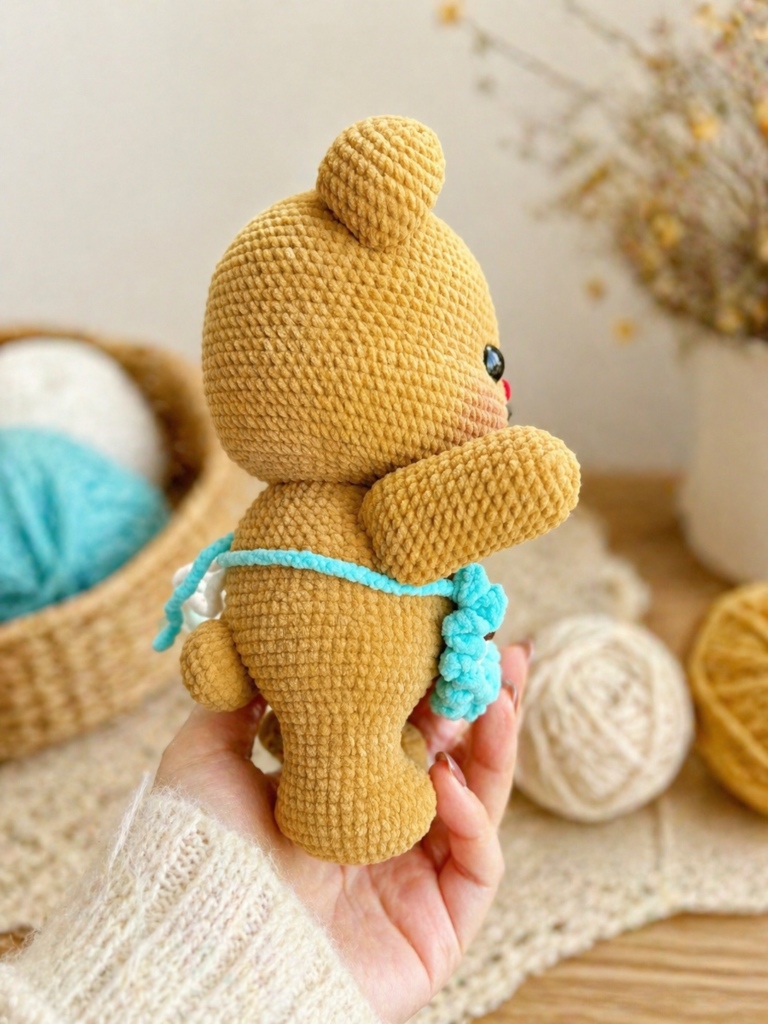
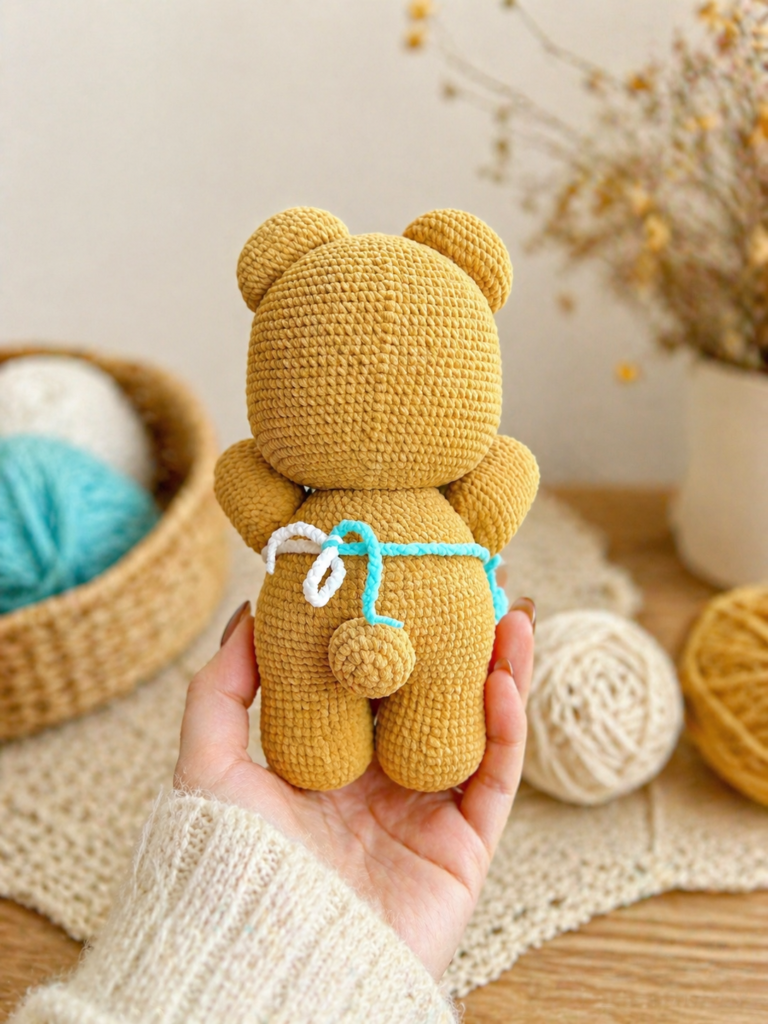
Tail
Use caramel or butter brown yarn.
- Rnd 1: 8 sc in MR. [8]
- Rnd 2: inc ×8. [16]
- Rnd 3: (sc, inc) ×8. [24]
- Rnd 4–6: 24 sc. [24]
- Rnd 7: (sc, dec) ×8. [16]
Stuff lightly. FO and leave a long tail for sewing.
Apron
Use white yarn.
- Row 1: Ch 16. Starting in the 2nd ch from hook, make 15 sc. [15]
- Row 2–7: Ch 1, turn, 15 sc. [15]
Now work around the other three sides of the apron with sc to create a neat border.
This apron is what makes the mini butter bear crochet pattern feel extra charming. You can leave it plain, add a little red heart, or embroider tiny black paw details.
If you like amigurumi projects with cute accessories, the Mini Bunny with Carrot Bag Crochet Pattern is another adorable pattern with a small wearable detail.
Blue Ruffle Edging
Join aqua blue yarn to one side of the apron.
Repeat around the three outer sides:
Ch 3, 3 dc, sl st in the next stitch.
Continue this shell-style edging around the apron sides and bottom.
At both top corners of the apron, chain enough stitches to create waist ties. Make the chains as long as needed to tie around the bear.
You can also sew the apron permanently to the body if the bear is made for display or for a child who may untie the straps easily.
Assembly
- Sew the head to the body, matching the 36-stitch openings.
- Sew the ears to the top sides of the head.
- Sew the arms to the sides of the body.
- Sew the tail to the back of the body.
- Tie or sew the apron around the waist.
- Embroider the red nose.
- Embroider the black smiling mouth.
- Add a red heart on the apron.
- Add small black paw details on the apron if desired.
Before sewing everything permanently, pin the ears, arms, and apron in place. This helps you check the symmetry and makes the finished bear look balanced.
For a family-style collection of soft characters, you can pair this bear with the Three Bare Bears Crochet Pattern and make a cozy handmade bear shelf.
More Free Amigurumi Patterns You’ll Love
")


Finishing Tips
- Use a yarn needle and matching yarn tails for invisible sewing. Plush yarn can be bulky, so sew slowly and shape the pieces with your hands as you go.
- When sewing the head to the body, add extra stuffing inside the neck area before closing completely. This helps the head stay upright.
- For the apron, do not make the waist chains too short. It is better to make them slightly longer, tie the apron, then trim and weave in the ends if needed.
- If you want a softer baby-style bear, skip the paw embroidery and keep the apron simple. If you want a more playful kitchen-bear look, add the red heart and tiny black paw marks.
Customization Ideas
You can easily customize this mini butter bear crochet pattern with different colors:
- Use cream yarn for a vanilla bear.
- Use chocolate brown yarn for a cocoa bear.
- Use pastel pink or lavender for a sweeter kawaii version.
- Change the apron ruffle to yellow, mint, red, or pink.
- Add a tiny bow near one ear.
- Embroider initials on the apron for a personalized gift.
You can also make a small animal set by crocheting this bear beside the Mini Milk Dragon Crochet Pattern, especially if you enjoy soft fantasy-style amigurumi.
FAQ
Is this mini butter bear crochet pattern beginner-friendly?
This pattern is best for intermediate beginners. The stitches are simple, but the plush yarn, large stitch counts, and sewing steps require patience.
Can I use cotton yarn instead of plush yarn?
Yes. Cotton yarn will create a smaller and firmer bear. The stitches will be easier to see, but the final toy will not be as fluffy as the chenille version.
What size safety eyes should I use?
This pattern uses 20 mm safety eyes. If your yarn is thinner, you may need smaller eyes so the face stays proportional.
Can I make the apron removable?
Yes. Make the blue waist chains long enough to tie around the body. This lets you remove the apron whenever you want.
Can I sell finished bears made from this pattern?
Yes, handmade finished items can usually be sold in small quantities. Add your own photos and credit the pattern source when possible.
This Mini Butter Bear Crochet Pattern is a sweet plush amigurumi project with a soft teddy-bear body, big eyes, a rounded head, tiny tail, and a charming apron. The simple shape makes it cute and cuddly, while the blue ruffle and red heart give it a special handmade personality.
It is a lovely project for gifts, nursery shelves, craft fairs, or your own amigurumi collection. Once you make one butter bear, you may want to make a whole family in different apron colors.