
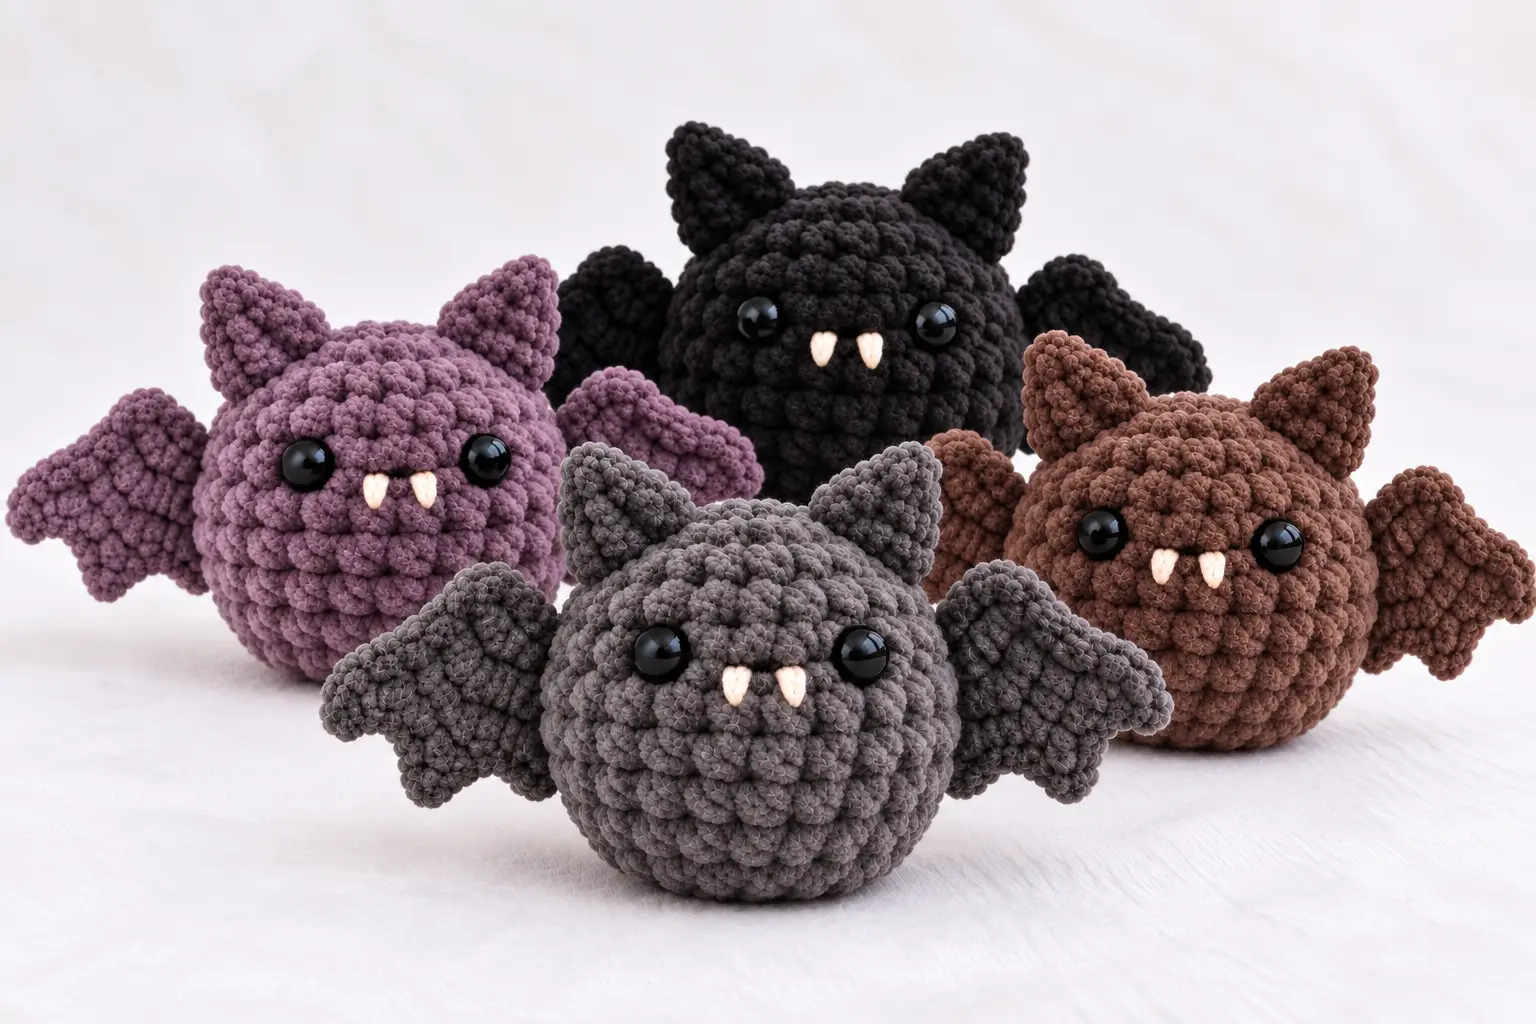
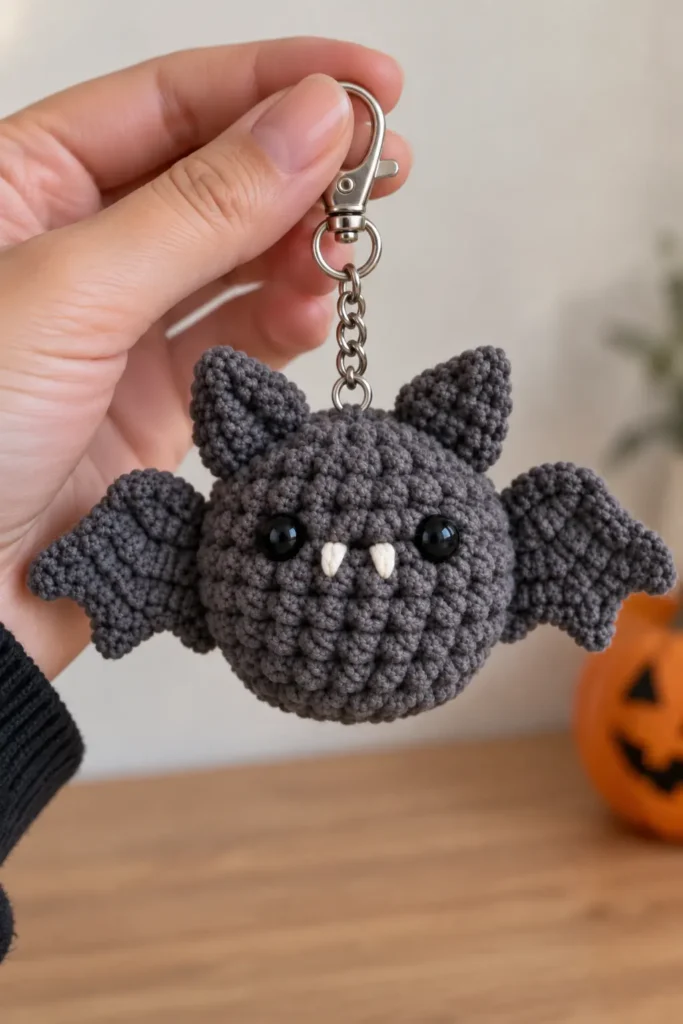
Looking for a quick Halloween project with almost no assembly? This No-Sew Mini Bat Crochet Pattern makes an adorable little bat with a round body, pointed ears, and tiny scalloped wings—all without sewing separate pieces together.
The body is worked in one simple spiral, while the ears and wings are crocheted directly onto it. You can keep your bat simple or add optional bobble-stitch feet, a tiny embroidered nose, or little white fangs.
At approximately 9–12 cm / 3.5–4.75 in tall, this chunky-yarn mini bat is a fun size for Halloween decorations, keychains, desk companions, treat-bag extras, or small handmade gifts.
If you love quick spooky projects, make this little bat alongside my Mini Mummy Crochet Pattern for an adorable Halloween pair.
Jump to section
About This No-Sew Mini Bat Crochet Pattern
One of my favorite things about this little bat is how little finishing it needs.
Instead of crocheting the wings and ears separately and sewing everything together later, both features are worked directly onto the finished body.
That means:
- No separate wings to sew on
- No separate ears to attach
- Only a few yarn ends to weave in
- Optional bobble feet can be made directly into the body
- Easy color customization
- A compact finished size perfect for mini amigurumi
The basic body uses only single crochet, increases, and invisible decreases. If invisible decreases are new to you, my invisible decrease crochet tutorial explains how to make them while keeping the shaping neat.
Finished Size
The finished size will depend on your chunky yarn, hook size, and tension. Using chunky yarn gives the bat a soft, plush look and makes it larger than a DK-yarn version.
Materials
You will need:
- Chunky yarn in your preferred bat color
- 4–6 mm crochet hook, or a size that gives you a tight amigurumi fabric
- 10–12 mm safety eyes
- Fiberfill stuffing
- Yarn needle
- Scissors
- Stitch marker
- Small amount of contrasting yarn for the optional nose or fangs
Dark gray, black, brown, deep purple, and muted orange all work beautifully for Halloween bats, but there is no reason to stick to traditional colors. Pink, lavender, cream, or pastel bats can be especially cute.
Yarn labels can vary between brands and countries, so the Craft Yarn Council’s Standard Yarn Weight System is a useful reference when comparing yarn categories.
For amigurumi, I normally choose a hook that creates a dense fabric with very small gaps so the stuffing does not show through. My yarn weight, gauge, and hook size guide can also help if you want to substitute yarn.
Safety note: Safety eyes are not recommended for babies or very young children. For a child-safe version, embroider the eyes instead.
Abbreviations – US Crochet Terms
- MR – magic ring
- ch – chain
- sc – single crochet
- hdc – half double crochet
- inc – increase
- dec – invisible decrease
- sl st – slip stitch
- bbl – bobble stitch
- FO – fasten off
This pattern is written in US crochet terminology.
If you usually follow UK patterns, you can check my US vs UK crochet terms conversion chart before starting.
Bobble Stitch
The optional feet use a 5-dc bobble stitch.
To make one bobble:
Yarn over, insert your hook into the stitch, yarn over and pull up a loop. Yarn over again and pull through 2 loops.
Repeat this process 5 times in the same stitch, leaving the final loop of each partial double crochet on your hook.
Yarn over and pull through all remaining loops.
Push the bobble toward the outside/front of the body.
No-Sew Mini Bat Crochet Pattern
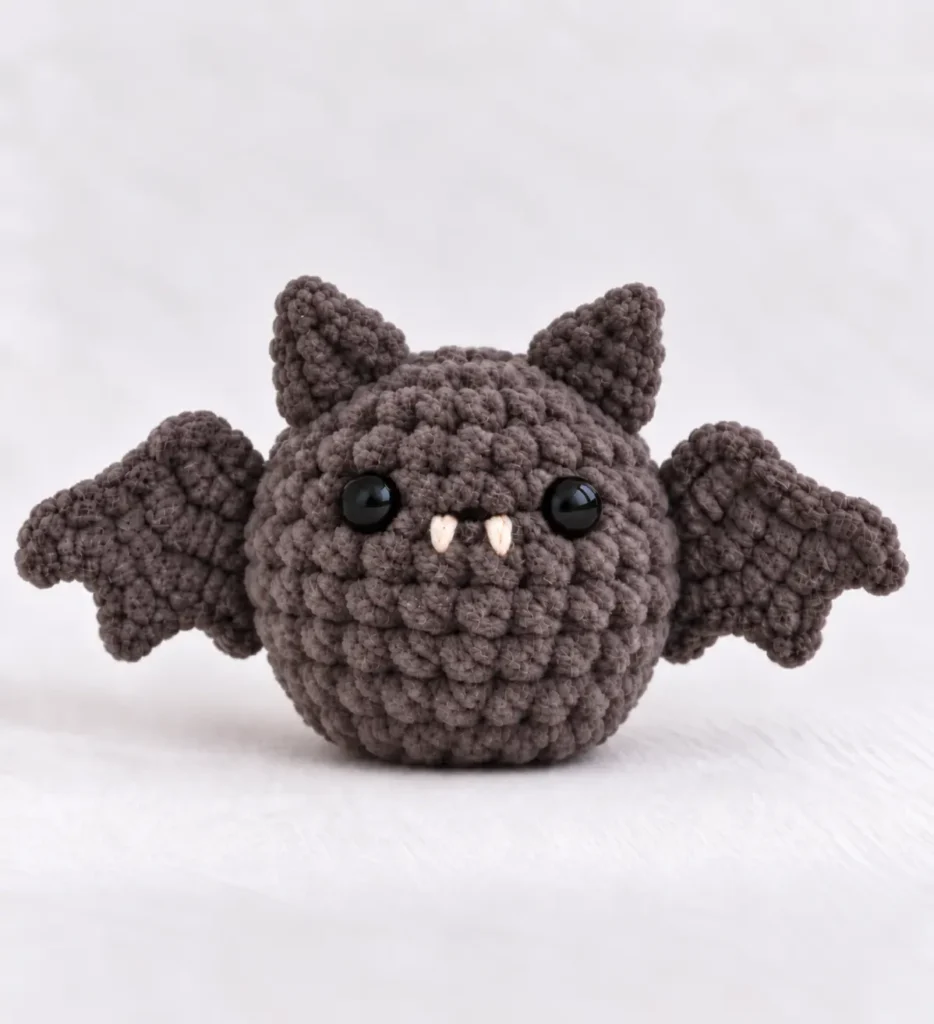
No-Sew Mini Bat Body
Work continuously in a spiral. Do not join at the end of each round unless instructed.
Place a stitch marker into the first stitch of every round and move it upward as you work.
Body Without Feet:
- R1: 6 sc in MR. (6)
- R2: inc × 6. (12)
- R3: (1 sc, inc) × 6. (18)
- R4: (2 sc, inc) × 6. (24)
- R5: sc around. (24)
- R6: sc around. (24)
- R7: sc around. (24)
- Insert the safety eyes between R5 and R6, leaving approximately 4 visible stitches between the eyes.
- Check the placement from the front before securing the washers.
- R8: sc around. (24)
- R9: sc around. (24)
- R10: sc around. (24)
- R11: dec × 12. (12)
- Stuff the body firmly, adding small amounts of fiberfill at a time.
- Shape the top and sides as you stuff rather than pushing one large piece of stuffing into the center.
- R12: dec × 6. (6)
- FO, leaving a short tail.
Thread the tail through the front loops of the remaining 6 stitches. Pull firmly to close the opening.
Secure the yarn and weave the end inside the body.
Your basic round mini bat body is complete.
Optional Bobble Feet
Want your bat to have two tiny feet instead of a completely smooth body? Add one extra round after R10:
- R11: 9 sc, bbl, 6 sc, bbl, 7 sc. (24)
- Push the bobbles toward the front.
- Then continue:
- R12: dec × 12. (12)
- Stuff the body.
- R13: dec × 6. (6)
- FO and close the opening.
If you enjoy this kind of construction, my No-Sew Long-Eared Dog Amigurumi Pattern is another fun project that reduces assembly by joining pieces while crocheting.
Crochet the Bat Ears Directly Onto the Body
Make 2 ears.
The ears are not separate pieces. They are crocheted directly onto the top of the bat.
Join yarn to R2, ch 3, sc in 2nd ch from hook, hdc in next ch, sl st into next body st. FO.
Position both ears so they tilt slightly outward.
The combination of the short chain and hdc naturally creates a small pointed bat-ear shape.
No-Sew Bat Wings – Make 2
Crochet the wings directly onto the body, starting around R6–R7.
Wing 1
Join yarn to the side of the body.
- Row 1: Ch 8, starting in 2nd ch from hook, 7 sc. Sl st into next body st.
- Row 2: Turn, skip sl st, 7 sc. Ch 2, sl st in 2nd ch from hook.
- Row 3: Turn, skip first wing st, 6 sc. Sl st into next body st.
- Row 4: Turn, skip sl st, 6 sc. Ch 2, sl st in 2nd ch from hook.
- Row 5: Turn, skip first wing st, 5 sc. Sl st into next body st.
- Row 6: Turn, skip sl st, 5 sc. Ch 2, sl st in 2nd ch from hook.
FO and weave in ends.
Second Wing
Repeat on the opposite side, beginning at the same height. Position it to mirror the first wing.
Wing shape: 7 sts → 6 sts → 5 sts, with 3 small pointed edges.
Optional Face Details
You can leave the bat with only safety eyes or add simple embroidered details.
More Free Amigurumi Patterns You’ll Love
Tiny Nose: Embroider a small horizontal or triangular nose between the eyes using pink, beige, gray, or black yarn.
Tiny Fangs: Use white yarn to make 1 tiny vertical stitch on each side below the mouth.
Keep the details small for a cute mini-bat look.
For another cute spooky character with simple facial details, try my Black Cat Crochet Pattern for Halloween.
How to Shape Your Mini Bat
Once everything is finished, gently shape the amigurumi with your hands.
Press the body slightly from the sides if you want a taller look, or gently flatten the top and bottom for a rounder bat.
Then:
- Pull the ears slightly outward.
- Flatten each wing between your fingers.
- Define the three wing points.
- Push the optional bobble feet toward the front.
- Adjust the stuffing around the eyes if necessary.
Avoid overstuffing the body. Too much fiberfill can stretch the stitches and make the little bat look overly round.
Color Ideas
Black is the classic choice, but this mini bat is a great pattern for experimenting with colors.
Try:
- Black body with pink nose
- Charcoal gray with black wings
- Purple with lavender details
- Orange with black facial features
- Cream with pale pink ears
- Brown with beige details
- Pastel pink with white fangs
You can even make several bats in different shades and turn them into a small Halloween collection.
A few bats grouped with a free crochet pumpkin would make an especially cute handmade Halloween display.
Turn the Mini Bat Into a Keychain
Because the finished bat is only around 7–9 cm tall, it also works well as a crochet charm or keychain.
Before closing the body completely, attach a sturdy yarn loop or keychain fitting near the center of the head.
Make sure the attachment passes through several stitches rather than only one loop.
A smaller hook and thinner DK yarn can produce an even tinier version.
More Free Halloween Crochet Patterns
Want to make a whole spooky amigurumi collection? Here are more free Halloween crochet patterns from TopAmigurumi:
- Mini Mummy Crochet Pattern – A cute no-sew mini mummy perfect for quick Halloween projects.
- Free Crochet Pumpkin Pattern – Make a classic little pumpkin for fall and Halloween decorating.
- Black Cat Crochet Pattern – An adorable black cat designed especially for Halloween.
- Free Crochet Ghost Pattern – Includes 4 cute ghost variations with different shapes and details.
- Mini Bear Pumpkin Toast Crochet Pattern – A fun mini bear combined with a pumpkin-toast Halloween theme.
- Crochet Pattern for Candy Corn – A colorful and beginner-friendly Halloween candy amigurumi.
- Pumpkin Witch Crochet Pattern – A cute combination of a pumpkin and little Halloween witch.
- Grim Reaper Crochet Pattern – Make a spooky-but-cute mini Grim Reaper with hood and robe.
Mix these patterns with your No-Sew Mini Bat Crochet Pattern to create Halloween baskets, handmade decorations, craft-market sets, party favors, or a complete spooky amigurumi collection.
Frequently Asked Questions
Is this mini bat really no-sew?
Yes. The ears and wings are crocheted directly onto the body, so no separate pieces need sewing.
Is this pattern beginner-friendly?
Yes. You mainly need basic amigurumi skills such as sc, inc, dec, and working in a magic ring.
Do I have to add the bobble feet?
No. The feet are completely optional.
What yarn should I use?
This pattern is designed for chunky yarn for a soft, plush finish.
Can I make the bat smaller?
Yes. Use thinner yarn and a smaller hook.
Can I embroider the eyes?
Yes. Embroidered eyes are a great alternative to safety eyes.
Why are my wings curling?
A little curling is normal. Gently shape and flatten the wings with your fingers after finishing.
Can I use different colors?
Absolutely. Black, gray, purple, orange, pink, and cream all work well.
🎃༄˖°.🍂Happy Fall & Halloween Crocheting!.ೃ࿔*:・🎃 ̟
This No-Sew Mini Bat Crochet Pattern is a small project with lots of character but very little assembly.
The simple round body keeps the main construction beginner-friendly, while the directly crocheted ears and tapered wings add enough detail to make the finished amigurumi instantly recognizable as a tiny bat.
Keep yours simple with large eyes and plain wings, add bobble feet for an extra-cute version, or embroider tiny fangs for a miniature Halloween vampire.
It is also easy to customize the size, yarn, color, and face, so once you’ve made one, you may find yourself making an entire colony of tiny crochet bats.
