
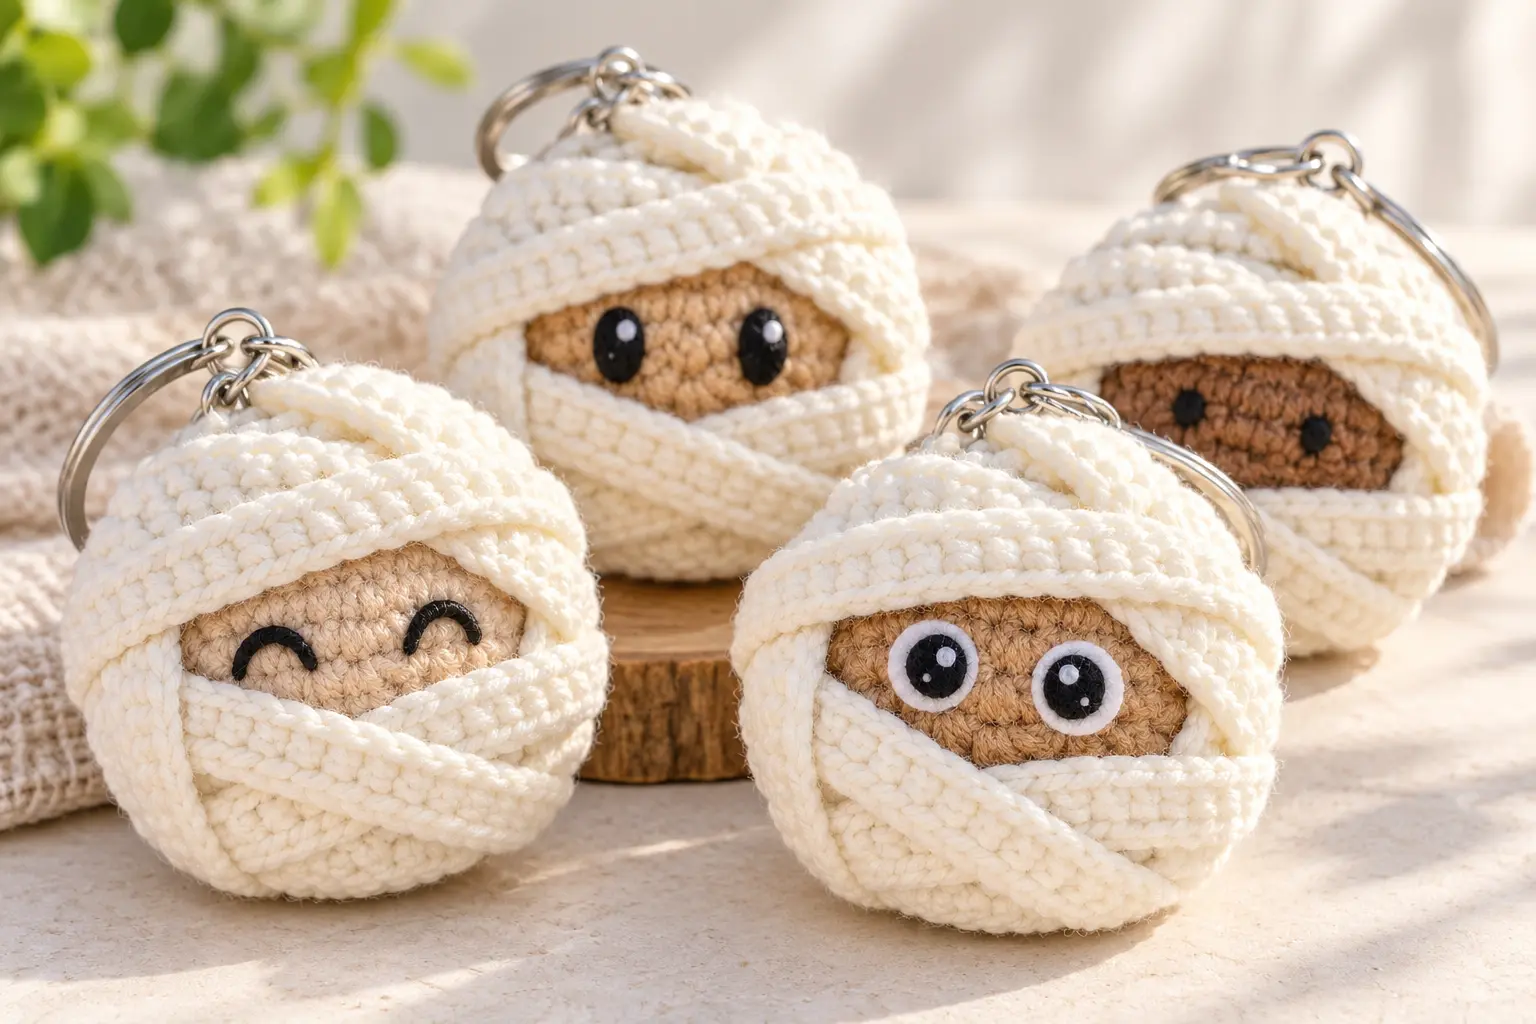
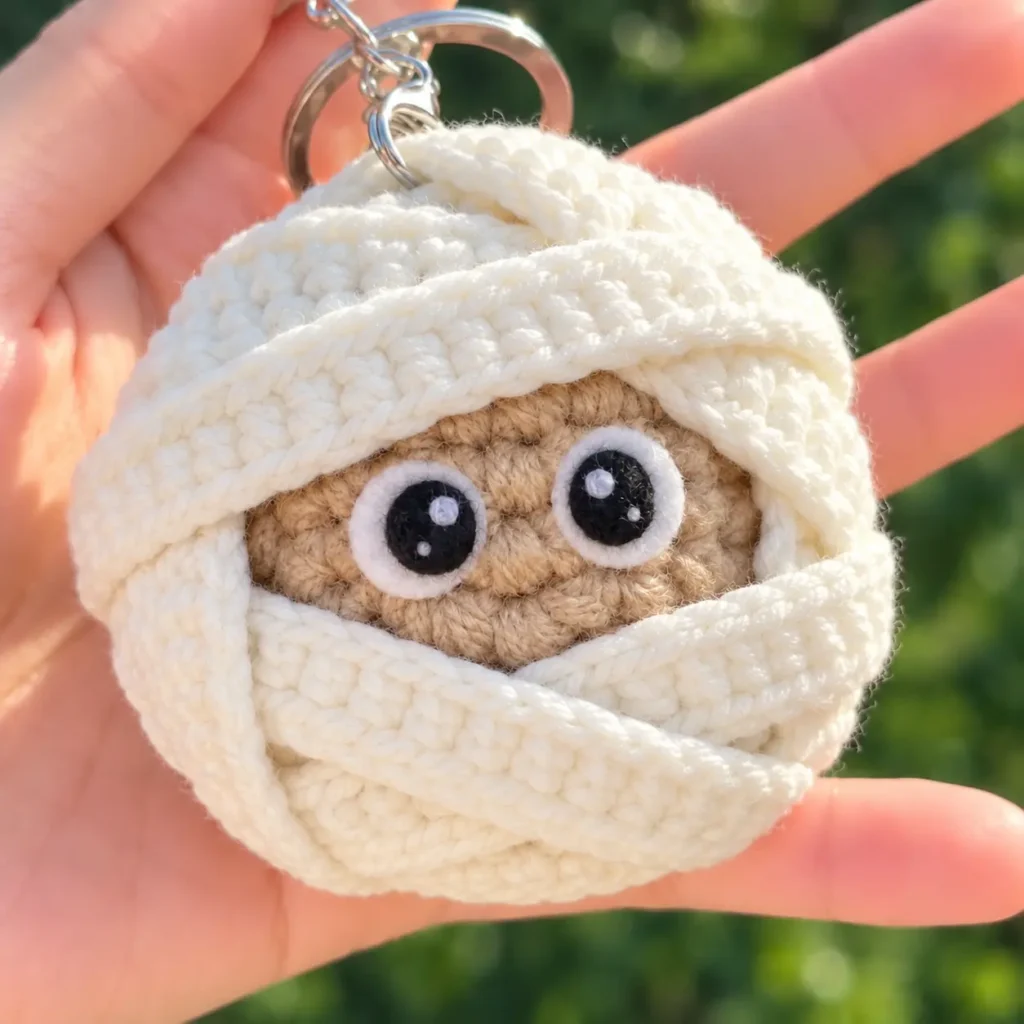
Looking for a tiny Halloween crochet project you can finish quickly? This Mini Mummy Crochet Pattern makes an adorable round mummy with a skin-tone body, layered cream bandages, big expressive eyes, and an optional keychain loop.
The mummy body is crocheted in one piece, so there are no separate arms, legs, or head pieces to sew together. Only a few simple finishing stitches are needed to attach the eyes and secure the mummy bandage.
At about 7–8 cm / 2.75–3.25 in wide, this little mummy is perfect for Halloween keychains, bag charms, party favors, small handmade gifts, or spooky desk decorations.
The pattern uses simple amigurumi shaping, making it a fun project for beginners who already know how to single crochet, increase, and decrease.
If you are still learning the basics, my first amigurumi step-by-step guide covers the essential techniques used in small crochet toys.
Jump to section
About This Mini Mummy Crochet Pattern
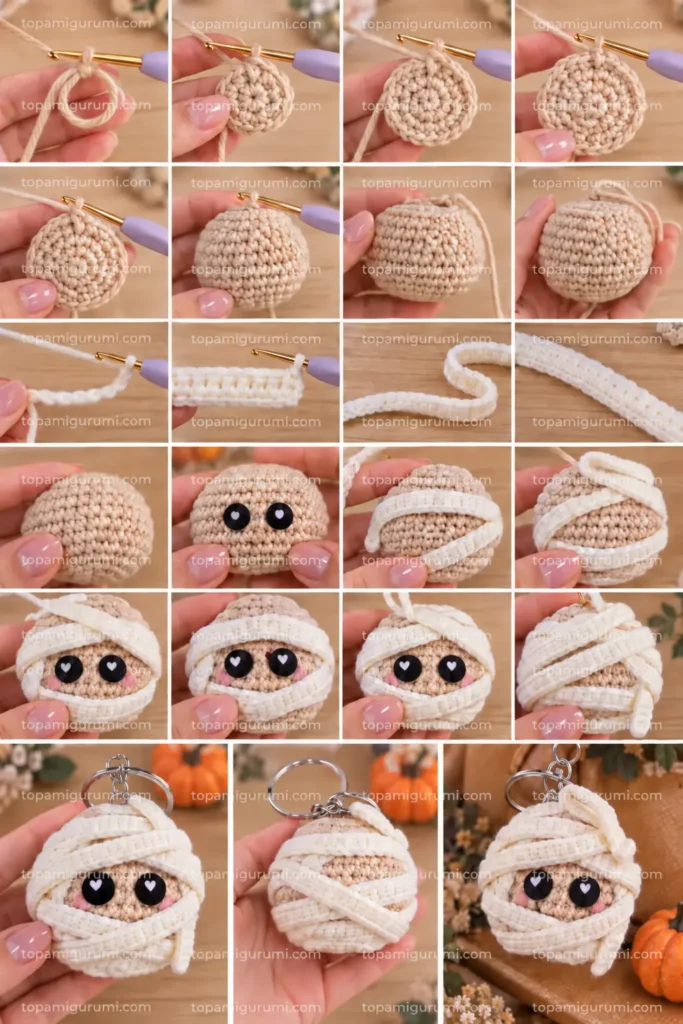
This mini mummy starts with a simple round amigurumi body worked entirely in continuous spiral rounds.
Instead of crocheting complicated mummy details into the body, you make one long cream bandage strip and wrap it around the finished ball.
The slightly uneven, overlapping wraps create the mummy effect.
You can also change the position of the pupils, cheeks, and bandages to give every mummy a different personality.
Skill level: Beginner to easy intermediate
Crochet terms: US terminology
Construction: Continuous spiral rounds
Finished size: Approximately 7–8 cm / 2.75–3.25 in wide
Hook size: 2.5 mm
Yarn weight: #3 DK / light worsted
Assembly: Minimal sewing
Materials
- #3 DK/light worsted cotton or cotton-acrylic yarn
- Skin-tone or light beige yarn for the body
- Ivory or cream yarn for the bandages
- Small amount of white yarn or white felt for the eyes
- Small amount of black yarn or black felt for the pupils
- Small amount of pink yarn for optional cheeks
- 2.5 mm crochet hook
- Fiberfill
- Yarn needle
- Stitch marker
- Scissors
- Metal keyring or lobster clasp
A smooth cotton or cotton-acrylic yarn works especially well because it gives good stitch definition and helps the mummy keep its rounded shape.
If you want to use a different yarn thickness, see my yarn weight, gauge, and crochet hook size guide before choosing your hook.
Abbreviations
This pattern uses US crochet terminology.
- MR = magic ring
- ch = chain
- sc = single crochet
- inc = increase — 2 sc in the same stitch
- dec = invisible decrease
- hdc = half double crochet
- sl st = slip stitch
- st = stitch
- FO = fasten off
- Rnd = round
If crochet abbreviations are still new to you, my guide to reading an amigurumi pattern explains how rounds, stitch counts, repeats, and abbreviations work.
You can also check the Craft Yarn Council crochet abbreviations for a reliable reference to standard US crochet terminology.
Pattern Notes
- Work the body in continuous spiral rounds unless otherwise stated.
- Place a stitch marker in the first stitch of every round and move it upward as you crochet.
- The body starts with a magic ring. If you have trouble getting a neat center, my magic ring vs. chain circle guide explains both methods.
- Stuff the mummy gradually. Adding several small pieces of fiberfill usually produces a smoother shape than pushing in one large piece at the end.
- Use invisible decreases for the closing rounds whenever possible. You can see the technique in my invisible decrease crochet tutorial.
- The bandage length does not have to be exact. Different yarns and crochet tensions create slightly different lengths, so measuring the finished strip is more reliable than using a fixed chain count.
Mini Mummy Crochet Pattern
Mini Mummy Body
Use skin-tone or light beige yarn.
- Rnd 1: 6 sc in MR. [6]
- Rnd 2: inc ×6. [12]
- Rnd 3: (sc, inc) ×6. [18]
- Rnd 4: (sc, inc, sc) ×6. [24]
- Rnd 5: (3 sc, inc) ×6. [30]
- Rnd 6: sc around. [30]
- Rnd 7: sc around. [30]
- Rnd 8: sc around. [30]
- The piece should now look like a shallow rounded bowl.
- Rnd 9: (3 sc, dec) ×6. [24]
- Rnd 10: (sc, dec, sc) ×6. [18]
- Begin stuffing firmly but evenly.
- Push small pieces of fiberfill toward the sides so the surface remains smooth.
- Do not overstuff. Too much stuffing can stretch the stitches and make the fiberfill visible.
- Rnd 11: (sc, dec) ×6. [12]
- Add a little more stuffing if needed.
- Shape the body gently with your fingers.
- Rnd 12: dec ×6. [6]
- FO, leaving a yarn tail.
Thread the yarn tail through the front loops of the remaining 6 stitches.
Pull tightly to close the opening.
Secure the yarn and hide the end inside the body.
The finished body should form a small round ball.
Crochet Mummy Eyes
The large eyes give this mini mummy its cute personality.
You can crochet the eye whites or cut them from white felt if you prefer a flatter finish.
Eye Whites — Make 2
- Use white yarn.
- Rnd 1: 6 sc in MR. [6]
- Sl st into the first stitch.
- FO, leaving a tail for sewing.
- Flatten each circle gently before attaching it.
Pupils
- Make or cut 2 smaller black circles.
- Attach one pupil to each white eye.
For a cute expression, position the pupils slightly toward one side rather than placing them perfectly in the center.
You can also embroider a tiny white stitch on each black pupil to create a simple eye highlight.
Position both eyes on the front of the mummy.
Sew them securely in place before adding the bandages.
This makes it much easier to decide where the opening between the bandage strips should be.
Optional Pink Cheeks
Use soft pink yarn.
Embroider 2–3 short horizontal stitches slightly below and outside each eye.
Keep the cheek stitches small and subtle.
The cheeks are optional, so leave them out if you want a more traditional mummy.
Crochet Mummy Bandage
Use ivory or cream yarn.
Make a chain approximately:
50–60 cm / 20–24 in long
The strip should be long enough to wrap around the mummy several times.
- Starting in the 3rd chain from the hook:
- 1 hdc in the back bump of each chain across.
- FO, leaving a long yarn tail.
You should now have one long, narrow crochet strip.
Working into the back bumps of the chains creates a clean lower edge, but you can work into the chains normally if you find the back bumps difficult.
How to Wrap the Mummy Bandage
- Place one end of the bandage near the lower side or back of the mummy.
- Secure it with a few small stitches.
- Begin wrapping the bandage around the body.
- Do not make every wrap perfectly horizontal.
- Change the angle slightly as you work.
- Let some sections overlap.
- Cross a few strips diagonally.
- Leave occasional small spaces where the skin-tone body remains visible.
- Most importantly, keep a clear opening around both eyes.
- You can let a small section pass slightly above, below, or between the eyes, but avoid covering them completely.
- Once you are happy with the arrangement, use ivory yarn and a yarn needle to tack the bandage to the body at several hidden points.
- You do not need to sew down every edge.
- Leaving a few sections slightly raised makes the bandages look more layered and natural.
Keychain Loop
You can leave your mummy as a mini amigurumi or turn it into a Halloween keychain.
- Use ivory or skin-tone yarn.
- Join the yarn securely at the top of the mummy.
- ch 8.
- Sl st back into the same attachment point to form a loop.
- FO.
Use the yarn tails to reinforce the base of the loop several times.
Hide the ends inside the body.
More Free Amigurumi Patterns You’ll Love
Attach the metal keyring or lobster clasp through the crochet loop.
If you enjoy small crochet charms, you might also like my cherry keychain crochet pattern.
Final Assembly
- Check the mummy from the front, sides, and back.
- Make sure both eyes remain clearly visible.
- Adjust any bandage sections that look too straight or evenly spaced.
- Add a few extra hidden stitches anywhere the bandage feels loose.
- Add the optional pink cheeks.
- Check that the keychain loop is securely attached.
- Finally, gently shape the mummy between your hands until the body is nicely rounded.
Your Mini Mummy Crochet Pattern is finished!
Tips for a Better-Looking Crochet Mummy
- The best mummy bandages are usually a little irregular.
- If every strip is perfectly parallel, the finished piece can look too neat. Crossing a few layers diagonally creates a much more natural mummy effect.
- Leave small areas of the beige body visible between some of the wraps. The contrast helps the bandages stand out.
- Try different pupil positions before sewing the eyes permanently.
- Pupils looking inward create a cute expression, while pupils facing slightly different directions can make your mummy look funny and playful.
- Avoid overstuffing the body.
- You want the mummy firm enough to hold its round shape without stretching the stitches.
- Ivory, cream, oatmeal, pale gray, and soft beige all work well for the bandages.
Color Ideas for Your Mini Mummy
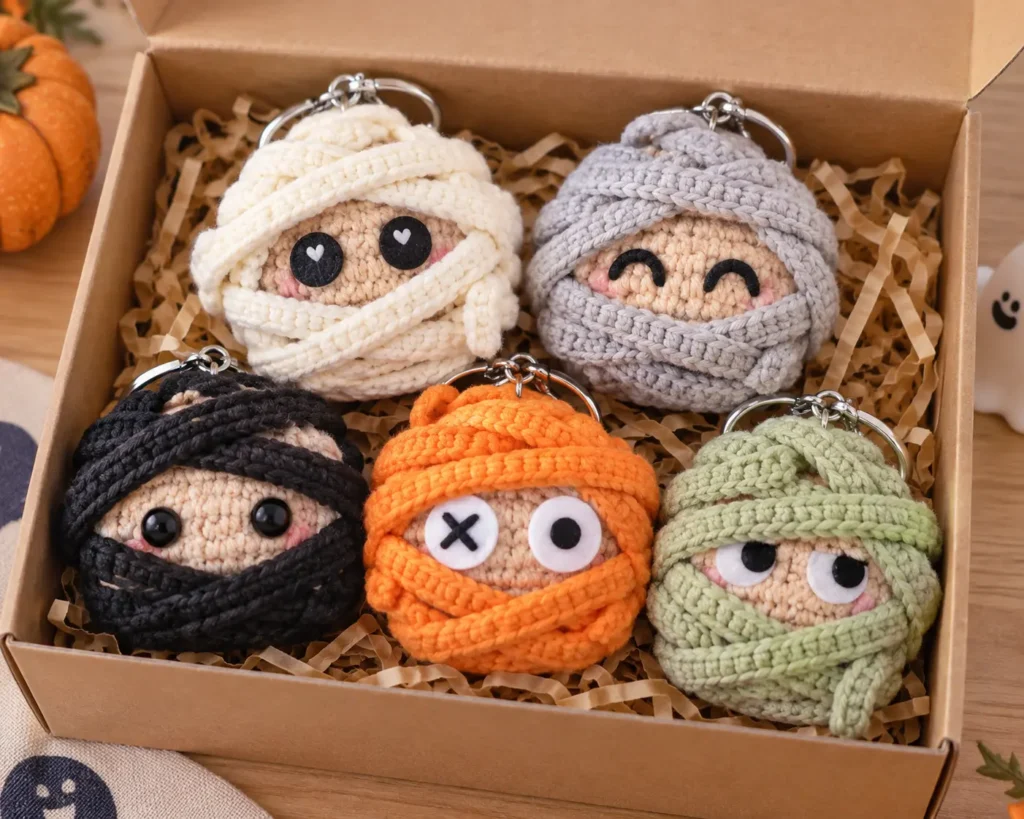
- The classic version uses a light beige body with ivory bandages, but you can easily create different versions.
- Try a pale gray body with cream wraps for a slightly spooky mummy.
- Use peach or warm tan underneath white bandages for a softer look.
- For a cute pastel Halloween collection, try lavender, mint, peach, pale pink, or light blue bodies with cream bandages.
- Making several color combinations is especially fun if you are preparing handmade Halloween gifts, party favors, or craft market items.
Mini Mummy Crochet Pattern FAQ
Is this mini mummy crochet pattern suitable for beginners?
Yes. The pattern mainly uses single crochet, increases, invisible decreases, chains, and half double crochet.
A beginner who already understands working in continuous rounds should be able to make it comfortably
How big is the finished crochet mummy?
Using #3 DK/light worsted yarn and a 2.5 mm hook, the finished mummy should measure approximately 7–8 cm / 2.75–3.25 in wide.
Your exact size can vary depending on your yarn, hook, stuffing, and crochet tension.
Can I make the mummy smaller?
Yes.
Use thinner yarn and a smaller crochet hook while keeping the same stitch counts.
For example, sport-weight or fine cotton yarn will produce a smaller mummy that works especially well as a keychain or bag charm.
Can I make a larger mummy?
Yes.
Use thicker yarn and an appropriately sized hook.
The stitch counts for the body can stay the same, but you may need a much longer bandage strip.
Can I use felt instead of crochet eyes?
Yes.
Small white and black felt circles work very well and make the facial area flatter.
You can also embroider the entire face if you prefer.
Can I sell mummies made from this pattern?
You may sell finished handmade items made from the pattern in small quantities. Please do not copy, republish, redistribute, or sell the written pattern itself.
More Free Halloween Crochet Patterns
If you enjoyed this Mini Mummy Crochet Pattern, you can make a complete collection of small Halloween amigurumi with these other free patterns from TopAmigurumi.
- Try the Free Crochet Pumpkin Pattern for a classic Halloween decoration that looks cute beside the mummy.
- For another dark but adorable character, make the Black Cat Crochet Pattern.
- The Free Crochet Ghost Pattern includes several ghost variations with different shapes and finishing details.
- If you want another small project that works well for Halloween baskets and decorations, try this Crochet Pattern for Candy Corn.
- For a character with a little more detail, the Pumpkin Witch Crochet Pattern combines two classic Halloween themes.
- You can also add a darker character to your collection with the Grim Reaper Crochet Pattern.
- And for something cute rather than spooky, make the Mini Bear Pumpkin Toast Crochet Pattern.
Together, these small projects can create a fun handmade Halloween display with mummies, ghosts, pumpkins, witches, cats, candy corn, and other spooky characters.
Enjoy making your mini mummy, and have fun experimenting with different eye expressions, bandage placements, and Halloween color combinations!
